Thursday, 24 March 2016

Operation Jupiter 07 - Chateau de Eterville

Introduction
This is game 7 in replaying the scenarios from the Briton Publishers Operation Jupiter skirmish scenario book (Lulu PDF link).  I playing them on a 4.5'x5' table using 20mm; Games 1 to 5 used my own Advance to Cover rules (1 figure = 1 section).  After the last few games, I felt 1:10 was too abstract to me and so have gone to a 1:3ish figure ratio (so 3 figures = 1 section).  The rules are largely unchanged – all I have done is doubled the ranges to account for the fact is it is now company level and not battalion level; the deployed frontage of companies are different to battalions leading to the distance scale needs to be different.   Background on why I am playing these is at the start of the first game post.

Scenario
Germans are defending the Chateau.  The British have 6 turns to take over the German aid post in the Chateau.

Overview of the table from the British entry view - farm on the back left, chateau (the objective) on the right
A larger picture of the right side of the table with the road tracks through the woods a bit more visible.
The chateau with a large flat bare field aka potential killing field to its front.

Troops
Note that although I am playing with 1:3 ratio and the scenario is at 1:1, I fielded the same number of figures and vehicles as the scenario.

British

The British attackers, plus 4 carriers I forgot to include in the picture.
1 Company HQ
     6 figures
2 Platoons, each:
      1 CO
      3 sections (3 figures each)
4 Carriers (for one platoon)
2 Churchill VII
2 Archers
German

And the German defenders. 
1 Company HQ
   6 figures
1 Zug
      1 CO
      3 Gruppe (3 figures each)
1 PanzerIVG
1 Panther

Deployment
The German plan: The British are unlikely to to advance to the Chateau over the flat field to its front - the avenues of attack will be the woods.  They may also attempt to go through the farm and attack the chateau from the side.  The German defense splits the infantry between the farm and the chateau (as the latter is the objective to defend). The tanks guard the Chateau front and also cover the woods to the edge of the chateau ,and may turn 90 degrees if an attack comes via the farm.  All the Germans have to do is stop the Brits in 6 turns, so delaying them advancing is the key.

Two German sections (3 figs = 1 section) in the farm buildings (picture from the German edge).

The tanks and the other half of the infantry (again, picture from the German edge).

Game
Like the previous game, after deployment I dictated the game as I was playing using a voice recorder on the PC rather than typing notes as I went along. It worked well, and I now know the game took exactly 41 minutes to play from post-deployment to the end.
The British plan is to use the carriers to determine enemy location and strength; Tanks are split across the farm and the chateau.  Remaining infantry to go via the wood edge to take the chateau from the woods. Go fast, go hard! 6 turns is not long.
The Carriers split and go through the woods.  Carriers move very fast on the roads!
Fortunately (good planning) or unfortunately (bad luck) the carriers achieve their aim and the first carrier to enter into the farmyard is destroyed by a lucky panzefaust shot from the nearest farm building.

Carrier destroyed by a panzerfaust from the German gruppe.
The tanks come on next to support the infantry.  One Achilles and Churchill through the woods following the carriers, and the other enter to guard the area in front of the chateau.

Tanks enter into the woods.  Churchills are very slow compared to carriers!

While the other two take up a defensive position in front of the chateau.
The remaining British infantry move on. The platoon heads for the woods, ready to move down the edge facing the Chateau.  The company HQ takes up a position behind the stone walls in front of the Chateau.

The other British platoon enter to take on the Chateau.
The Germans in the chateau, or the tanks, do not open fire.  The Brits cannot see any of them yet and the Germans are better off holding their fire, especially the infantry that van wait until either a) the British need to cross the open or b) need to engage in close combat and the Germans will be in hard cover.  Also, the German tanks have a better chance to hit stationary tanks and so can always wait on hold until next turn when some of the them have stopped and so count as stationary.

Which is exactly what happened next turn...

The Panther and the PanzerIV fire at the Achilles in front of the Chateau.  Panther misses but the PanzerIV hits and KOs the Achilles. The Churchill returns fire but misses.  On the recording I heard me sum this up as me saying flatly "Oh dear".  In the previous scenario play there was 5 turns of trading shots before a vehicle was destroyed, this game it occurs with the first trading of shots.

First tank blood to the Germans - one Achilles is knocked out.
Meanwhile over at the farm (British left flank), the infantry from the central two carriers deploy - one platoon and the commander 4 figures.

The infantry deploy from the 2 carriers (that were not fired at).into the woods near the farm
..and the Churchill continues down the road towards the remaining carrier to hopefully help clear the farm.
Churchill desperately trying to catch up to support the infantry
The surviving passengers on the far left British flank leave the carrier and take up a position behind the wall in the woods, fire at the buildings.  With not much chance of hitting, no damage.  The Gruppe in the building returns fire and routs one of the figures.

The survivors to the right, down one after the Gruppe has just fired at them.
The Churchill makes it to be able to fire on the German occupied building but causes no damage.  This occurred for the net two turns - both HE and hull MG. and no suppression results either!  The British frustration levels are rising. Note: on the third turn of firing the British did manage to rout a figure. And turn 5 another one!  Still to slow to enable a breakthrough on the farm.

The German hits the Churchill with a panzerfaust but it is ineffective.  Same again next turn.

Churchill arrives to provide support fire...that was ineffective.
The Achilles that was following the Churchill split off at the fork to provide support for the infantry that is going down the wood edge.

The Achilles arrives at the wood edge in the centre to provide much needed armour support
The main British centre platoon continue down the wood edge and get to the corner or the wood.  They are now in an excellent position to assault the chateau off the to back right of the blow picture).  The British are bogged down at the farm, but have a bit of concentration of effort right here.  The plan is working, what could go wrong? Formerly frustrated, the British are now mildly confident.  

The main British platoon arrive.  Armour support, lots of infantry.  All that is left is to assault the Chateau (just off to the top right)
There was a whole turn here (turn 3) of lots of firing back and forth to absolutely no effect to either side.  Which is actually in the German's favour.  The British are on a very aggressive time limit after all.

The British charge a section to the chateau for some close combat action.  British lose two of the three figures that assaulted and the remaining figure retreats and is pinned. Germans automatically lose one.  But now the British know what is there.

Charge! (they fail are rout)
Lots of firing into the chateau but no effect.  After a few turns of engaging fire between the Achilles and Panther, the Achilles is destroyed.  This is not good for the Brits.  There is nothing left to take on the Panther, or more importantly -  to keep it busy.

Panther destroys the Panther.
The British send some more infantry (another section) to assault the Chateau.  A figure is lost to MG fire but the rest are fine.  However, the assault fails badly (poor dice rolling for the British) and 3 figures are lost.

Another charge.  Also fails.
The British platoon is down quite a few figures and takes a morale check - they will pull back.  This effectively ends the game as there is no way the British can dislodge the Germans from the Chateau, and occupy it, in one more turn.

End game.- note the Churchill at the right was immobilised late in the game.
Verdict
The rules seem to work well again and so did the voice recording to prevent often having to interrupt the games to scribble down notes.  But it was a bit slow sometimes listening to the narration.  In preference, I prefer to not interrupt flow of the battle to write notes, and take the hit listening to my narration. 

The game is another great scenario.  Wild swings and decisions to be made.  The British sent too many troops to the farm on the left, and turn 3 was a time waster for the Brits.

I continue to enjoy these battles.

Sunday, 31 January 2016

Operation Jupliter 06 - The Edge of Town

Introduction
This is game 6 is replaying the scenarios from the Briton Publishers Operation Jupiter skirmish scenario book (Lulu PDF link).  I playing them on a 4.5'x5' table using 20mm; Games 1 to 5 used my own Advance to Cover rules (1 figure = 1 section).  After the last few games, I felt 1:10 was too abstract to me and so have gone to a 1:3ish figure ratio (so 3 figures = 1 section).  The rules are largely unchanged – all I have done is doubled the ranges to account for the fact is it is now company level and not battalion level; the deployed frontage of companies are different to battalions leading to the distance scale needs to be different.   Background on why I am playing these is at the start of the first game post.

Scenario
Germans are defending the village.  The British need to get 10 figures into one of more building on the village to win.  No time limit.

View of the table from the British entry edge.

View from the German edge.
Troops
Note that although I am playing with 1:3 ratio and the scenario is at 1:1, I fielded the same number of figures and vehicles as the scenario.

British
British.  I have no Crocodile tank so the lighter coloured one will count as the Croc.
1 Company HQ
     4 figures
2 Platoons, each:
      1 CO
      3 sections (3 figures each)
2 Churchill VII
1 Churchill Crocodiles (flame)
Note that the British also have 4 Bren carriers for transport but ignored it as, in my rules, they would have to dismount once 18” from the enemy.  As there is no time limit it would only save them a turn and that is why I did not include them.

German
German defenders with the Marder standing in for the Sdkfz 251/22
1 Company Commander (1 figure)
2 Security platoons each:
   5 figures
1 Pak-40
1 MMG
1 Sdkfz 251/22, which I don’t have so is represented by a Marder III

Deployment
Will so few units, it was hard to decide where to put them.  But the goal is to stop the British getting enough figures in to the building.  So no counterattacks required.  AT gun deployed forward in the orchard to cover most approaches with the Marder III further back to be a mobile reserve if required.  One platoon in the large building, another in the orchard and the right flank building.  MMG in the top floor of the central building offering a good commanding view.  A fairly forward deployment, but one the British get 10 figures into the buildings, the game is over so a counter-attack is not required.

German deployment of the British left flank

Right flank deployment of 5 figures.    The red building is a railway one I built in 1981-ish and rarely get to use as it is quite large.  I have a factory that is 3 times larger that I had not had a chance to get out for a long time either :-(

Just to show the 3 figures that are in the building.
For the British, the large building on the right flank looked very dangerous and hard to get to. All units concentrated on the left flank.  While further to reach the buildings, it offered better cover along the way.  Two Churchills to deploy centrally and the third to accompany the infantry.

Game
Normally I play the game and take notes as I go and also indicate when I took pictures so I can align the notes to the picture.  I then write it up in longer form.  For this game after deployment I dictated the game as I was playing using a voice recorder on the PC.  I could only do this as I knew I would be playing the game with no other noise around, as the rest of the family were out.  I then listened to the recording to provide the game writeup.  Three things – this worked well, I know the game took 51 minutes to play from deployment to the end, and lastly, although is was a little tedious listening to me for 51 minutes telling me what happened, it meant that when I was actually playing the game there was no interruptions (normally to take notes).

The British move on to the table. Infantry focus on the left flank, Churchills deployed to assist.  Immediately the Churchill are on, the German Pak 40 fires at a Churchill but misses, gets another chance to fire and misses again.

The British enter on the left flank
The first thing to occur at the end of turn 1 is a random Typhoon bombing run that resulting in friendly fire in the original battle.  The scenario called for random placement but I chose instead to inflict it on a random unit to reflect that real casualties did occur on the day.  With bad (or good) die rolling, all 4 dice hit and wiped out all of the company HQ except the company commander.  A subsequent morale test saw the commander pass with flying colours.  However, the CO is suppressed and the cards never saw him get a chance to move for the rest of the game...


Typhoon attack wipes out the Company HQ except the CO. 
The Pak 40 gets another chance to fire before the Churchills can react and destroys it,  The Pak 40 is fired on by the other Churchill but the Churchill never manages hit the Pak 40.  This happens for the rest of the game with appalling rolls on both sides sees neither destroying the enemy target.

The Pak 40 in the central orchard.

The Pak 40 third shot manages to destroy the Churchill.
The other Churchill  The German platoon on the British right flank (including the big read house) begins moving towards the centre where they can fire on the British invaders.

Germans moving from one flank to another.
A random event sees the British subject to 1d6 sniper attack.  It is successful and 1 figure down. The British require 10 figures into the village to win so every figure gone makes it harder.

One British figure has been lost to a sniper.
Both British platoons advance over the first hedgeline and into the crops and the woods.  It seems a way to go to get to the first building, and barely a German unit has been seen.

British continue to advance.
The Marder moves from its central location to the German right flank to repel the British coming down that flank.

Marder moves to a good defensive position to fire on the advancing Brits.
The PanzerIV enters as the German reinforcement.  The aim is for it to move up the centre to provide a fire base from its central location towards any British it can see.

The PanzerIV enters as the reinforcement.
The British reach the second hedgeline, and the second last before the buildings.  The Churchill moves up in support.  The stage is set for the British to charge in and take some buildings!

The German MMG believes the time is right to fire on the British in the wheatfields, but causes no casualties.

The British  all ready to advance and take the village.
The Churchill spots the Marder, fires and destroys it.  I believe this is the first kill for the British.

The British finally destroy something (the Marder)
The left most British platoon send two sections (6 figures in total) in the wheatfields over the hedge and towards the last hedgeline before the buildings. The German platoon (3 figures) in the orchard fire at the exposed advancing British - certain to cause casualties - but cause none!

British advance.  The Germans seen on the right open fire but fail to inflict any damage.
Now that some German defenders have been seen, the British platoon in the woods send to sections (6 figures) to charge at the Germans).  The British successful close assault the defending section, cause one casualty and the rest then rout.  The British advance over the wall into the orchards.  that went well.

British assaulting the Germans in the orchards, and win!
The German from the other flank decide it is time to advance into the orchard to provide a mini-flank attack on the British.

Meanwhile the German MMG is spotted, suffers one casualty and is suppressed.

The Germans advancing into the orchard.  Also note the PanzerIV that has moved up to protect the orchard as well.

The Germans jump the wall land now in the orchard.

The Germans are charged by the British.  The Brits lose the assault, fired on shortly later and go from 6 to 2 figures very quickly.  This was a mistake for the British and they really need to conserve figures.   I would say this was a turning point for the British that made it very hard for them to get 10 figures into the village.

Germans and British meet in the orchards.  The British lose.
Meanwhile the other leftmost British platoon is advancing besides the orchard trying to actually achieve the objective of occupation rather than destruction.

The other leftmost British platoon is still advancing 
The orchard is effectively lost to the British.

Six figures went in and only one is left.
The British charge the building.  They are down to 12 figures left on the table and so hope that there are not many Germans in the building.  There are Germans who are on hold in the building, and the MMG in another building, so they fire, cause some casualties as the British advance. The British continue to advance to assault the building but lose.

The British assault the building but lose and do not have enough figures left to continue.
The British are down to 9 figures on the  table and so cannot meet the objectives and so retreat. Game over.

Picture at game end.
Note: I used the word appalling about 6 times when describing the second Churchill and Pak 40 rolls!  I was very surprised they lasted though about 6 exchanges of fire.

Verdict
A great scenario and my rules seem to work well.  Card activation (to decide which side may activate a previously inactivated unit of choice with a joker for end of turn) is still my favourite mechanism to recreate the uncertainty of battles, at least in my opinion.  It also is great for solo play.  The rules worked fine with the doubling of distance.  My 6mm rules for a similar scale of game on a 2’x2’ table had suppression as the main result for infantry fire with a really good roll required for a KO.  For these rules I went with an unchanged Advance to Cover rules firing process with hits as the main result.  While my last 6mm game has the same number of units of the table as this game, I did not miss the suppression result.  The game played faster as a result.  The 6mm rules are 1 base = 1 section and so is a ruleset in-between the battalion level rules and these rules.

Saturday, 23 January 2016

WW2 6mm company Contour 180 scenario and battle report - Normandy 31 July 1944

Introduction
This is the second of a planned series of WW2 historical scenarios based on the operations of the Hampshire Regiment (7th Battalion) of the 130th Brigade, 43rd (Wessex) Division in Europe July 1944 to April 1945. The scenarios will be a mix of a battalion and company level, with maybe some platoon/skirmish if the detail is available.  These will be based on their War History with further research where necessary. At the moment this is a side project, so not sure when I may get to the rest.

The first scenario and more background to the Hampshire Regiment is at this blog post.

This post contains a scenario and a battle report of two companies supported by Honey tanks attacking German defenders in the Normandy countryside.

Contour 180 outside Cahagnes scenario

Background
As part of Operation Bluecoat the 130 Brigade is to head from Caumont to Jurques. On 30th July, the 7th Battalion (also known as The Hampshire Regiment) advanced down the road and settled for the night midway between Caumont and Cahagnes. Cahagnes is midway between Caumont and Jurques.  D Company was subject to a small counter attack from a farm complex on the right side of the road.  On the 31st D company was to take out the farm complex (scenario 1 **link) and later join the rest of the battalion for the attack on Cahagnes.  A Company was protecting the left flank and B and C Company were to advance down the road to take Contour 180 - the ridge line outside of Cahagnes - prior to the assault on Cahagnes itself.  In this battle they were supported by Honey Tanks from the Sherwood Rangers.

The scenario is the taking of the Contour 180 ridge by the two companies.

Map

  • Each grid is 100m by 100m. North is at about 2 o'clock.
  • The Caumont-Cahagnes road runs down the centre of the table (the one with no bocage on either side), indicated by dark brown dotted line.
  • British B Company enters on top left of the Caumont-Cahagnes, C Company on the right. Onboard infantry support must be allocated to either company  Honey tanks on the road but may then go off road first turn.
  • German deploy anywhere below the red line.
  • Germans may be in shell scrapes but there are no specific fortifications or engineering works.
  • All buildings are stone (hard cover).
  • Tress represent orchards but the trees are not close and are not bushes but low trees.
  • All hedges lining the roads are bocage and impassable to the Honeys and Carriers.  Other hedges are hedges.
  • All roads are one lane and a destroyed vehicle will block the road to other vehicles (no way around with bocage on both sides).
  • Germans start the game hidden.
  • The fields have the occasional crater, but not really enough to place on the map and not really an impediment to traversing the field by foot, wheel or track
  • The ridgeline (contour 180) does runs across the bottom of the table as indicated (the road and hedge) but its effect negligible - it blends in with the very gentle slope that runs from the top to the bottom.

British (7th Battalion)
Mission: Clear the road to Cahagnes and the ridgeline.   You have 10 turns as you need to reform and attack Cahagnes with the rest of the battalion later in the day.

Victory:
Score 5 points for clearing the the Caumont-Cahagnes road (no German units within 150m).
Score 5 points for no unbroken/unsuppressed/non-routing Germans on the ridgeline.

0 - lose
5 points - draw
10 points - win.

B Company:

B Company HQ
     1 HQ infantry rifle stand
     3 PIAT teams (may be allocated to Platoons)

10 Platoon
      1 2” mortar
      3 infantry rifle stands

11 Platoon
     1 2” mortar
     3 infantry rifle stands

12 Platoon
     1 2” mortar
     3 infantry rifle stands

C Company

C Company HQ
     1 HQ infantry rifle stand
     3 PIAT teams (may be allocated to Platoons)

13 Platoon
      1 2” mortar
      3 infantry rifle stands

14 Platoon
     1 2” mortar
     3 infantry rifle stands

15 Platoon
     1 2” mortar
     3 infantry rifle stands

Carrier Platoon (as reinforcements enter a random turn):
On turn 4, roll 1d6: on a 1,2 enter on top road; turn 5, 1-4 is required; enter automatically on turn 6.
A full 13 carrier platoon, depending on how you want to represent it. Here I have it as
1 Carrier with 1 rifle stand
3 Carriers each with 1 rifle stand, 1 2" mortar and 1 PIAT.

MMG Platoon (as reinforcements on  random turn):
On turn 4, roll 1d6: on a 1,2 enter on top road; turn 5, 1-4 is required; enter automatically on turn 6.
2 MMGs plus 2 carriers as transport.

Battalion Support
     3 batteries of 2 3” Mortars in direct support (4+ on a d6 to call)
     1 battery of 4 4.2" Mortars potentially available (6+ on a d6 to call)

Battalion AT Guns were not available.

Armour Support:
3 Stuart V Honeys from Sherwood Rangers.

Initial artillery:
    One call of 4 4.2" Mortar pre-game bombardment.

The British are of Average/Regular quality.  Although the 7th Battalion took many casualties in the Battle for Maltot on the 10th-11th July, reinforcements from the 12 Battalion filled the gaps.

I have assumed that the Battalion 3” mortars are available for indirect support.  D Company was also conducting their own attack on the 31st,, so the mortar support is not fully guaranteed.

While it is likely that the Carrier support platoon was with the Battalion AT guns and did not move on the 30th with the infantry companies, they did move forwards on the morning of the 31st. I am assuming the Carrier Platoon will arrive during the battle.  The recon Honey tanks are documented as being in support.  The Sherwood Ranger Shermans were also in the area for the assault on Cahagnes later - I am assuming they did not participate in this battle.
4.2" Mortars and an MMG platoon were allocated to the 7th Battalion and so are also a possibility.

Random Balance.  If you wish to increase the British force slightly, roll 2d6:
  2-3
One M4 Sherman
4-6
Extra Honey Troop (3 Stuart V) enter at same time as 1st Honeys
7-8
Extra MMG platoon (2 MMGs plus two carriers)
9-12
Reserve A Company platoon (3 rifle stands + 2" mortar) arrives on turn 7


German (elements of the 751 Regiment of the 326th Infantry Division)
Mission: Defend the ridgeline and keep the road closed as long as you can.  If you last at least 10 turns you have successfully delayed the advance of the British.

Victory:
Score 5 points for having the Caumont-Cahagnes road with German units within 150m.
Score 5 points for having unbroken/unsuppressed/non-routing Germans on the table and on the ridgeline at the end of 10 turns

0 - lose
5 points - draw
10 points - win.

Kompanie HQ
    1 Rifle stand

1st Zug
   3 Rifle Stands

2st Zug
   3 Rifle Stands

3st Zug
   3 Rifle Stands

Support
   3 MMG stands (representing 6 MGs) to be allocated to the Zugs
   1 Panzerschreck stand allocated to one Zug

Battalion Support
     1 batteries of 2 81mm Mortars in direct support (4+ on a d6 to call)
     2 batteries of 2 81mm Mortars available (5+ on a d6 to call)
(can only be called by Kompanie HQ and at same target)

Average quality.  Panzerfausts can be allocated as much or as little as required but assume each stand has Panzerfaust capability.

Options
None.

To increase the balance for the German side, you may add any or all of the following 2nd Kompanie elements:

Second Kompanie HQ
    1 Rifle stand
1st Zug
   3 Rifle Stands
2st Zug
   3 Rifle Stands

The German unit designation is correct, but not much else.  From the histories, it seemed that average motivated troops were defending the ridgeline at near organisational strength.  Based on the tenacity of the defense, I have used approximately a company in defense.

Aftermath
After a hard fought battle, B an C Company cleared the ridgeline mid-afternoon and re-organised ready for a battalion assault on Cahagnes later in the day.

Notes
I did use an aerial map from 1944 to assist in creating the terrain features for the scenario so the terrain should be a close match.

Replay

Rules
I am using some company level rules I have written based on my battalion level set with a base = a section, 1 MMG base = 2 MMGs,

The problem for the British is that the Cahagnes road is very open and so an attack down the centre is fraught with danger.  To clear the road and ridgeline in time, the British cannot concentrate on only one flank;  they would run out of time to clear one flank and then attack the other.  They must attack down both flanks for a win.  Just like in 1944. For the Germans, the problem is in reverse - how to maximise the forces to cover both flanks?

British force
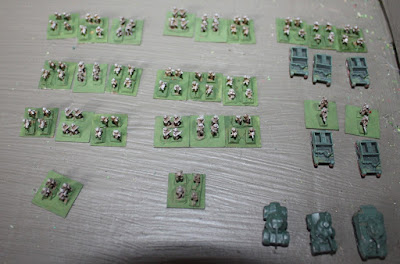
The British in 6mm
I did not use any extra forces.

A few months ago, I thought about buying some Honeys as I only had one in 6mm. But then, when I am ever going to use them ;-(  So I have 2 armoured cars substituting for the Honeys, but will use the stats for the tank. They may look like armoured cars, but they are really tanks.

German units

The Germans  defenders. Does not seem a lot compared to the Brits.
Deployment

German deployment was done by choosing 4 good positions (I could only really think of 4 but if I looked longer there may have been more) and randomly chose 3 of them.

Overview of German deployment
1st Zug is in the stone farm and can both slow things down, the MMG has good coverage for the centre, and it could be used as a counter-attack force if the British do attack down the flank.

View of 1st Zug.


2nd Zug is in a central location to defend the road and anything coming down the left flank.  It is in a position that it can be switched to the right flank if required.

2nd Zug


3rd Zug is in the best of a worst position where is does have some good fire lines, but cannot concentrate it fire.


The Kompanie HQ is in a good position for calling in the mortars on any unit on the left flank, and could move to the right if required.

3rd Zug and Kompanie HQ.
British orders
B Company, supported by Honeys, to advance down the right of the main road.  C Company to go down the left.  The Honeys are supporting B Company as it is more open.

The Game
Initial British 4.2" mortar bombardment of farm near C Company entry (randomly chosen).  No effect as there are no Germans there.

The British move on. Observant readers with a good memory will remember the Honeys are supposed to enter via the centre road.  I did not remember...

British entry.

Close up on C Company entry.
The German 2nd Zug (bottom centre) opens fire on B Company and one British section retreats.  The German Company HQ can actually see the same platoon but fails artillery call.

A Honey spots them, fires, and one 2nd Zug gruppe routed.  B Company's platoon fires as well and another routed. The Zug takes a morale check - rolls a 1 and routed. Oh dear - a 1/3 of the defenders gone already!  It happened so fast I took no pictures.


B company positions after entry.
Panzerfaust attack on the the left honey sees a die roll of a 1: nothing.


Elements of B Company move in on the farm.
Can I just mention that by now the German Co HQ has had 5 attempts to call in artillery on a really great target of British infantry and has failed every time...but the 6th roll was a winner!  3 retreats scored but morale check is passed by both affected platoons.

Another successful artillery call by the Germans and gone is the B Company HQ!

Artillery fall - the green markers to the rear indicate suppression for the retreating sections.
More bad rolls for the gruppe panzerfaust attack so I will assume they are out of panzerfausts. Another gruppe is in range of another Stuart, fires and it brews up on their first shot!

Now it has fired the panzerfaust, it is almost certain to be spotted so the entire Zug also fires at another British platoon and destroys a British section.

The British platoon (3 sections) storm a farm building defended by one gruppe.

First shot by another gruppe sees a Stuart brewed up.
The Brits lose! and retreat and also fail a morale check and rout.  A lone gruppe fire, rolls a 6 to rout another B Company section.  Suddenly B Company is running out of steam - they have not advanced very far and a lot of casualties.

A British platoon assault a lone gruppe in the building.  They will lose and retreat. 
Another brutal German artillery roll sees another platoon gone from B Company.   A subsequent morale check for B Company sees it routed.  This is bad. Half the attacking infantry no longer is involved in the attack.

An advancing C company platoon runs into the 3rd Zug, the latter wins the close combat.  And subsequent firing routs a section.  Only one left in the advancing platoon.

C Company platoon advancing into the 3rd Zug.  They subsequently lose the resulting melee. 
The Germans continue to fire and rout the platoon.  The Brits return fire and with brilliant dice rolling rout 2 gruppe,the Zug fails the subsequent  morale check (a '1').  This flank is now wide open except for the German Co HQ. It makes up for the fact the advance on the other flank has stalled.

Only the Kompanie HQ left on this flank (bottom left).  British elements of C Company can be see among the trees top lef.t.
Note we are at turn 5 - halfway.

The MMG platoon arrives and deploys.

British MMG Platoon in the centre.
C Company manage to surprise the German HQ before it could move (no German card drawn for ages - there are not many of them left).

C Company elements advancing on the Kompanie HQ. 
The Brits manage to get into close combat and it is routed.

Brits assault the German HQ.  The Germans rout.
German company morale checked but the other Zug is happy to continue and defend the farm on the German left flank.

The Germans manage to rout a British MMG.

Only one MMG element left.
The Carrier platoon arrives.

Carrier platoon arrives on the British left flank to provide some desperately needed infantry support.
The Germans rout the last MMG from the MMG platoon.  They also inflict one casualty on the carrier platoon.  But one gruppe of the Zug is routed in retaliation.  The farm is being very hard to clear - stone buildings and there is not enough British troops to charge in and clear them by assault..  The Honey MGs are being most ineffective.

A British platoon of 2 sections has made in to the farm on the Cahagnes road and is able to fire on the German Zug in the farm.

End game with the location of the surviving British units
Finally the last German succumbs...on turn 9!  So what I thought was going to be an easy game for the Brits, and then by about turn 3 thought they had no hope, actually turned out to be quite close.

Note that what the Brits should have done is simply continued to move along the ridgeline - they do not need to rout all Germans units, just clear the ridgeline.  Of course, routing all the German doe shave the same result.

Verdict
A fun game, and researching it was fun too.  The scenario needs more playtesting, possibly shorten the number of turns and alter the artillery support. But the decisions it threw up were quite good so I will have to come back to it when I have a few more done and collate them into a decent scenario booklet with background, maps etc. The mortars may be too powerful.  Certainly the British never got to use theirs as my rules have indirect artillery only being able to be called by the Company HQ.  And the British Co HQs never got in front enough to call - when one HQ did, it was routed!