Friday 22 November 2019

Battle of Dertosa 215BC using Ancients Battlelines Clash

Introduction
This is game 40 in play testing my ancient rules by replaying historical battles.  The latest version of ‘Ancient Battlelines Clash’ is on its own blog page. I am play testing the rules by replaying all the Peter Sides scenarios from his Historical Battles books.  ABC is designed to finish in around 30 minutes on a 2'x2' table.
I have been slow in play testing these rules for the last few years.  For November 2019 I set a challenge to play the 10 First and Second Punic Wars battles in the book.  This battle is game 5 in the attempt.

Battle of Dertosa 215BC
A set piece battle between Scipio and Hasdrubal in Spain.

Internet links of interest:

Troops
Roman
Romans
8 legionaries, Heavy Infantry
4 Velites, Skirmish Infantry, javelins
2 Medium Cavalry
Leader with one of the legionaries unit.
ACA +1

Breakpoint: 11

Carthaginian
Carthaginians
4 Veterans, Heavy Infantry
4 Spanish allies, Medium Infantry
4 Skirmishers, Skirmish Infantry
2 Medium Cavalry
1 Light Cavalry
1 Elephant
Leader with one of the Medium cavalry

Breakpoint: 10
     

Scenario changes
In the scenario book, this battle is labelled the Battle of Ebro 216BC.  While the Battle of Dertosa is fought on the bank of the Ebro, the Battle of Ebro 216 is a naval battle.  I have renamed this scenario the Battle of Dertosa.
I also reduced the number of cavalry from the Peter Sides scenario from 10,000 to 4,000.

Deployment

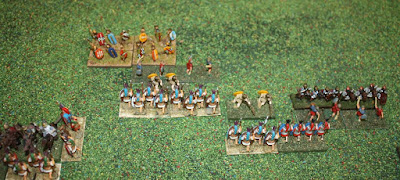
Deployment, Romans on the left.
Game
Romans advance the legions only.  They are unlikely to win on the flanks but have superioty in Infantry.  Need to break the centre before the flanks give way. The Carthaginians advance everyone.  I thought about not advancing the infantry but they need to not be too far behind the supporting cavalry.

Romans advance the infantry line only, Carthaginians advance everyone.
The skirmishers of both lines meet and exchange missiles

The skirmisher lines clash
All the Velites retire, doing no damage to the Carthaginian skirmishers.   The Skirmishers are not in the proximity zone of the legions.  One legion is disordered, the rest charge in.

And then the main battlelines clash.
One Spanish ally routed but otherwise a lot of disorders all round.

First blood to the Romans as a Spanish ally unit is routed.
Carthaginians charge the Roman left flank but are locked in melee.

Roman left flank cavalry clash
The Carthaginian centre Allied (medium) infantry collapses!

The Carthaginian centre with the weaker infantry collapses.
On the Roman centre right, one legion lost and one Carthaginian heavy infantry lost. Both opposing units pursue the routing unit.

On the Roman right they lose a heavy infantry unit but the Carthaginians also lose a heavy infantry unit.
Melees continue, the Elephant fails to move.  One of the legions in the centre manages to get on the flank of the Carthaginians.

With the centre gone, a Roman unit attacks the flank.
It will not be good – the Carthaginian is being attacked from the front by two units and also flanked.  It routs

The flanking Roman legions pursue into the flank of another Carthaginian heavy infantry unit, and it also routs


And follows up with another flank attack.

The Carthaginians reach their breakpoint and the Romans have won.

The Romans win!
Verdict
The Romans had to quickly overcome the weaker Carthaginian centre before their flanks were overwhelmed.  It worked, but some unlucky die rolls, or a longer time spent rolling over the centre would have seen a Carthaginian win.

Tuesday 19 November 2019

Battle of Lake Trasimene 217BC using Ancients Battlelines Clash

Introduction
This is game 39 in play testing my ancient rules by replaying historical battles.  The latest version of ‘Ancient Battlelines Clash’ is on its own blog page. I am play testing the rules by replaying all the Peter Sides scenarios from his Historical Battles books.  ABC is designed to finish in around 30 minutes on a 2'x2' table.
I have been slow in play testing these rules for the last few years.  For November 2019 I set a challenge to play the 10 First and Second Punic Wars battles in the book.  This battle is game 4 in the attempt.

Battle of Lake Trasimene 217BC
It is six months after the terrible Roman defeat at Trebia.   Rome raised new legions and sent them north under Gaius Flaminus.  Hannibal deployed his troops in ambush in the hills along Lake Trasimene.  Completely unaware, Flaminus marched the Romans along the plains between the hills and the lake.
Here are some internet sites of interest:  

Troops
Carthaginian
Carthaginians

And two heavy infantry that would into fit in the previous picture.

4 Heavy Infantry (Iberians & Africans)
2 Gallic Warbands, Heavy Infantry, warband
4 Skirmishers, slings
3 Medium Cavalry
2 Numidian Light Cavalry, elite
ACA +2
Leader with the HI

Breakpoint: 12

Roman
Romans, Lake is behind them.

4 Legionaries, Heavy Infantry
4 Allies, Heavy Infantry
4 Velites, javelins
Medium Cavalry
Leader with a Heavy Infantry

Breakpoint: 10


Scenario changes
None.

Deployment
The Carthaginians are all on a rise and will count as uphill for all combats that take place where the Romans are deployed.  If any Romans do retreat and are pursued, this will be not counted as uphill.  Being downhill is bad.

Lake to the left, Head of Romans march at the bottom with two Carthaginian Heavy Infantry facing it.  All Carthaginians on a hill.
Game
Numidians move to behind the line.  Carthaginian cavalry charge to opposing cavalry. Disorders all round.

The Carthaginian cavalry, lead by Hannibal, charges downhill into the Romans. No ruts though so next turn the cavalry will be at a disadvantage.
Gauls move up but do not charge.  The Carthaginian heavy infantry are attacking the forward deployed Romans.

At the head of the Roman column the Carthaginian blockers charge in.
Some disorders occurred with the Carthaginians doing better (one not disordered).  But then one Roman is destroyed.

...and manage to destroy one Roman heavy infantry.
The Roman centre advance to try and take control of the centre.  They advance towards other Carthaginian heavy infantry, the Gauls and flank the cavalry.

The Romans try and control the centre and advance up hill to the opposition.
The right legions make contact and locked in melee.  Centre legions see the Velites suffer badly at the hands of the Carthaginian slingers.

Contact with the Carthaginian heavy infantry in the centre.
But the legion that flanked the cavalry sees the cavalry rout.  It advances into the cavalry with Hannibal but Hannibal survives and destroys the cavalry to their front.  The other Roman cavalry is also destroyed.


The Carthaginian cavalry charge left their inner flank exposed.  An Allied heavy infantry attacked one cavalry unit in the flanks and routed it.  It then advanced into Hannibal that not only survived that attack but also routed the Roman Cavalry attacking him to the front.

Carthaginian cavalry wheels and attacks the Roman infantry.  Locked in melee.  Hannibal survives the flanking infantry (rolled a 6).

The now freed Carthaginian supporting cavalry unit attacks the Romans, who survive.
The Gauls charge the legions.  All disordered.

The Gauls charge downhill into the Romans and all are disordered.
Carthaginian heavy infantry wheel and move to flank the Carthaginians  (and are disordered by doing so) and manage to rout the legion, who is also Flaminus the leader (a 6).

Back to the Romans at the head of the march.  Another Roman unit routed and the heavy infantry surround Flaminus (the general unit) and rout it.

This causes the Romans to reach their breakpoint and they lose.

The end.
Verdict
I think I forgot to apply the +1 modifier for attacking downhill in a few of the melees (I know I did when the Gauls charged down the hill).  I also poorly executed the action on the Roan rear with the Carthaginian cavalry and left them too exposed.  This made the game a lot closer than it should have been, the Carthaginians were lucky not to lose Hannibal in a reversal of history!

Sunday 17 November 2019

Battle of Trebia 218BC using Ancients Battlelines Clash

Introduction
This is game 38 in play testing my ancient rules by replaying historical battles.  The latest version of ‘Ancient Battlelines Clash’ is on its own blog page. I am play testing the rules by replaying all the Peter Sides scenarios from his Historical Battles books.  ABC is designed to finish in around 30 minutes on a 2'x2' table.
I have been slow in play testing these rules for the last few years.  For November 2019 I set a challenge to play the 10 First and Second Punic Wars battles in the book.  This battle is game 3 in the attempt.

Battle of Trebia 218BC
The first major battle of the Second Punic War between Hannibal and Tiberius Sempronius Longus.  Logus was provoked into battle that was effectively a trap of Hannibal’s.

Here are a few internet links of interest I used for this replay:

I also used Phil  Sabin’s Lost Battles.

Troops
Roman
Romans

4 Legionaries
4 Allies, HI,
4 Velites, javelins
2 MC

Breakpoint 10


Carthaginian
Carthaginians
4 HI
4 Skirmishers, slings
3 MC
2 Numidian LC, elite
2 Elephants
1 Numidian LC, elite, javs (Mago ambush)

Army Command Ability +2

Breakpoint: 13

  
Scenario changes
Changes from the Peter Sides’ scenarios were to make the Roman Allies HI, rather than Auxilia and Warband.  Carthaginian infantry similar – all now HI.

Deployment
Mago LC in ambush and will come on in Turn 3.

Deployment (Mago on far left as a reminder to bring him on)

Game
Romans move up the infantry battleline and hold back the cavalry flanks.  Carthaginians advance along the line, with the Elephants holding back a little to not hit the skirmish line before infantry contacts.

Carthaginians advance but Elephants holding back from the Roman skirmishers.

Romans move a large part of the infantry line to the Carthaginian heavy infantry line.

Skirmishers are fighting it our
Romans lose three Velites, Carthaginians lose one.


Rome came out better after the skirmisher clash. 

Carthaginian right flank cavalry charge the roman cavalry.  Note the Numidians hang back – they would have a good chance of being destroyed in directly melee the Roman Heavy cavalry in the first round of melee.  Both heavy cavalry units are disordered.


Carthaginian right flank cavalry charge the lone Roman unit opposing them and are locked in melee.

Carthaginian skirmisher fires at the Roman infantry who charge and rout it.  In the ensuing combat with the Carthaginian heavy infantry there are a number of disorders.   The remaining Carthaginian infantry charge into the Velites, rout them and in combat with the Romans all are disordered.


The centre infantry battleline sees everyone locked in melee.

The left flank elephant charges a disordered Roman infantry and The Romans are routed!

c
Time for the Elephants - they charge a disordered legion and the latter routs.  

The Elephant pursues at it was impetuous against the heavy infantry.  Right into a Velite!  The elephant is disordered and pushed back.

The Elephant pursues into Velite missiles and is subsequently pushed back.

The Carthaginian left flank cavalry split and the majority, including Hannibal, charge the lone Roman heavy cavalry.  The Roman heavy cavalry is disordered.

On the Carthaginian left flank, Hannibal and some supporting Numidians charge the Roman cavalry that then rout.

The heavy cavalry is subsequently routed.
The smaller contingent of Roman heavy infantry and Velite move into contact with the elephant, the Velites are routed at contact.


The Elephant charges the Velites and rout them but the Elephant then routs from melee with the Roman legions.

The Carthaginian Heavy cavalry charges but retreats disordered.  The Elephant charges and is routed.


The Elephant is not more.
Across the main infantry battleline, the Romans lose one unit, the Carthaginians one unit.  A victorious Roman infantry unit charges into an elephant and they are locked in melee.

The centre clash sees one Roman and one Carthaginian heavy infantry unit routed.
The unengaged Roman infantry advances into melee with the weakened elephant and it routs.


There was an elephant in melee with the legion on the left.  It routed.

The Numidian cavalry moves into the melee on the Roman left flank but the melee remains unresolved.

On the Carthaginian right the cavalry are still locked in melee.  The Numidians join the fray (the Numidian rout next turn!)
Mago  arrives with the Numidians.  Will hopefully help out in the middle against the heavy infantry.

Mago arrives in the rear of the Roman line with some light cavalry.
The Roman heavy infantry succumbs to two Carthaginian heavy infantry.

The Roman centre is collapsing the the middles of the line but the edges are still Roman.

But the Roman leader advances into the heavy cavalry and manages to rout them (supported heavy infantry with leader vs single unit disordered heavy was not going to end well).

The Roman general with a legion (centre unit) advances into the disordered cavalry and the cavalry rout.
And another unsupported Carthaginian heavy infantry routs on the Roman left end of the battleline.

And on the Roman left, another Carthaginian heavy unit routs.  All of the centre belongs to the Romans.

Numidians flee on the Roman left flank 


The Numidians on the Roman left, just before they rout.
The Carthaginian side is only 2 points from breaking (one more heavy unit)  and the Romans are only one unit (2 points) away as well.

There is some movement of units not in contact – positioning for upcoming melees.  Mago and the elite Numidians manage to charge into the flank of the Roman heavy cavalry.  It is soundly defeated.

Mago charges the flank of the Roman left cavalry.  Attacked on two side, the Roman Cavalry routs.

The Carthaginians win.  It was a close game.

The end.  The Romans on have heavy infantry left (all the units on the right).
Verdict
A lot closer game than I thought it was going to be.  No rules changes this time and I do like the way the new rules handle light units such as the Numidians.