Saturday 27 August 2011

Mighty Armies Ancients AAR - Greeks Vs Persians

Background
Andy (andyfb at TMP) came over for a game of MAA (Mighty Armies Ancients).  I have played it solo twice before refighting Callinicum and Zama.  Andy had the rules for about a week.  Andy used his excellently painted Xyston Greeks and I fielded some ebay acquired Early Archaemenid Persian.
 
Troops
From memory:
 
Greeks - 15 units: 1 Hoplite General 7 Seasoned Hoplites, 4 Peltasts, 2 Thessalian Light Cavalry and 1 Heavy Cavalry.
Persians - 16 units: 1 Infantry General, 1 Immortal, 3 Sparabara, 5 Subject Foot, 2 Heavy Cavalry and 2 Scythian horse archers.
 
Setup
So, first thing - setting up terrain.  How does that work?  I don't know - Zama and Callinicum had no terrain!  To the rules: OK, set up 2 pieces each.  So we both set up 2 hills on the flanks.  Ok, deployment.  I don't know either - I've only used historical deployment.  To the rules again - dice to see who deploys first, and then dice again to see who moves first.  Andy setup first and I moved first.  This poor die rolling was just the start for Andy.

Deployment, Greeks at the top
 
We used the rules from the forum (and I used in the other games) where combat is all the front rank fighting value and rear rank support value (not primary fighter FV and all others support).  Other things quickly decided on where the rules were unclear was that the start and end 90 degree turn allowed in movement does not subtract from  the movement rate.  And reading the rules seemed that whole groups had to line up - not  just at a unit level, but we decided to play the way I have in previous games where you line up only contacted units in a group, which means possibly not all units in a group get to fight.
 

Andy's hoplites.  Slightly blurred which is a shame as they are excellent.  There is a close up of some of the figures later.
 
Note: After a turn, I realised that all the Persian front rank units, except the heavy cavalry and the general, all have shooting.  While it was not my original intent to do so, this gave a lot of shooting attacks and played a significant part of the game.
 
The Game

The Scythians were on the Persian right flank, moved up for shooting opportunities,  No hits.  Greeks responded by charging them with a heavy and light cavalry. Javelins got one horse archers, and combat took out the other one.  Loses: Greeks 0; Persians 2. After one turn.  Combat is fast.  That is one of the fun parts of MAA - in combat, at least one unit will always be destroyed.
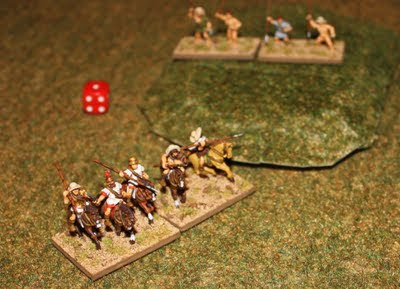
  
The happy Greek cavalry after destroying 2 Scythian horse archers.  The red die is indicative of Andy's rolling during the game

Andy had cleared the Greek left flank, but never rolled enough PIPs to exploit it.  Meanwhile, I managed to destroy a Thessalian Light Cavalry with the Persian Heavy Cavalry.  The last thing the Heavy Cavalry did in the Game!  I was thinking of charging the Peltasts on the hill.  There is nothing about differentiating terrain types so we decide all terrain is difficult.  Note: looking at the new fantasy MA reference sheet, I believe hills would not be classed as difficult, just blocking LOS.  The odds were not greatly in my favour.
 
Meanwhile, with poor PIPs, Andy slowly moves the Hoplites forward.  As they do, I snipe at them with all my shooting, killing about 2 Hoplites, one from each group, over 3 turns. Note: leftover PIPS can be used for commands.  One command allows you to add 1 to a units shooting.  I did this a lot - going from a 6+ to hit to a 5+ is doubling the chance of a kill.


Looking across the Persian infantry at the (slowly) advancing Hoplites.
 
3 Hoplites made it to my Persian infantry 6-unit group and the group lost, turned 180 and moved back.  I then turned them around again next turn.  This was my 'soaker' group, to take a bit of punishment over a few turns.  What I forgot it each time it is driven back, it retreats 3".  And it was only 5" from the table edge.  Should have moved them up a bit. But they ended up not being driven back again (luckily).

Meanwhile, the remaining cavalry was lining up with more Hoplites to charge my general and immortals.  So I pre-emptively charged and destroyed a Greek heavy cavalry.  The light cavalry ran to the flank.
 

The General and Immortals charge the Greek Heavy Cavalry.

The Hoplites that forced the general the soaker group  to retreat charged in again but lost.

The two remaining Hoplites charge the large Persian infantry unit (and lose)

I also managed to shoot and destroy another three hoplites over the next two turns.  The Greeks were now at their break point - 8 units lost - and the Persians claimed victory.  The Greek General holds the centre (by himself though!).


At game end. Note Persian blue die and Greek red one.

Verdict
A very enjoyable game and great company. Thanks Andy.  We were in the rulebook a few times but to be expected for a first game.  Shooting is more powerful than Andy or I expected, especially with the command to increase the shooting chance. Andy only lost 5 Greek units to shooting, and 3 to combat. Persians lost 3 by combat as there was no missiles, other than Javelins, on the Greek side. I note - a day after the game on the just released reference sheet - the new Fantasy Mighty Armies has reduced the chance to hit for shooting.  Andy's clearing a flank worked well, but was hard to exploit due to poor PIPs. In hindsight he believed he should have move faster with the Hoplites in the centre to reduce opportunities for shooting; or alternatively use the Peltasts to screen the Hoplites from shooting.  My soaker 6-unit group actually worked as planned. Most combats were a foregone conclusion (or just about) as to who would win. I think the game play may have lasted an hour including rules discussions.  But cannot really be sure as we chatted during the game as well.

Wednesday 10 August 2011

WW2 battle report - Russia 1941 Izdeshkovo (Take Cover)

Introduction
I've collected a lot of WW2 6mm miniatures over the last couple of years with the intention of playing some games on a 2'x2' table (I have little room or time at present).  So this is my first attempt at playing a game on that scale on a small board.

Rules used
I am using Take Cover (see review of this Rapid Fire like game) as the rules, but with slight streamlining of some processes -I estimate it ended up around 25% faster.  I am going with 1 20mm figure = 1 6mm base.  Hopefully I can fine tune the rules over more games.

Scenario
I had just flocked some hills so wanted a scenario with hills.  I chose Scenario 1: Izdeshkovo from Robert Avery's IABSM Vyazma or Bust Eastern Front campaign book, available at the Too Fat Lardies website.  I've modified it to work with a battalion level game like Take Cover/Rapid Fire so no Big Men, and some special rules not used (e.g. Ammo shortage). A platoon in the scenario becomes a company in Take Cover.


Russian Forces
Battalion HQ
   1 rifle base
1st Company
   10 rifle bases
Support Company
   1 MMG base
   1 81mm base
AT Platoon
   4 45mm/L46 AT guns
   4 trucks
Armour Company
   1 KV-1
   3 T-26
Artillery Support:
   3 missions of 4x120mm mortar


Russians forces

Note that crew served weapons (MMGs, mortars, AT Guns) can take two hits (was three in original Take Cover), I have represented an MMG unit as two MMGs, and the other units have a extra crew base with them to remove as a casualty.  I was going to just use 1 hit, but hope to re-use these rules with 20mm figures that have crew based with them.

German Forces
Battalion HQ
   4 Rifle bases
   1 Truck
   1 Horsch car
1st Company
   8 rifle bases
   1 PzB39 ATR
   3 SdKfz 251
2nd Company
   8 rifle bases
   1 PzB39 ATR
   3 Trucks
Support Company
   3 MMG
   2 81mm mortar
   1 flamethrower base
   5 Trucks
Armour Company
   1 Panzer III H
   3 Panzer III F
Air Support
   2 bombing missions


German Forces
 
Russians are Green, Germans are Veteran.

Deployment and Victory
Russians start anywhere north of the hills and are in shell scrapes.  Germans come in anywhere from the southern edge.  Germans win by clearing the highway (road from the south that exits east).


Board prior to deployment

Note that I am new to 6mm for terrain, the hill and trees are fine, the roads are just some pieces of wood.  the houses are paper houses.  The Russian squads I put behinds the buildings to remind me of which building they were actually in.


Russian deployment


The Germans aim to advance to two main groups - the 1st company, support company, Battalion HQ and 2 PanzerIIIFs will advance on the right through the farm and take the woods and hill on that side, and then advance on the village.  The 2nd company with a PanzerIIIF and Panzer IIIH will advance up the road, take control of the hill and woods on the left, and clear the highway to the left.

What the Germans did

 
The game starts the Germans having 1st company (in the 251s) aiming for the right hill and woods to the right of the road.

German 1st company disembark in the woods.

The 2nd company, in trucks, aims for the road to the right of the left hill and deploy in the woods to the left of the road. One of the trucks was bogged moving, and took two turns to recover.  The carried infantry disembarked, and the trucks did catchup and they were able to speed up when they reached the road.  They did come under fire from an ATgun but for no effect.  The trucks did not spot the firing gun.

The obligatory children helping out shot (nearly 3 and a 4 year old). He has a Bauhaus T-shirt and she has fairy wings and a tutu...  While they did help (sort of) moving the troops, they much preferred moving the trees around everywhere.  Also note the game is setup in a map drawer. It is hidden away and stays safe as it takes weeks (elapsed) to play a game.

Right Flank
The support company aimed for the farm in the middle of the board.  The mortars unlimbered behind the hedge, while the MMGs moved through the farm and on to the woods.  Battalion HQ came on and followed up the MGs.

 1st company advancing through the farm
 
Note: I removed most of the transports (251s and trucks) after the infantry had disembarked and moved away.  From reading historical accounts, transports did not really play much of an aggressive part in an attack on their own.

Battalion HQ advancing through the farm
 

2 PanzerIIIFs followed up three infantry scouting out the right hill.  While coming over the crest, three Russian squads opened fire, scoring one kill.  Return fire scored a Russian kill.  Next turn the Russians also came under fire from an MG that had moved up to the edge of the wood.  The German fire scored another kill and suppressed the remaining Russian squad.  The next turn the infantry charged the suppressed infantry and destroyed it in close combat, but lost one squad as well.

German 1st company and support company arrive on the edge of the wood overlooking the highway.  The hill is behind them.


The Panzers stop advancing as unsure what is in the wood and 2 squads are sent to clear the wood in front (there is a AT gun there, but also one hidden on the other side of the river that will have a clear shot at the Panzers as they clear the crest. heh heh).  The KV-1 hidden behind a building in a wood spots the infantry, and suppresses an MG. The German squads rush the ATGun, which is destroyed.

Germans advance to the edge of the wood and about to spot, and then charge, the AT-Gun.


The Panzers advance and they come under fire from the ATGun on the other side of the river - one panzer is destroyed.

Panzer destroyed by ATGun across the river.

The Germans call in a airstrike on the village that destroys a squad and suppresses the occupants of village. The German company advances to the edge of the wood across from the town, kills another Russian squad but comes under fire from the KV-1, an MG across the river and the town.

 The KV-1 commands the woods

The German company is down to just a few squads and decides (well, the morale check did) to retire.
 

Left Flank
On the left flank, a PanzerIIIF and the PanzerIIIH  followed up two infantry that were scouting out the left hill for hidden enemy (there are none).
 
Panzers following the infantry over the hill
 
The trucked Germans advance through the woods and reach the edge of the highway.  They do not spot the enemy on the opposing side.  But the Russians spot the Germans and fire at them, also dropping mortar fire on them.  Half of them are suppressed, and the other half also come under MG fire from the T-26's in the woods.

The 2nd company at the edge of the woods at the highway, under mortar fire and suppressed (I play at night and it is hard to spot facing - the units on the right are running away when they should not be!)

The  Germans eventually spot the Russians, and use mortar fire on them.  The Russian infantry, down to one squad survives its morale check (lucky!).  but then it is the next turn.  The infantry has cleared the hill, the Panzers are advancing through the woods and the Germans open up with everything they have against the Russians in the woods.  The last remaining squad is destroyed, one anti-tank gun is destroyed.  The other stays unscathed.  But the return fire from the T-26's decimate the Germans and all but 1 squad is gone.The 2nd infantry company (of 1 remaining squad) fails morale and retires.  The two Panzers move to the edge of the wood, receive fire but for effect.

Tanks facing each over off over the highway (there is a third Russian tank behind the tree to the left).

The  Panzers trade shots with the Russian tanks and an anti-tank gun over a few turns, resulting in one destroyed T-26 and the ATGun being destroyed.

 Destroyed T-26

Wrap-up
With lots of troops lost, a morale check for the group forces all units to pull back.  The game is over with the Russians hanging onto the road and the village.  A Russian victory.

I have to work on the terrain, make some better markers to indicate artillery and tweak the rules slightly; but otherwise, my first 6mm ww2 game was great!