I am ongoing quest for fast play ancient rules that play on a small table. I am supposed to be refighting Zama with numerous rules, but got sidetracked by doing a battle report when Rally Round the King was released. I have been sidetracked again. I saw on a thread on TMP that the Irregular Miniatures are carrying a new ruleset - Wars Ancient. There is a website for the game and also a boardgamegeek entry. But that is it. The rules are not cheap (22GDP), and shipping from the UK to Australia does nothing to help keep the cost down. But they sounded interesting - and they are interesting. Shiny new rules are a distraction. So following is an overview of the rules and a battle report between Sassanid Persians and Eastern Romans (yes, I know I did that for Rally Round the King too - it was easier for me as I had the armies still out). Battle report won't be as detailed as I normally do (might do when I use them for Zama) but enough to try and convey a feel for the rules.
Overview of the rules
This is not really a full review - more an overview of the rule mechanisms and some comments based on a playing.
Forces
Unit bases are mostly 6cm frontage by 3cm depth.
A unit is one base and called a DET (Detachment).
An army is initially 15 units split across 3 commands - a leader-general with 5 units and 2 generals each with 5 units.
An army also get six strategy cards - more on these later. Strategy cards are an important part of the game - they provide terrain, additional unit capabilities and tactics that can be implemented during play.
Movement is in MU which is 40cm or 1.5 inches.
Table size is 40" by 32".
Moves are 2MU for infantry, 4MU for mounted.
Units can move straight ahead, wheel, about face and a few special moves such as swap places.
The terminology for units are similar to that in DBA - Psiloi, Auxilia, Blades, Light Horse etc but besides combat values being similar the only resemblance to DBA is the unit names.
Troop types are differentiated by having a Combat Value (CV), a Morale Value (MV) and some attributes (about 3 is average) from a list of 20 or so.
Attribute examples:
Fierce - +1 CV if attacking (warbands have this)
Charge - CV bonus (cavalry have this)
Formation - +1 CV for friendly unit in contact (heavy infantry get this)
Impetuous - units must follow up in rout (cavalry, warbands).
Short Range - short range missile fire.
All units have two "Morale Damage" points. If a second morale damage point is received (i.e. they fail a morale check twice) they are destroyed. However, a unit can only receive a limited amount of morale damage per turn (see later as this is important but need to describe the other concepts first).
Deployment
Strategy cards (see later) are used to alternatively place any terrain.
Then players alternative deploying a camp.
Then players alternative deploying one command (general + 5 units) at a time.
There is an optional scouting rule where the scouting value of a side is determined and this can effect unit deployment.
There are simple weather rules.
Turn Sequence
1. missile fire - simultaneous
2. initiative - roll 1d10 and highest determines who goes first
3. players turn:
a) First player activate a general and move/melee units in command range
b) Other player activates a general and moves/melee units in command range
c) Alternate until all generals activated.
c) Alternate until all generals activated.
4. count Victory Points.
Command and Control
A leader/general must spend a command point to activate a unit to move. Unit must be in range. Unit can be activated only once per turn.
Leader-generals have a command radius of 6MU and 4 command points.
Generals have a command radius of 4MU and 3 command points.
Leaders/Generals have unlimited movement.
Missile fire
Missile fire is simple.
Bow fire is 3MU - d6 roll, hit on a 5-6.
javelin fire is 1MU - d6 roll, hit on a 6.
In cover - only a 6 is a hit.
A missile unit that doesn't move may be placed into "opportunity fire", where it can fire during the player turn. Missile units may fire at enemy units in contact and in firing arc.
See what a hit means under melee.
Melee
Melee is where it gets interesting. Bases line up edge on edge (like DBA) for combat. There is a shuffle when units engage to ensure this happens.
Combat values of opposing units are compared. The unit that is active rolls 1 to 3 d6 depending on the comparison ratio - The higher the CV ratio, the more dice rolled.
Each pip of a d6 has a specific result ranging from attacker takes a hit (a '1') to defender takes a hit and retreats (a '6'). For multiple dice rolls, the attacker chooses the best result. So, the more rolls, the more chance of choosing a bad thing for the defender. Nice.
The base combat values for a unit can get modified by attributes and attached generals.
A hit is not really a hit - A hit is a morale check. Every time a unit is hit, roll a 1d10 and compare against the morale value: if less, pass; nothing. If more, take one morale damage. Two morale damages and the unit is destroyed. On a natural 10, the unit routs which is a an about face and a full rout move back towards your table edge. Routing units can be rallied using a command point. I like this.
Morale values also can get modified by attributes, and +1 for each unit in contact.
A unit cannot take more than one morale damage point in the melee phase or the missile phase. Units hang around for a while.
Strategy Cards
Things come into their own with Strategy cards. There are 32 of them. Players get 6 each. Historical lists get about 4 defined and 2 random. Strategy cards range from terrain, deployment options to tactics during the game.
Terrain is placed if a player plays the appropriate terrain strategy card. It is placed anywhere.
Deployment options (and some of these can be played during the game) are such things like:
- replace up to 2 Auxilia with Bowmen
- the enemy leader is ill - reduce his command value by 1
- Replace an Auxilia with a blade or spear unit.
- Increase the morale value of a unit by 1.
- After all deployment, redeploy 2 units.
Strategies that can be played during the game are:
- Fanatics - select a unit and morale is now 9.
- Select an Auxilia - it is now a heavy infantry unit;
- Select a unit to now have javelins.
- Treason - and enemy unit is now on your side.
- My favourite is select up to 2 Auxilia and change them to Bowmen. I am not sure of the reasoning behind that one!
The strategies cards are not balanced but getting 6 of them each would reduce imbalances in their effects. I don't think I would play with some of the cards - they just seem a bit weird. But the cards add some uncertainty to the game and should make it quite interesting.
Army Lists
There are 10 army lists given but the game is designed for more build you own armies.
There are no points values for units.
Building armies consists of an Auxilia plus 4 random units and 10 selected units. Note there are minimum and maximums for unit types.
That being said, I think the game will play quite well with historical armies. My first replay was using a historical army list generated from other sources.
Determining the Winner
Victory points are awarded for inflicting morale damage, destroying enemy units, sacking an enemy camp and destroying enemy generals. First side to reach 15 points wins.
Presentation
The rules are clear and the layout is fine. The rules total 24 pages including army lists, optional rules and pictures of games in progress. There are diagrams littered throughout the book to assist in describing some mechanisms. The Strategy Cards and Army cards are in the book and need to be cut out. I used a paper guillotine.
The only issue I really came across is that attributes and their effects are in one table on the back of the book. The effects are very important and listed no where else. Such things like Skirmishers reduce attacking infantry CV by 1 and Mounted destroying routing Psiloi and Bowmen. These effects are not referred to anywhere else in the rule book (not even an indication that unit attributes are varied and have a large effect on unit interactions) so when you get to the back page, the richness of the attributes for the units takes you by surprise.
I had only a couple of questions and clarifications I sent to the author which I will post once tidied up.
My verdict on the rules after a battle are at the end of the post. But in summary: not for everyone, I liked them a lot, will play again and lends itself to tweaking (using the existing rule mechanisms) to get your version of history.
Back to the battle report....
Troops
There is no list for the Sassanid Persians and Later Eastern Romans. Armies are 15 DETs each so I just used the first edition Armati lists as a basis (they are about 15 units each). As I mentioned earlier, the rules lend themselves to historical tweaking - you could adjust combat and morale values to better differentiate troop types. But I will resist for this replay and stick to the standard troop types.
Sassanid Persian
2 Cataphracts
4 Cavalry (one has +1 CV +1 MV due to Weapon Maker Strategy Card)
2 Light Horse
2 Auxilia
4 Psiloi
1 Elephant
+1 additional Cavalry from playing a Strategy card.
+1 additional Cavalry from playing a Strategy card.
Later Eastern Roman
1 Cataphract
3 Cavalry
2 Light Horse
3 Blades (+1 MV and Wall of Shields due to Legionaries strategy card)
3 Auxilia
3 Skirmishers
Strategy Cards
Cataphracts is a Strategy card. There is only one, but I could not help but give the armies the cataphracts I think they deserved. So I will reduce the number of Strategy cards by 2 for the Persians, and by 1 for the Romans. Further, I will give 2 Missile Weapons to the Persians. And 2 Thrown Weapons and 1 Legionaries (I chose to only apply this to the Blades) to the Romans.
This leaves 2 random cards for the Persians:
And 2 random cards for the Romans:
Strategy Cards
Cataphracts is a Strategy card. There is only one, but I could not help but give the armies the cataphracts I think they deserved. So I will reduce the number of Strategy cards by 2 for the Persians, and by 1 for the Romans. Further, I will give 2 Missile Weapons to the Persians. And 2 Thrown Weapons and 1 Legionaries (I chose to only apply this to the Blades) to the Romans.
This leaves 2 random cards for the Persians:
- Weapon Maker (used in deployment - one DET gains +1 to CV and MV)
- Mercenaries (deployment - add one Spear, Bowman or Cavalry last).
And 2 random cards for the Romans:
- Treason - play at start of a melee and enemy DET becomes yours.
- Strategist - either redeploy army at end of deployment or redeploy 3 DETs during play.
Deployment
If you use 4cm width bases, that is 2/3rds of the recommended size, and then a MU needs to be reduced by 1/3rd which equal 1" and table size goes down to 22"x28" which is close to 24"x24". Eminently playable. And I only have units based on 4cm wide bases. I don't have a 2x2 board except a (slightly bright) green 26"x26"mat I picked up from a hardware store. I'll use that as my real 2'x2' board is being used for Zama refight. I'll deploy 2" further in to account for the slightly wider board.
Normally alternate deployment, but will skip this as solo and can't outthink myself this late at night.

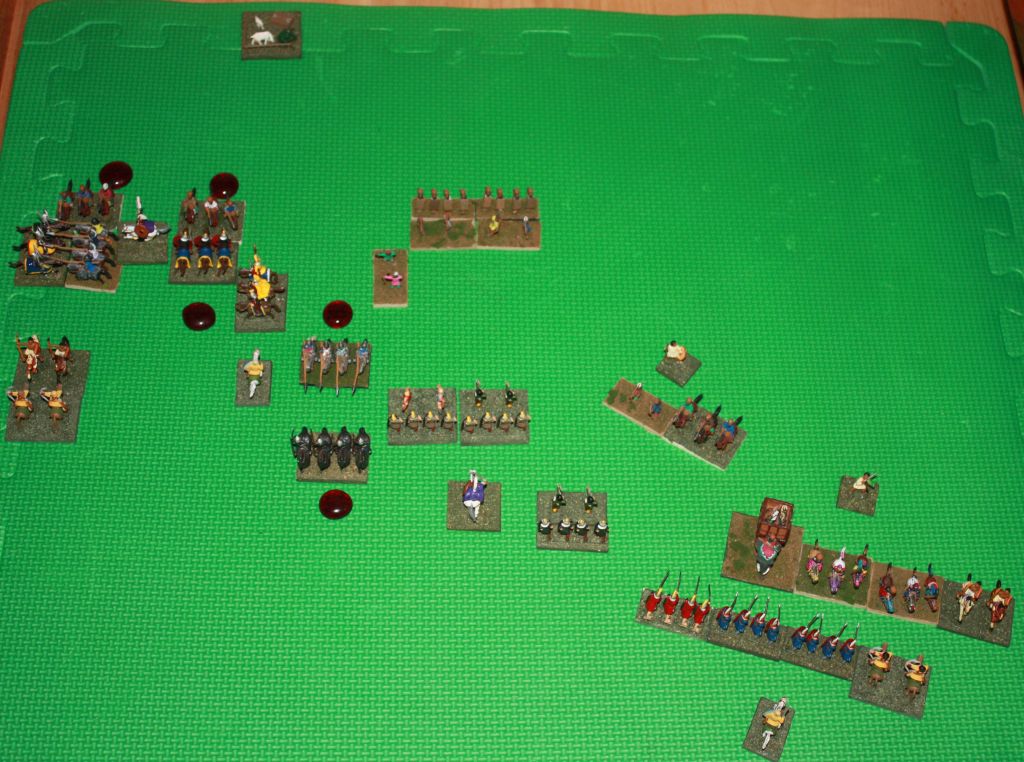
Romans setup cavalry on the left flank, legionaries in the centre with skirmishers and auxilia on the right with a light cavalry. Leader is in the centre.
Roman plan - break the left flank, maybe using some blades from the centre. Hold or break the centre. Panic at the large force on the right flank so refuse it.
Persians setup General with cataphracts and heavy cavalry on their right flank, levies with some skirmishers in the centre and more heavy cavalry and the elephant on the left flank.
Persian plan - use the cavalry on the wings to beat the Romans. Hold the Romans on their left flank with equivalent forces and hopefully break their right flank. the centre is weak, but only has to hold - may not even need to engage.
Normally alternate deployment, but will skip this as solo and can't outthink myself this late at night.

Deployment view from the Roman side
Romans setup cavalry on the left flank, legionaries in the centre with skirmishers and auxilia on the right with a light cavalry. Leader is in the centre.
Roman plan - break the left flank, maybe using some blades from the centre. Hold or break the centre. Panic at the large force on the right flank so refuse it.
Persians setup General with cataphracts and heavy cavalry on their right flank, levies with some skirmishers in the centre and more heavy cavalry and the elephant on the left flank.
Persian plan - use the cavalry on the wings to beat the Romans. Hold the Romans on their left flank with equivalent forces and hopefully break their right flank. the centre is weak, but only has to hold - may not even need to engage.
Turn 1
A general advance by both sides. Shuffled some Psiloi when I reread their atrribute of providing +1 to a DET on their flank. Cavalry get +2 to their CV if they charge so initiative is important - The Persians only moved up the Cavalry within charge distance of the Roman left flank - the Cataphracts advanced but not to within charge reach.

Turn 2
Romans win initiative and charge into 2 of the opposing cavalry and cause a rout. The Persians retaliate and cause a damage point as well. The cavalry on this flank is becoming a bit of a swirling mess.

I'm using blood red glass beads for damage markers. Seemed like a good idea at the time but blood red on bright green does clash. I will go back to casualty rings next game.
Elsewhere, the Roman centre advanced and the Persian left flank continued its advance.

Victory Points: Persian 1 Roman 1
Turn 3
Romans charge in on their left flank and cause 2 damage points. The Persians retaliate and cause a cataphract rout and some damage elsewhere. The rest of the board is taken up with an advance on the Persian left flank to within 1MU of the Romans. In hindsight, maybe the Romans should have really used the treason card on the Cataphract melee, but I have been saving it for the Roman right flank, where they could get overwhelmed. The Romans also have the Strategist card, which I was going to use to redeploy some centre legionaries to the left flank, but a pursuit by a Persian cavalry has quashed that idea - The Strategist card only allows redeployment is no enemy are within 4MU and the pursurer is now within 4MU.

Victory Points: Persian 2 Roman 3
Turn 4
Missile fire - the Persians play the 2 missile weapons cards to give missile fire to 2 cavalry on their left flank. Roll to hit - both miss.
Romans win initiative for the 4th time (!).
The chaos on the flank with the cavalry on cavalry continues. The centre legionaries split up to start the journey of being assistance to the other flanks.

The Persians cavalry and elephant charge into the Auxilia. The Romans play the Treason card and turn the Elephants.

Otherwise, the charge was disappointing - only one damage out of three attacks. And cavalry get +2 to their combat value when charging.

Victory Points: Persians 4 Romans 3
Turn 5
Persians finally win initiative. In the cavalry swirl, a roman cavalry succumbs to the general and cataphract and another flanking cavalry. The Persians activated quite a few melees and the dice were hot - scoring morale checks in almost all of them and inflicting some damage. The flanked Light Horse on the far right of the Roman line was destroyed. The Romans did not have much go there way but the Elephant (now Roman) assisted in causing damage to a neighbouring - former friendly - cavalry.

Victory Points: Persian 10 Roman 4
Turn 6
Persians win initiative for the first time. The Roman camp is three moves away from the cavalry on the right flank.

It is probably worth giving it a go as capturing the camp would give enough victory points to win the game. So the cavalry move towards the camp. There was little movement this turn - more jockeying for position, a bit of flanking and an advance of the Roman centre. No hits this turn - everyone survived any morale checks.
Turn 7
Still no hits from missile fire anywhere!
Things are slowing down as most units are in melee, or don't want to be so don't move! The Persians are only one move from the camp. The Romans finally managed to destroy the Persian cavalry flanked by the elephant. And also finally destroyed the Persian cataphract facing the Roman cataphract and flanked by a legionary unit.

Victory Points: Persians 10 Romans 8
Turn 8
The Persians win initiative and attack the camp, successfully scoring a hit which means it is captured. The Romans lost a melee against some Persians cavalry: they rolled two 1's on the dice roll to hit, which means the attacker needs to do a morale check, which they failed. They already had a melee damage and were destroyed. Those snake-eyes rolls are bad - this was the second one for the attack (last time the attacker passed the morale check).
The Romans give up as there is no way they can exceed the Persians victory point score this turn, and most places they could try, there is just as much chance of worsening their victory point score!
Victory to the Persians.
Final victory points: Persians 17 Romans: 8

Postscript to game
There were a few rules I did not play correctly. When I started the game, I sent off a few (ok, about 14 and I do feel bad about asking so many at once) clarification questions. They were not really omissions, just things that seemed unclear. There was only about 3 things I think I had assumed incorrectly. An example of one of these is that units that have missile fire capability can fire at enemy unit in contact with them to the front (it does imply this in the rules so my bad). I will format the clarifications and post them here later.

Roman left flank
Turn 2
Romans win initiative and charge into 2 of the opposing cavalry and cause a rout. The Persians retaliate and cause a damage point as well. The cavalry on this flank is becoming a bit of a swirling mess.

Roman left flank and centre area
I'm using blood red glass beads for damage markers. Seemed like a good idea at the time but blood red on bright green does clash. I will go back to casualty rings next game.
Elsewhere, the Roman centre advanced and the Persian left flank continued its advance.

Roman right flank
Victory Points: Persian 1 Roman 1
Turn 3
Romans charge in on their left flank and cause 2 damage points. The Persians retaliate and cause a cataphract rout and some damage elsewhere. The rest of the board is taken up with an advance on the Persian left flank to within 1MU of the Romans. In hindsight, maybe the Romans should have really used the treason card on the Cataphract melee, but I have been saving it for the Roman right flank, where they could get overwhelmed. The Romans also have the Strategist card, which I was going to use to redeploy some centre legionaries to the left flank, but a pursuit by a Persian cavalry has quashed that idea - The Strategist card only allows redeployment is no enemy are within 4MU and the pursurer is now within 4MU.
Roman side at the bottom of the picture, Persians at the top.
Victory Points: Persian 2 Roman 3
Turn 4
Missile fire - the Persians play the 2 missile weapons cards to give missile fire to 2 cavalry on their left flank. Roll to hit - both miss.
Romans win initiative for the 4th time (!).
The chaos on the flank with the cavalry on cavalry continues. The centre legionaries split up to start the journey of being assistance to the other flanks.

Legionaries split
The Persians cavalry and elephant charge into the Auxilia. The Romans play the Treason card and turn the Elephants.

The treasonous elephant
Otherwise, the charge was disappointing - only one damage out of three attacks. And cavalry get +2 to their combat value when charging.

The Roman right flank after they turned the elephant
Victory Points: Persians 4 Romans 3
Turn 5
Persians finally win initiative. In the cavalry swirl, a roman cavalry succumbs to the general and cataphract and another flanking cavalry. The Persians activated quite a few melees and the dice were hot - scoring morale checks in almost all of them and inflicting some damage. The flanked Light Horse on the far right of the Roman line was destroyed. The Romans did not have much go there way but the Elephant (now Roman) assisted in causing damage to a neighbouring - former friendly - cavalry.

Overview with Romans at the bottom.
Victory Points: Persian 10 Roman 4
Turn 6
Persians win initiative for the first time. The Roman camp is three moves away from the cavalry on the right flank.

The Roman camp is only an about face and two moves from the Persian cavalry to the left.
It is probably worth giving it a go as capturing the camp would give enough victory points to win the game. So the cavalry move towards the camp. There was little movement this turn - more jockeying for position, a bit of flanking and an advance of the Roman centre. No hits this turn - everyone survived any morale checks.
Turn 7
Still no hits from missile fire anywhere!
Things are slowing down as most units are in melee, or don't want to be so don't move! The Persians are only one move from the camp. The Romans finally managed to destroy the Persian cavalry flanked by the elephant. And also finally destroyed the Persian cataphract facing the Roman cataphract and flanked by a legionary unit.

Overview - Romans to the bottom, Nadia the dice roller at the top. Having the game in a drawer helps protect it for the weeks it takes to play.
Victory Points: Persians 10 Romans 8
Turn 8
The Persians win initiative and attack the camp, successfully scoring a hit which means it is captured. The Romans lost a melee against some Persians cavalry: they rolled two 1's on the dice roll to hit, which means the attacker needs to do a morale check, which they failed. They already had a melee damage and were destroyed. Those snake-eyes rolls are bad - this was the second one for the attack (last time the attacker passed the morale check).
The Romans give up as there is no way they can exceed the Persians victory point score this turn, and most places they could try, there is just as much chance of worsening their victory point score!
Victory to the Persians.
Final victory points: Persians 17 Romans: 8

Final positions
Postscript to game
There were a few rules I did not play correctly. When I started the game, I sent off a few (ok, about 14 and I do feel bad about asking so many at once) clarification questions. They were not really omissions, just things that seemed unclear. There was only about 3 things I think I had assumed incorrectly. An example of one of these is that units that have missile fire capability can fire at enemy unit in contact with them to the front (it does imply this in the rules so my bad). I will format the clarifications and post them here later.
Verdict
I like the rules. I was thinking they could be used for fast play, but they are aimed at the 2-2.5 hour game. It should be obvious, as it is written in large letters on the front of the rule book: 2-3 hours. But, again, I was thinking, maybe they could be cut down, as per some of the other rules I have tried. Probably not - I may do some more thinking on it before using them for a Zama replay. Anyway, the rules may seen to be simple, but they are not simplistic. The command and control system is excellent, and the grind of melee is well represented. Troops have both a combat value and morale value which works well in differentiating the units. Lastly, a word on the cards - while they could be powerful, they are not within the mechanics of the game. And they do add uncertainty to the battle. The game can be used for straight pickup games with selected forces but would work quite well for historical games and historical scenarios.


.jpg)


