Saturday 25 January 2014

WW2 20mm West Front Goodwood mini-Campaign Game 4

Introduction
I have 1/2 a table tennis setup and am playing a 7 game mini-campaign set over 2 days at the opening of Operation Goodwood. This is game 4.  Game 1 and some more background, see this blog post.  I set this game up and then a few days later got a call from a friend who needed a place to stay from that night.  The only spare place for a bed is where the gaming table was temporarily setup.  I played the game in a hour, including taking notes! Note sure when Games 5 to 7 are going to get played.


Scenario 4 - Evening assault upon Cagny
Grenadier Guards tanks supported by motorised infantry attack Cagny; the latter defended by an ad hoc collection of Panzer Grenadier troops.

The story so far.  Germans won the first two, the British the third.
Troops
Germans
1 Panzer Grenadier HQ
3 Panzer Grenadier squads
1 Pak 40
Sdkfz 250/9 (supposed to be a 234/1 but I do not have one)
80mm mortar
And I add the surviving 88 from game 1 (1 of them) as per the mini-campaign rules.


British
1 Squadron
    3 Shermans
    1 Firefly
1 Motorised unit
   1 Infantry command in M3 half-track
   3 Infantry squads in M3 half-track
   3 PIAT teams

1 FAO in Bren Carrier; dedicated off table 3 x 3" mortars


Scenario changes
Game is supposed to be on a 6'x8' but I am playing on a 4.5'x5'.  No changes to accommodate this, it will just be cramped!
 
I realise it is game 4, but I looked up what a squad is in Kampfgruppe Normandy and the Battlegroup series.  Turns out a Panzer Grenadier squad is 5 men and a separate MMG (the MMG is the MG34/42 that comes with the squad).  So when the scenario has 3 Panzer Grenadier squads and 3 MMGs, that is really just a squad of ten men in my rules (as I have scaled them up and a squad = a company).   But a German company would often have been allocated some MMGs from the Support Company so will make each "Panzer Grenadier Squad" 6 men and an MMG.  Luckily it has made no difference to the game so far.

I put in a Jack card into the deck - if the card before was a moving vehicle, it is now bogged (the scenario notes mention bogging).

Normally I would use 1 halftrack with 3 passengers but due to space restrictions I will go with 10 figures to one halftrack.


Deployment
The British deploy on either side of the road with the objective to race to the first town and take it.  The Germans are in an staggered defense from the first objective back to the one in the rear. The Sdkfz 250/9 is in reserve near the rear.  AT Guns are near the rear tow with good fields of fire.

British deploy in their designated area.  Germans may setup anywhere to the right of the village and the village.


A view down the road - the British need to basically take everything you can see to get to the church at the far end.


Game
First card is out for the Germans and chose the AT guns.  88 fails to spot but the Pak 40 hits a halftrack, destroys it  and the passengers bail with 3 casualties and subsequent retreat through the woods and are pinned.

Half track KO's the remaining parts of the unit retreat through the woods and are pinned.
 Second card is the Brits that advance a halftrack up to the first building (Allies cannot close than  9" from suspected enemy) and unload the 11 passengers.

Another squad gets into the first building.
 Third card is for the Germans and i attempt to call in the mortar but fail.  This game is more exciting in three cards that some of the other ones.  I hope it continues. Two minutes in and interesting things happening already.

The British infantry unit that retreated managed to advance up thier right flank.  They got halfway up the table but were never anything more than a nuisance.  If the Germans had held on longer, they would have come in very useful.

The squad that bailed from the destroyed halftrack advanced up the right flank and ended up quite near the far village before the game ended.
 Axis response fails to damage the Brits out of the building (very bad dice rolling) but the allies maange to kick them out of the building; and then to add insult to injury manage to set alight the building they had retreated to with the indirect mortars!

The second building from the left is cleared and the third building set on fire by indirect HE.
 Infantry advances and another halftrack comes up and unloads in the now vacated house.

Building hopping.
 They continue hopping across the road and back to the other side, losing a few casualties but eliminating two more Panzer Grenadier squads along the way.

More building hopping


Still more building hopping
 

OK, this was the last of the building hops

 After 3 attacks by the guns and not doing any damage, both took out a Sherman!


One Sherman gone
...and another in the same turn by the very next shot with the other AT gun


Eventually they took out the Firefly before the Pak 40 succumbed to indirect HE.  And the 88 succumbs as well a few turns after.
 
All that is left of the German defense.
The Germans are now down to 50% their starting units and fail the morale and pull back.  The British win the scenario.

Overview shot at the end of the game.  The British lost 4 tanks all told.
I forgot I had a Sherman HQ.  The trees were blocking it as I was playing from the side facing the line of trees.  I only noticed it when I was taking a few end game shots!

The extra Sherman that never left the start, never fired - it was never actually seen by me until the end of the game!

Verdict
I really enjoyed this game.  I don't do many house to house clearings and it may not seem so from the report but I had lots of decisions to make as the British about when to commit the tanks and how safe it was to actually move form house to house.  The rules stood up just fine, another British win but it was close.  Here is to Game 5 sometime!
Monday 20 January 2014

100,000 posts and a retrospective

100,000!
This blog has reached 100,000 posts.  I never thought it  would get this far.  When I started it in 2010, it was as a way to get back in the hobby while I was time-poor with two small children.  My aim was to solo test a few ancient rules for fast play on a small board size.  There was a dearth of the very thorough reviews that I liked - those that showed in detail how the rule mechanisms worked during a game.  So I decided to blog these battle replays using the same ancient battle:
Nearly 50% of my posts relate to these battle replays so I did not do too badly, afflicted as we all are with starting other projects mid-project.
Diversifying
So, that was the primary aim.  In early 2011 Dave Howitt of Britannia Miniatures tragically passed away.  I was a big fan of his Battalion level 20mm WW2 rules Take Cover!! but had not played with my 20mm collection since about 2004.  So it was an opportunity to dig out the rules and play a game.  This lead me to remind myself how much I liked WW2 gaming and built up some 6mm armies so I could play some solo games on a small table.  I did play some games, but not as much as I would have liked.  I also started acquiring more WW2 rules but ended up writing some of my own.  I am still tinkering with them.
 
And I did a few projects I had wanted to do for a while - play Hydapses with a few different rules; play a few battles using Cyrus the Great armies against different opponents.  But I had always wanted to play all the Peter Sides scenarios from the three Ancient and Medieval scenario books.  I had just started writing my own set of fast play ancient rules (based on some scratchings from 2001) and thought this would be a good way to test them out.  This has been great fun so far and will continue.

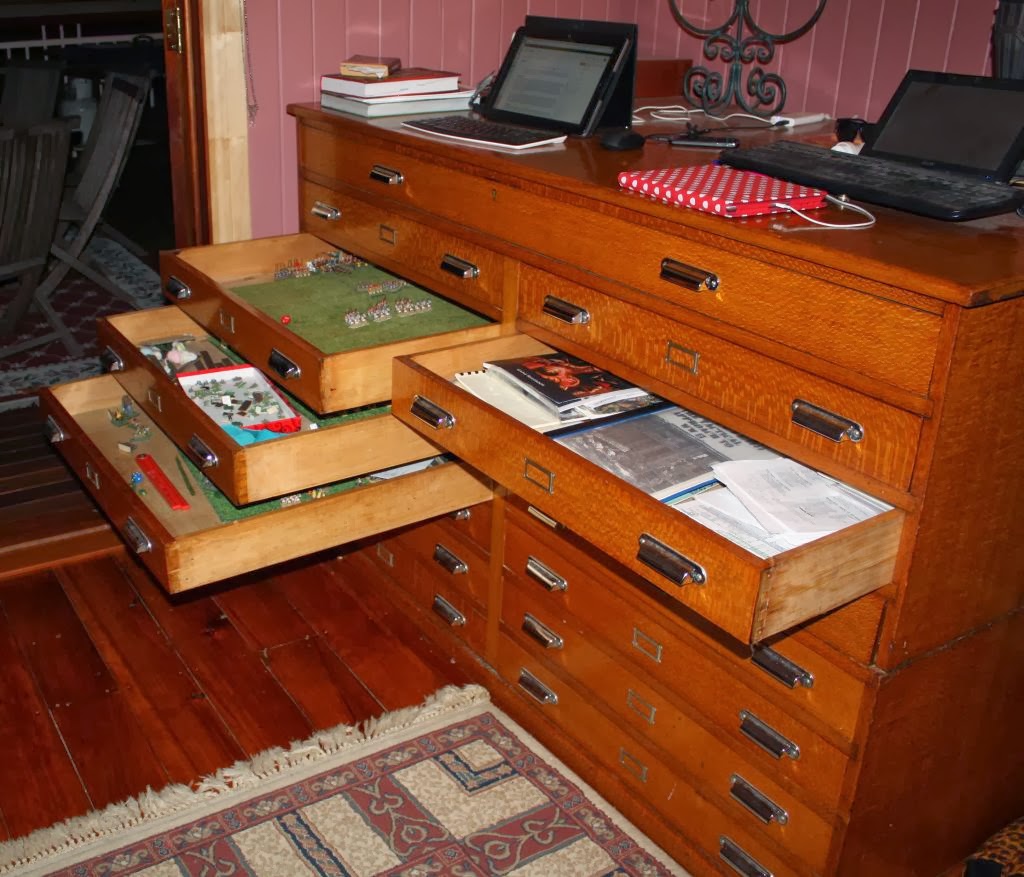
If anyone is interested, here is the gaming map drawers - silky oak and the picture does not do it justice. 
Silky oak map drawers.  The three open at the far end are where I play ancients and ww2.  The closet drawer houses rules I am playing or recently acquired. Other closed drawers hols plaints, terrain and some boardgames. The far computer is my ASUS slate  that I use for all blogging.  If fact, it is my only machine - the others in the picture are my wife's.
My wife was looking for some cheap map drawers to store wood veneers in.  We walked into a huge second hand office warehouse and this was at the the far end.  I knew straight away that my wife would pick it!  And so we walked away with something 10 times more expensive than what "we" were looking for.  But it is a fantastic piece of furniture so I did not mind, and at the time thought I could use it to store some boardgames while in play (that did not happen but I have had Steve Jackson's One Page Bulge setup for about 2 years in one of the drawers!).  It now goes in a corner of the lounge and I have taken over most of the drawers.  Each drawer is about 2.5'x2.5' .  The top drawer is 5'x2.5' but I do not have ownership of that!  So I have three 2'x2' green boards that sit in the drawers and  I use for almost all my figure gaming.
  
Learnings
The main thing about gaming blogging is the community of gaming bloggers.  There are not that many of us and we all seem to crop up everywhere - forums, on each other's blogs etc.  It have been an absolute pleasure to be part of this.

When I first started the blog, I had no idea what I was doing or the level of interest out there.  I had been on TMP for only a little while and posted a topic there when I posted a blog entry.  Compared to other blogs, I would be happy to get to 10 followers and a few hundred hits a month.  I have delivered approximately 100 posted over nearly four years - that is a post just under every two weeks.   I have now 70 followers and hits are about 3000-4000 a month.  I would never have thought my ramblings may be of such interest!  I post what I would like to see but the hit rate is always pleasing (and good for the ego).  My wife is stunned I am past 100 hits, let alone 100,000!
 
Blog Stats
Comments are about 300 on 100 posts.  I respond to most comments but that still means I get about 1.5 comments per post.  My most comments are normally on reviews.

Most popular posts/pages (via Google Analytics, not Blogger):
 
1. Take Cover!! WW2 rules review
2. WW2 rules ramblings and draft rules
3. Ancient Battlelines Clash (rules)
4. Rally Round the King: Persians V Romans
5. Irregular Miniatures Ancients Rules Review
6. Warrior Kings Review
7. Callinicum refight with Mighty Armies Ancients
8. Mighty Armies Ancients AAR - Greeks Vs Persians
9. Wars Ancient rules overview and battle report - Persians Vs Romans
10. WW2 1943 Eastern Front Take Cover report

Note: don't use Google Analytics if you love your blogger stats!  while you can do far more analysis and detailed drill downs on blog data via Analytics, the hits are only about 60% (or are for me) than reported by blogger due to not recording bot or known spammers.  I use it occasionally to see where some hits are coming from in a bit more detail than blogger.


The thing I gleam from all the statistics is that rules reviews are really popular, and that WW2 posts are generally more popular than than Ancients (this shows up more when I look past the first 10).
Onwards
What does the next few years hold for this blog?  More of the same:
  • Continue trying out the remaining 10-15 rules that are on my list to play.  I have yet to pick a battle but leaning to Sentinum after playing it with my rules.
  • Continue with the Peter Sides scenario replays using my own solo-friendly rules.
  • Get in a few more games with spaceships. Have lots of rules but no idea on what I will try out - likely give Full Thrust a go but who knows?
  • Increase face to face gaming.  I succeeded in 2013 of increasing non-solo games compared to 2012, that in itself was an increase over 2011 that was also an increase over 2010 ( none).
  • Play more 6mm WW2 but using the rules I have acquired and paid money for.  I wrote a list of the ones I would like to play and stopped at 30!  I need to prioritise this a bit :-)  I think I have a top 10 I have wanted to try out for a while and will start there.
  • Attempt to try out a few more games with my latest incarnation of WW2 rules - Advancing Battalions.
The one new area of gaming over the next few years is to play some of the boardgames I have acquired over the last 30 years.  I did used to play lots of boardgames in the 80s but nearly none since then.  I have a list of a top 10 here too, some designed for solo play, some not.  I am hoping to focus a bit here and play 10 in 2014 (compared to zero in 2013 and one in 2012).

And If I ever acquire some second hand GW fantasy figures (there is a possibility), I may start playing some fantasy games such as Kings of War but no rush there.

Final Word
Thanks to all of you out there that read the posts, comment and provide feedback.  I am glad to have started the blog to get back into gaming - it has been an enjoyable 4 years and here is to many, many more!

Friday 10 January 2014

WW2 20mm West Front Goodwood mini-Campaign Game 3

Introduction
I have 1/2 a table tennis setup and am playing a 7 game mini-campaign set over 2 days at the opening of Operation Goodwood. This is game 3.  Game 1 and some more background, see this blog post.

Scenario 3 - Emieville Charge
Irish Guards attack a Pak front and a lost King Tiger wanders in for support.  Objective is for the British to hold the road in front of the woods.


Setup and table.  Objective is the road on the right
Troops
Germans
3 Panzer Grenadier Squads
3 MMG
2 Pak 40
2 Pak 43
Tiger 2 (potential reinforcement on a 4+ per turn from turn 4)

British
3 Squadrons
    2 Shermans
    1 Firefly
1 Sherman FAC
1 Daimler Armoured Car

Scenario changes
As I use card activation with a End of turn card, I will start rolling for the King Tiger on turn 6.

Campaign so far - two wins to the Germans (blue).  We are in game 3.
Deployment
3 AT guns in the woods and one slightly forward in a hedgerow. The Panzer Grenadier squads spread out across the woods and the hedge on the far edge.

The German setup.  The third squad is off camera on the far left behind a hedge.

The British will focus on coming down their right flank.


British deployed with focus on their right flank.

Game

With my card activations, one possibility is to hold where you can then activate anytime during the rest of the turn.  I have not had much of a chance to use this during the last two games but this game, I gave the 88s (as the first unit activated) this order as the allied tanks were likely to get closer this turn.

The Allies advance. Daimler is shot at by a Pak 40 but misses.  The other Pak 40 hits a Sherman and it is destroyed (rolled a 6 to hit, and then a 6 for damage - reminds me of the first shot with the 9 year old and he was playing the Germans as well!).

First Sherman gone.
The Pak 40 that destroyed a Sherman destroys another one and the remaining firefly in the sqaudron has enough and pullback ( after a unit suffers equal or greater than 50% casualties you need to roll a morale check.  The Firefly rolled a 1).

..and another.
The Daimler spots the Pak 40 that fired at it (needed a 5+) but misses.

The Daimler is halfway down the road at this point with AT guns firing at it.

A Sherman next to the Daimler also spots the Pak 40 and manages to kill the crew (very lucky MMG firing).   The Pak 40 takes a morale check and the other Pak 40 (that has two kills for two shots) is pinned (no move or fire).

Two of the AT guns - a Grey 88 (should not be grey but all I have) and a Pak 40 further away.

88s on activation either fail to spot a target or miss entirely.  The Pak 40s are showing them up!  And then the Shermans manage to spot an 88 and the entire squadron opens up with direct HE fire and manages to kill all the crew.  The other 88 rolls a morale check and also rolls a 1 (just like the Pak 40) and so is also pinned.  Things are not looking so great for the Germans now.

And the FAC Serman successfully calls in a Typhoon on the remaining 88 that is destroyed.  The Pak 40 (the last remaining AT gun) becomes unpinned and destroys another Sherman.  But the combined returned fire from three Shermans finally puts the Pak 40 out of action.  The Brits have lost 4 Shermans (three KO and one routing) and so have 6 left.


A view of the "advancing" British armour.

And then the Tiger II comes on.

Tiger II

All the Fireflies have a shot but miss.  One of the Shermans raced up the road and subsequently got a flank shot on the Tiger and pinned it (1 in 9 chance).

The Sherman in the foreground has a flank shot at the Tiger and actually pins it!
But the Tiger II subsequently unpins and destroys a Firefly.  Tiger II subsequently pinned again by other Shermans.

The Daimler advances to the road - it is the objective after all - and is destroyed by a Panzerfaust.

The destroyed Daimler.

Other Shermans race up the British right flank, over the hedge and a clear line of sight down the hedge.

Could not be better - over the hedge and they are nicely lines up for the Sherman MMGs.
The following turn 4 vehicle MMGs  with 12 dice manage to cause 7 casualties (5 sixes!).  The rest of the unit routs.  They advance to the road and one is pinned by a Panzerfaust from the woods.

A German squad in the woods.
  The other Sherman successfully spots them and fires it MMGs, causing casualties and pins.

The Shermans now focus on the squad in the woods
A Battalion morale check is triggered (greater than 40% of all units pinned destroyed or routed).  They pass, but next turn the Sherman MMGs fire again, causes another battalion morale check and the Germans fail and pull back off the board.  Victory to the British, and well deserved too!

End game. The British survive with 1/2 their armour 

Verdict
Well, I did think that it would be all over for the British; and when the Tiger came on it was not going to get better.  But the German AT guns fell one by one, and the plane attack definitely helped. I think there was a bit of luck on the British side.  It was an interesting game (and fast - I think it took 30 minutes), and one likely best played solo as I did.  The Germans don't do much but fire at best targets, it is up to the British to figure out what to do with ever diminishing resources.

Thursday 2 January 2014

WW2 20mm West Front Goodwood mini-Campaign Game 2

Introduction
I have 1/2 a table tennis setup and am playing a 7 game mini-campaign set over 2 days at the opening of Operation Goodwood. This is game 2.  for game 1 and some more background, see this blog post.


Scenario 2 - Oemler's counter attack
King Tigers from the 1st Company of the 503rd Heavy Tank Battalion run into the Coldstream Guards west of Le Preuire.  It is an encounter battle with both deployed on either end of the table.
Any Tigers surviving are added to Scenario 5.  Any British halftracks that make if off the other end of the table can be added to Scenario 4.

Deployment
Troops
Germans
Three Tiger IIs (the middle Panther is a stand-in) and a Panzer IV.
3 King Tigers
1 Panzer IVH
1 Grenadier squad
1 MMG

Game 1 had four 88s and I wondered who had 4. This scenario has three King Tigers.  I have two (both over 30 years old) that I acquired when I got someone else's German armour bits and pieces. So a Panther will stand-in as a third King Tiger.


British
The British deployed (actually after their first move)
2 Squadrons
    3 Shermans
    1 Firefly
1 Motorised Infantry Company
   Platoon command in M5 halftrack
   3 rifle platoons and PIAT team, each in a M5 halftrack

Scenario changes
The Tigers must advance on their first activation as they are not aware of the British units.


Deployment
Germans deploy tanks in one corner and British in the opposite corner.  The German infantry may deploy anywhere and do so behind the hedge.  They are fully concealed and will not be spotted (unless moving or firing) until the British are 1" away.

The min-campaign so far. Germans won game 1. We are at Game 2
Game
Tigers must advance so do so.

Two Tigers advancing.

Shermans advance and spot the tigers.  Firefly attack 5+ to hit and a subsequent 6 will pin.  All misses. The Tigers retaliate and one Firefly goes up.

One Firefly taken out. Note the weird brown is likely what happens to varnish after 32 years.  After seeing this picture, i went back and it is barely noticeable except under the flash.  And the turret is from a different tank - as the picture clearly highlights - but it is much harder to see in daylight.
Two of the Shermans advance to the hedge-line where the German infantry is hidden.  Panzerfausts open up and pin one of the Shermans.

Shermans at the hedgeline where infantry was.
The other Shermans manage to spot the Squad and open fire with the their MMGs, cause 3 casualties and the squad retreats and is pinned.

..and the retreating infantry.
 Another Firefly down and a morale check on the squadron sees the pinned Sherman rout and the other Sherman in the squadron retreat.  Not looking good for the Brits.

Tigers take out another Firefly, near the first one.

A Sherman in the surviving squadron is brewed.

And a Sherman goes as well.

And then another in pinned.  The squadron fails its morale check and retreats.  They had managed to reduce the Grenadier squad down to 4 figures via MMGs.

A very happy Tiger II
The Tiger IIs have such great frontal armour and long range - no match for the Shermans.  One 75mm Sherman did manage a flank attack but missed.

A view at the end of the game.  Half Tracks are OK, One tank OK in the centre, one pinned (on right), rest brewed or routed.

Verdict
Using rules like Rapid Fire or equivalent, this scenario may be overbalanced to the Germans.  But to be fair, it does hinge on dice rolls so the Firefly's may have got one Tiger II, but really 2 Tiger IIs was a lot here, and 3 just wiped the Brits off the map!