Introduction
I have lots of things in the
pipeline…so I decide to do something else! I have been mulling over
creating a programmable opponent for my
Ancient Battlelines Clash rules
to help with replaying historical scenarios. This stemmed from some
discussion from
Dale's Solo Battles blog from early 2013. An excellent place
for quality discussion on creating decent opponents for solo play. The
last few posts discussed finite state machines and their applicability
to gaming, Dale use Meso-American Saga as an example. Discussion turned
to using FSM for THW’s Rally Round the King but did not get far. I kept
this in the back of my mind and thought about it at odd moments over the last year. I
finally decided to write it down early March.
Warning
This post gives an overview of the Ancient Battlelines Clash programmable opponent and an overview of the 5 playtests. While I have tried to make it as exciting as I can, I think it is still dry reading and likely a bit self indulgent (so it fits the criteria for a blog post!) unless you really really care about playtesting ancient gaming programmable opponents.
Where the programmable opponent is at
I have done five playtests, brief overviews are the rest of the post. The programmable opponent is closer now than it was a few weeks ago. Playtesting has shown I need more testing with different armies. From the five games I did below, I did not use the zone order unit tactics (to decide a units move) very much past the first few
moves. This is mainly because there was not much decision making to be
made after the few moves and combat commenced! It did come in handy to
help with some individual moves and I have expanded the zone orders table
to accommodate this. However, the last game had the units further away and the zone orders and action selection got a good working out. I am *very* tempted to ignore my other projects and play some more games using the programmable opponent.
 |
| The zone order unit tactics table at the start of playtesting. Zone
orders are the columns (each of 4 zones - flanks, centre, reserve) - each zone
has a zone order. Rows are broad unit types. Each cell in the table
determines the action that a unit may or must undertake. |
 |
| The zone orders table at the end of game 5 of playtesting. |
I will play some more games and then post the whole thing.
ABC programmable opponent summary
Pre-battle
The opponent assists with the following:
- Random unit selection: this is done as per the ABC army lists, based on the Milgamex tactical armies army lists.
- Random selection of attacker: a die roll
- Random
selection of terrain: as per normal ABC rules using 12 cards to place
terrain into 9 zones based on the terrain location of the defender.
- Selecting
of defenders deployment edge: This is new and loosely based on the DBAS
edge selection rules – roll a die for each edge, add to each die from a
list of 7 modifiers and select the edge with the highest result.
Battle
The opponent assists with the following:
- Deployment:
I revamped the ABC deployment options but think Rally raound the King
where the army type (Mounted, Infantry etc.) determines the broad
strategy for the army (e.g. Centre attack, skirmish line, flank
attack). The broad army tactic determines unit placement e.g. 50% of units
in centre.
- Zone orders: This I borrowed the WRG 7th/Warrior
concepts of command orders – Rash, Attack, Probe, Wait, Hold, Delay.
Each zone (left flank, centre, right flank, reserve) is given one of the
6 orders. So an army with Left Flank attack strategy will have the
left flank with Attack orders, centre and right flank with Probe or Hold
and any reserve with Wait. As a bonus, each zone rolls for a cautious,
normal or bold general. There is a small chance that zone orders will
change each turn. This is also very loosely based on the WRG 7th generals and orders.
- Tactical
engine aka unit tactics: The zone orders determine what each unit does. I have split
unit into 4 broad types – impetuous, non-missile, missile-armed and
skirmishers. Each unit type acts a particular way based on the zones
orders. E.g. an impetuous unit in a zone with attack orders will charge
at the enemy or full advance if cannot charge. But with hold orders
they will attempt to not move past the centre line. Missile units in a
zone with attack orders will charge into a combat if they have a good
chance of winning, else will stand and fire. Missile units in zone with
hold orders will only advance until in range on and enemy, and will not
advance over the centre line.
- Unit reactions: unit reactions are unchanged from ABC and operate “sort-of” like in Rally Round the King.
So,
armed with all of this I thought, let’s play a few battles to see how
it goes. I thought it went well. I tweaked a lot of the tactical engine
as I went but the concepts held up well. Amazing what 12 months of
working with an idea gives. The practicability of it was really useful
for game setup and the first few turns until there was general combat
along the line, after that is was not so useful as most movement was
based on reaction. However, it did help decide what to do with those
lone units that won a combat and wanted to know what to do next.
Potential room for improvement
I
do not have a system whereby a zones forces will change their order
based on circumstances e.g. the left flank has ATTACK orders but is
facing overwhelming forces in front of it – maybe the orders should be
HOLD. But again, the zones orders are selected based on what the entire
army is doing, so maybe it is not required. Maybe it would be better
to have the
army change orders based on circumstance, so in the
previous example, if the army was doing an Oblique attack with a focus
on left flank and centre but the left flank is facing overwhelming odds,
the
army changes to Centre attack, and places the left flank into hold.
Troops
For
these game, I dug out my first two ever 15mm armies – Late Imperial Roman
(that I used as mid-imperial as I have not yet done an ABC Later
Imperial Roman army list) and Sassanid Persians.
After
generating about 30 different battles I gave up selecting what looked
like interesting ones and just generated 5 in a row and used them. I
should be testing out the random army selection after all! I did notice
after this that the army size seems just slightly too small. I have
decreased the costs for generals which effectively increases the points
available for the rest of the army by about 3 points (from 32 points to
35 points for an average general’s army). This will make armies nearly
10% larger. 3 points is one average Heavy Infantry unit.
I
also went with naming the overall commander and each of the zone’s
generals. I did this to inject a little of a campaign feel to follow
the generals’ performance through the five games. This bit was not as
onerous as I thought, added to the fun and will do more of it where I
can. I can thank internet friend Jack from
BlackHawkHet blog link for
this who has been badgering me to do something like this for ages. I grabbed the names by looking through a Persian myths book and "The Roman Eastern frontier and the Persian Wars AD 226-363" compiled by Dodgeon and Lieu.
Game 1
 |
| Battle creation page (all randomly generated) |
The battle creation page explained
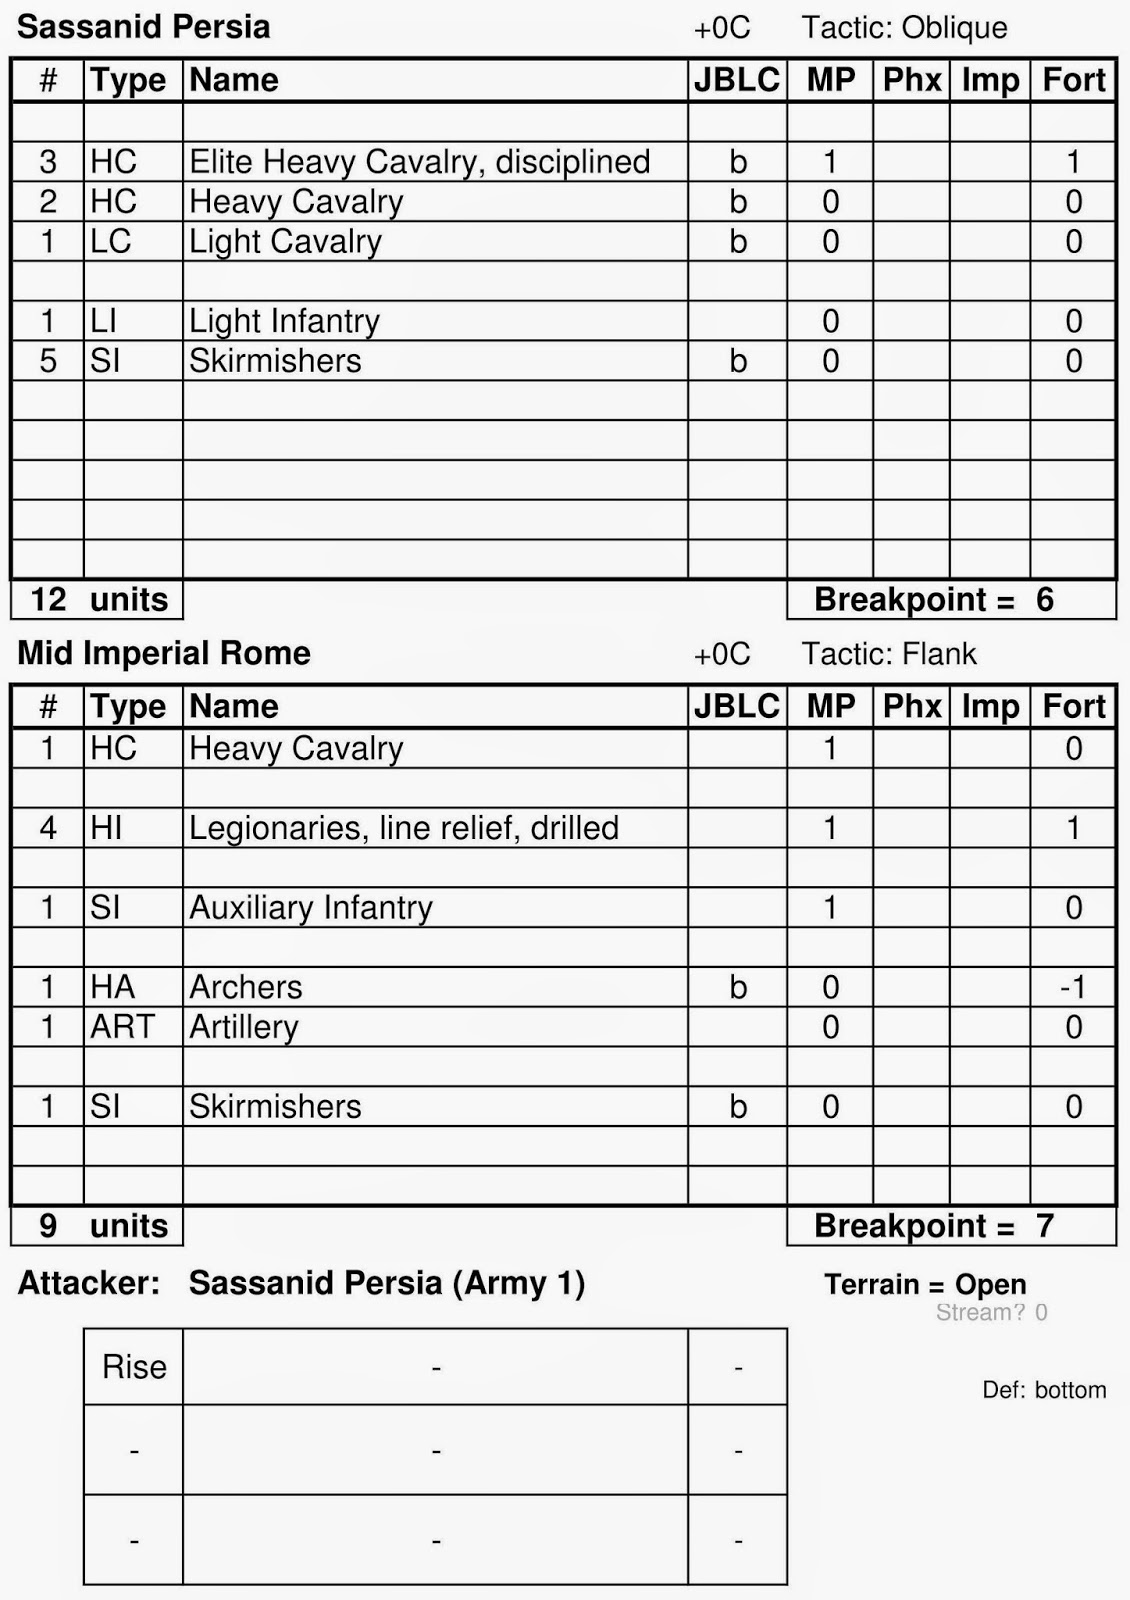
Creating a battle is very easy - select two opposing armies from a drop down list in Excel. Everything you see on the page is randomly derived - the forces for each side (based on defined army lists) including breakpoints and army tactics, the attacker, the battlefield (and lower right the Def: xxx shows the side the Defender will choose). It is simply a matter of grabbing the appropriate miniatures and then following the programmable opponent from there. When I am more confident of the programmable opponent, I can add zone orders and generals to the random army generation.
Sassanid (attacker)
Army General Siyavush
Army tactic: Envelop Flanks
Left flank: Attack. General Karus (cautious)
Centre: Wait (using optional dice to see if Probe changes to Wait). General Garsivaz (rash)
Right flank: Attack, General Khusrow
Roman
Army General Aurelius
Army tactic: Envelop Flanks
Left flank: Attack. General Macrianus ( a +1 marker)
Centre: Probe. General Quintus
Right flank: Attack. General, Timesicles (rash)
Note:
Not one random zone order change in the entire game. There were 4
turns and about a 1 in 12 chance per zone per turn per side of a
change. So in 24 tests (12 per side) tests there was not one zone
change. Ah well.
Overview
 |
| Game 1 |
The
Sassanids advance and early and things are going fairly well. The
skirmish infantry screen is cleared early on with only a couple of
disorders inflicted. The Roman allied warband is routed on the Sassanid
left flank. However, the Roman cavalry unit on that flank proves to be
very stubborn and the melee continues to the end game, even with a rear
attack!
On the right flank the Roman Cataphract (with
Commander Aurelius) routs an opposing cavalry unit. But immediately
after the other Sassanid heavy cavalry unit charges an disordered roman
cavalry unit and rout them. The legionaries in the centre attack the
Sassanid Cataphract and elephant; disorders are handed out to most
combatants. Aurelius leads the Roman Cataphracts into side of the
elephant that then routs though a legionary (oops)! Aurelius pursues
into the side of the Sassanid cataphracts who rout. Game over.
 |
| Game 1 end |
Awards
No awards given out – Aurelius and the cataphracts could do no wrong.
A
special mention to Timesicles (Roman right flank) that lost his
warband early on but held off superior cavalry for three turns, even
surviving a rear attack The Sassanids could only fail on a roll of a 1
and so rolled that!
Lessons
Tweaked table so that non-missile will not always charge, and impetuous will charge closest unit. Otherwise I did not change much at all. The units were only 20cm apart and so there was not much looking up of orders.
Game 2
Sassanid attacker
Army General Siyavush
Army tactic: Oblique (right and centre)
Left flank: Probe. General Khusrow (again)
Centre: Attack. General Shaqad (new)
Right flank: Attack. General Sohrab (new)
Roman
Army General Aurelius
Army tactic: Flank (left)
Left flank: Attack. General Timesicles (rash) (again)
Centre: Probe. General Felix (cautious)
Right flank: Wait. General Macrianus (again)
I
had to add some new generals as I did not want a general to be rash in
game 1, and then become normal in game 2. I will attempt to use the
fewest generals.
For game 2 I changed the chance of a random zone order change to a 1 in 9. With 4 turns there still was no order change.
Different forces to Game 1 - no Sassanid elephant and artillery on the Roman side. I do not have a roman artillery piece but do have one for a Byzantine army, so used that.
Overview
 |
| Game 2 |
Things did not go well for the Sassanids overall. With General Sohrab on their right flank, the regular heavy cavalry was wiped out by the Roman legionaries and heavy cavalry with Aurelius and zone general Macrianus. All the Romans lost on this flank was the skirmish infantry.
In the centre, the Sassanids did much better - one legionary and heavy archer for one Sassanid elite heavy cavalry.
But the left flank! I classed the Roman artillery as light artillery - acts basically like a light infantry unit with bows. It managed to disorder and then rout the light infantry and the skirmish cavalry just kept evading under fire! Eventually the artillery was routed by a charge from a Sassanid Heavy cavalry unit from the centre. But it was all too late, the Sassanids had reached their breakpoint, and lost again.
 |
| Game 2 end |
Awards
No outstanding actions warranted an award, but we say goodbye to the Sassanid general Sohrab who lost his entire right flank force.
Lessons
None but I added a priority list on targets for charging that was useful in this game.
Game 3
Sassanid
Army General Siyavush
Army tactic: Envelop flanks
Left flank: Attack. General Karus (cautious) from game 1
Centre: Wait. General Khusrow (game 1 and 2)
Right flank: Attack. General Garsivaz (rash) from game 1
Roman attacker
Army General Aurelius
Army tactic: Centre attack
Left flank: Probe.General Quintus from game 1
Centre: Attack. General Felix (cautious) from game 2)
Right flank: Probe. General Macrianus (game 1 and 2)
Overview
 |
| Game 3 |
On the Sassanid right flank the Cataphracts and elite heavy cavalry overruns and routs the lone Roman heavy cavalry and also capture Commander Aurelius.
In the centre, the legionaries never managed to engage with the Sassanid Light Infantry - the skirmishers exchanging fire took two turns and so no main combat occurred before the battle was decided on the flanks.
On the Sassanid left flank, the impetuous warband did not last long. The elephant was delayed a lot by the artillery but in the end the elephant managed to rout the artillery and end the game.
 |
| Game 3 end |
Awards
General Karus on the Sassanid left flank lost no units and managed to clear the entire flank. The Elephant managed, despite disorder, to rout the artillery.
Commander Siyavush who managed to capture the opposing Roman Commander (Aurelius).
Lessons
A very one sided game - The Sassanids had lost only two skirmishers compared to half the Romans. It was really that the flanks decided the game and the Romans really did not have enough in defense on the flanks having concentrated in the centre. Even one extra unit on one of the flanks would have made a difference. I do not think I need to change the programmable opponent - it was just one of those things; the deployment rules would have allowed an extra unit from the centre to be on the flank.
Oh, and I finally got an zone order change - the Sassanid centre went from Wait to Hold - slightly worse off but did not impact the game.
I spent a bit of time clarifying the non-missile unit tactics - minor changes - but I needed to add in the bits and pieces I had built up over the 3 games and make them easier to follow.
Game 4
Sassanid
Army General Siyavush
Army tactic: Oblique (right and centre as Left has terrain)
Left flank: No left flank as too few units to populate this flank
Centre: Attack. General Khusrow (game 1, 2 and 3)
Right flank: Attack. General Garsivaz (rash) from game 1 and 3
Roman attacker
Army General Macrianus (promoted from zone general in games 1, 2 and 3)
Army tactic: Centre attack
Left flank: Probe.General Priscus (new)
Centre: Attack. General Quintus from game 1 and 3
Right flank: Probe. General Cassianus (new)
Overview
 |
| Game 4 |
The Roman right flank sees the Roman Heavy cavalry advance and eventually rout the opposing Sassanid Heavy Cavalry (lucky 6).
The left flank has the Roman Cataphract manage to rout two opposing heavy cavalry for no damage to itself.
The centre did not end well. One legionnaire is routes but so is an opposing Heavy Cavalry. But then the generals - both in a continuing combat - see the roman legionnaire rout, the general is captured and the game is over.
 |
| Game 4 end |
Awards
Roman General Priscus, new general on the Roman left flank, manages to rout two opposing elite heavy cavalry and is not disordered themselves.
Lessons
I realised Probe was too similar to Attack orders for non-missile units and so the Roman cavalry on the flanks were two aggressive. And if they were infantry, there would have been no difference. So I reduced the aggressiveness of infantry a bit and mounted slightly. And then looking at HOLD and DELAY they were the same too. So I reworked those too. The whole table is now about twice as complex (still easy to follow) but it now captures a lot better the differences between the zone orders that did not exist before.
I also think I am started the armies too close together - 20cm is 2.5 times heavy infantry moves and a Heavy cavalry moves 16cm. I think I will make the defender's side setup no more than 10cm in - this will give a separation of 30cm. The games are all over too fast with not much tactics happening after deployment.
And this game did show that my proposed change to increase the points by 3 is good - there was not really enough units in this game.
Game 5
Sassanid
Army General Siyavush
Army tactic: Flank (right)
Left flank: Wait. General Garsivaz (rash) from game 1, 3 and 4
Centre: Probe. General Khusrow (games 1-4)
Right flank: Attack. General Shaqad from game 2
Roman attacker
Army General Quintus (promoted from zone general in games 1, 3 and 4)
Army tactic: Defensive
Left flank: Hold.General Priscus (game 4) +1 marker
Centre: Hold. General Cassianus (game 4)
Right flank: Hold. General Vincentius (new)
Overview
 |
| Game 5 |
With the Romans setting up 10cm in and the Persians also this means the distance between them is 40cm, rather than the 20cm of previous games. This led to quite a exciting game.
The Sassanid right flank charges down that flank and manages to rout the guarding heavy cavalry. The Roman Legion in reserve advances to that flank and holds the cavalry for a while unit the legion is routed. The Cataphract eventually manages to charge uphill and rout a legion, causing the end of the game.
Sassanid centre changed is zone order from Probe to Wait first turn and wait and then to Hold in the second turn. On the fourth turn they zone order was sucessfully changed back to Probe and the Elephant advanced, charged uphill but was repelled. Another heavy cavalry unit from the centre also charged uphill and was routed.
The Sassanid left flank is simply the skirmisher that advanced to the centre and went no further.
 |
| Game 5 end |
Lessons
The Sassanid Centre changing from Probe to Wait to Hold over two turns showed me that the Commander in Chief would want to change the orders back to what they were at the start of the game. So I added in a table to allow for orders to potentially revert back to the original orders. But having the zone general interpret the orders his own way can shake up the game a little. A good thing when playing solo.
The Sassanid Persian cavalry is not impetuous as they all have bows. I realised I needed to make sure that heavy mounted units (that get a charge bonus) are treated appropriately and that heavy mounted units with bows also work the way I think they may have. I created a non-archer Shock section in the non-missile units. I also had to add in special rules for heavy mounted archers in a couple of the zone order columns. I think after the last 2 games, the zone orders table is a lot closer to being workable.
The Generals report card
It was interesting to track the generals as they went from game to game and hand out awards. On the Sassanid side, General Khusrow was in every game, and the rash General Garsivaz was only missing from game 2. On the Roman side, things were grimmer - the Army General Aurelius was captured in game 3 and his replacement, General Macrianus, was also captured in Game 4. These generals were the only ones to participate in more than two games.
The Romans won games 1 and 2, while Sassanids won games 3, 4 and 5.
Verdict
Playtesting is fun and frustrating (as I have learning with playtesting my rules). The first three games did not test much as the troops were too close together and I was just tweaking the tactical engine. But the last 2 games! There was where all the action was. I spent a while focusing on the zone orders table, matching to what the units would have done (or at least what I would potentially have done - it is a solo effort so far). There was a lot of situations that came up in the last two games that the zone orders table did not handle, or handled not very well. All better now and, as I mentioned at the beginning, I am tempted to run a bunch more games from different periods to firm up the tactics table.


.jpg)


