If you just want the final rules they are at this google drive link.
Introduction
In 1997 I bought the MiH Tank Commander Eastern Front CCG

In 2006 I came across an expanded version by Gary Chappell. (webgrognard link) Seemed a better game but never got around to playing it.
In 2008 I created a 3x4 version combining rules from both the original version and Gary's rules. I also included a random terrain and force selection method. Played them a few times but not enthused.
Then in 2014, buried in some TMP thread I mentioned that I was thinking about a portable ancients game that could be played on the train as I go to work. But I was playing World War Two at the time and have 6mm WW2 figures, but no ancient figures smaller than 15mm. So my thoughts turned towards a (very) portable WW2 game that could be played solo on a train...or a lunch break.
This post details the journey I have taken over the last three years to get to a game that works, including 6 battle reports of the final rules (albeit some tweaking between games!).
Summary
Over the last three years I have done a few attempts to translate Tank Commander CCG to a game.
My first go was heavily based on Tank Commander.While the 3x4 grid seemed OK and some bits were fine, the rest of it I could not get it to work. So I gave up on everything to do with Tank Commander except the 3x4 format. I kept 3x4 as that fits quite well on an A4 page - excellent for portability.
I then remembered I had a NUTS! variant I wrote that worked for 2'x2' with 20mm and maybe I could combine the good bits of the Tank Commander variant with some of my other WW2x2 rules. After a few goes I thought I had something that worked. I didn't. I went back to Tank Commander. Not great either.
In 2017 I had a brainwave. I have some homegrown WW2 company level rules (that I did not have in 2014) - convert these to a grid. This seems to work and have some AARs at the end of this post to prove it.
Test game
My test game is the first scenario in a Kursk campaign that I can no longer seem to find online (although I have a saved copy). Anyway, the idea is to play the first scenario and if that works, play through the 4-6 games of the campaign.
Battle Description
The Germans are attempting to take a farm in the opening of the Kursk Offensive in July 1943. The table is mostly wheatfields with woods down the German left flank.
Troops
The poor trained Russian defenders are dug in and are:
- 1 Company HQ squad
- 2 platoons of 3 squads each
- 1 MMG
- 2 45mm AT gun
- 3 T34/76 as re-inforcement
- 2 offtable 122mm artillery battery
The veteran German attackers are:
- 1 Company HQ squad
- 2 platoons of 3 squads
- 1 MMG
- 4 Panzer IVG
- 4 Stug IIIG
Terrain
Russians setup in top two rows, Germans enter onto the lower row.
Woods Farm Farm
Woods Wheat Wheat
Open Wheat Light
Wheat Wheat Light
Wheat = wheatfields
Light = light cover such as train banks, hedges, tree lined roads, orchard, scrub etc.
Victory
Germans occupy the two farm squares with no enemy in the farm squares
The original scenario is for IABSM and did not have a time limit. I have found time limits are important for these vignette style battles but with one an activation or two a turn I did not want to count turns (makes it slightly faster) and it is a test game after all. So I will stick with no turn limits.
Stage 1 (2014) – Tank Commander CCG (discarded)
Note that I went down this alley and discarded it after it was not working. Go to Stage 4 if uninterested in my attempt to modify the Tank Commander card game to a quick train/lunchtime game.
Evolution of an idea
I got 6 packs of Tank Commander: The Eastern Front, a Collectable Card Game (CCG) back in 1997 or 1998 and liked it, but did not love it.
It is based on a 3x4 grid with a maximum of 3 squads/tanks per square. Scale is each square being 500mx500m. You build a deck of units and event cards and play. But (and it is a scenario in the game) we usually played with a set number of units and a limited number of events. Took about 30 minutes a game. So while it was not great, the grid fits in with a small space and it is fast. The downside is there is no suppression/pinning or spotting rules, two things I would like to see in the rules. A fuller review of Tank commander a little later in this post.
In 2006, I came across a variant written in 2002 by Gary Chappell that expanded the grid to 5x4, clarified some of the rules, increased terrain effects, provided a better differentiated tank combat resolution system and increased the actions for each side each turn. This increased the time for a game but opened up a lot more playability. I think I only ever played this once as it made the game longer.
In 2008, I wrote a draft of WW2 rules that were played on a 8x8 grid and loosely based on Take Cover/Rapid Fire. These re-used some concepts from Tank Commander. In reality, the rules were more converting Take Cover!! to use a grid to formalise movement more than anything else and so lost interest.
2014 – I have an idea for a portable ancients games using a 8x8 grid. I think it will work, but I was thinking of using 2mm units to make it ultra-portable. I have no 2mm ancient units, but then thought about using my 6mm WW2 collection instead for a game to play on a train. Tank Commander with its 3x4 grid and small number of units seemed like a good start.
Overview of Tank Commander mechanics
Tank Commander is a d10 based system. Infantry roll to hit and if hit are destroyed. Tanks roll to hit, if hit compare penetration Vs armour value and roll to see if destroyed. The grid is 4 long by 3 wide (so a player’s edge is 3 wide). 3 units per player per position.
The turn sequence is IGOYGO but this a player turn:
EITHER
- Move units from one position to other positions
- Fire with one unit (not all units in a position)
- Draw a card (that could be a unit, an interrupt (play anytime including now) or an instant (play later)
- Play a card (bring a new unit on or play an event)
Interrupts are played at any time and are things like equipment, stop a unit from moving, conduct 2 actions.
Instants are played as an action; examples are artillery strikes.
I had a few attempts before I abandoned it, as detailed below
First attempt at the rules
I initially was going to go with Tank Commander but with d6s (I really like d6s). I changed the infantry to d6 to hit and d6 to destroy (based on cover) to match the 2-step dice rolls for tanks (d6 to hit, d6 to destroy (based on penetration Vs armour). I was going to keep the cards but not for more units - just for events such as bonus equipment, interrupts and actions. This did not last as cards would not really translate into a portable game on the train and there was no suppression and suppression is important to me for a WW2 game. I did add in the concept of being hidden (no move or fire since the start of the game and if you hidden you cannot be hit).
Second attempt at the rules
I revamped the "to hit" and the "to destroy" mechanism. But the “to hit” now has five modifiers. I got rid of the event cards. It looks just like normal rules forced into a 3x4 grid. And suppression, while good, slowed down the game. It did not play well.
Third attempt at the rules
Kept the suppression and the to hit modifiers and added back in the event cards but as an event roll, rather than event cards. This was much better. Events are scenario dependent or randomised for the game (so at least you know the type of events that you can get). But I did not really like the back and forth – one fire or one move or event then the other player has a go. The back and forth “activate one unit” was not working great on a small scale. And even though there were only a few events, they needed to be tracked as they could be saved. I thought about immediate play of events but this made them too powerful and all a player would probably do was keep rolling for events! It still was not a great game.
Abandonment
I was trying to shoe-horn a CCG into a miniature game. In hindsight, it was never going to work. Tank Commander is a very event driven game that did not translate into a miniature game. The good news is that after 15 years I can stop thinking about tweaking Tank Commander!
Stage 2 (early 2015) – Upscale my NUTS! interpretation
In 2014, I played a few games of NUTS! and then rewrote a version that used a single d6 and streamlined the rules a lot so it would play faster. I played on a 2’x2’ table with 5-10 figures moving 4”. My thoughts were that I could modify the rules to a 4x4 grid and add in some of the work I had done on weapon ranges from the abandoned Tank Commander rules.
First attempt at the rules
For this attempt, at the start of each player turn, a d6 is rolled to see how many areas may be activated, Veterans more than Green. For higher level rules, I like to add troop differentiation of Green and Veterans into morale and/or command and control. For skirmish games, I do not mind if Green and Veterans modify the fire/save results. However, in a game on a 4x4 grid with only 8-12 individual units, it may be better to represent troop differences by command and control rather than firing/saves. And the rules will be simpler! I could not do this easily with the Tank Commander rules as the turn sequence did not really allow it (I had ideas, but none I felt I would like!). If it doesn’t work, I can always add back in green/veteran modifiers.
I never played these rules as they just were too clunky and the activation mechanism did not sit well with me.
Side note on 3x4 Vs 4x4 grid (and Vs 6x9 squares)
I started Stage 2 thinking of using a 4x4 square grid. Not only would this make it easier to convert scenarios (a 3x4 requires some tuning to make sure the approaches are still what the scenario requires) but I could re-use the rules on a 2'x2' table. But the 6mm Russian units I have do not fit easily into a square on a A4 if using 4 squares along the narrow side. So I kept with 3. I also thought about going with a 6x6 or 6x9 grid and only one squad per square. But that meant I could have only 6 squads maximum across (compared to 9 if you have 3 per square on a 3x4 grid). I could have gone with less units but with only a small number of units I would feel compelled to mark units as damaged and that may not make a portable game. 3x4 grid it stayed.
Second attempt
I added in a better chance of multiple activations for veteran units. I also modified the to hit and damage to add in green/veteran modifiers. I went back to a 3x4 grid. Strangely, although I did not like the Tank commander activation, I have something similar - one square each side. The twist is there is a chance you may get two activations on your go. This is done by a die roll, while in the Tank Commander CCG this was a card you may get and then play. Rolling for it just *feels* more like miniature gaming.
Abandonment
The rules were too complex for a train game. While interesting as an exercise, these rules are still just like my WW2 miniature rules on a 3x4 grid but badly done!
Stage 3 (mid 2015) - Back to Tank Commander
Yes, I know I abandoned Tank Commander but I went back and actually played it. My failure previously was adding a lot of rules to Tank Commander. This time all I did was convert Tank Commander from a d10 to a d6 and add a few minor rules. I did not change the mechanisms.
The instant and interrupts became random events at the start of each player turn, with the events specific to each side. I played it again once and remembered why I did not think that it was a great game. Abandoned again!
Hiatus (2015-2017)
Busy doing other projects but every now and then thinking on how to get the 3x4 grid to work.
Stage 4 (2017) - modified my rules for a 3x4 grid
I started thinking on it again. I forgot entirely about using Tank Commander or NUTS! variants. I also used a scale of 150mx150m for each square as this is more consistent with the frontage for a company battle (width of table is 3 squares or 450m). I wrote some rules using 1d6 to hit, and then for vehicles a further 1d6 for damage. There were a number of modifiers (about 4) to each of the to hit and then the vehicle damage roll. I got to near the end of writing the rules and realised that I was not as fond as I was of a d6 with +/- modifiers as I used to be; and even though the vehicle and infantry used the same to hit table, I did not really want a further roll just for vehicles - it just seemed like it made the process different for infantry and vehicles. I could go with a 2 rolls for everything hit that would slow the game down. The reason I wrote these d6 rules is I did not think my latest company rules would work well. These are based on GoalSystem and see here for a brief explanation of my WW2 version, go to the last table in the post (I have not written up the rules yet). But I thought to give it a go, quickly wrote a quick reference sheet that seemed to work and was internally consistent.
The final version of the rules I used, WW3x4 Advancing Companies, are at this google drive link.
Quick rules summary
All dice are Goal System dice - 3 faces are blank, 2 faces are 1 success, 1 face is 2 successes; or think of it as a d6 with 1,2,3 is no successes, 4, 5 - one success, 6 - two successes.
Game sequence
- Player one rolls for activation and conducts activations
- Player one then conducts melee in any order (melee is any square with friendly and enemy)
- Player two does the same two steps.
- Keep alternating.
Activation
Roll 3d and count successes
0
|
Event
|
1-2
|
1 activation
|
3
|
1 activation, 2 if regular or veteran
|
4+
|
1 activation, 2 if veteran
|
Activation: pick one square and stands may either fire or move or rally.
There s a simple spot process - a squad can spot before or after activation. Hidden units not moving or firing require 2 successes on 1 die at range 1. Units that moved or fire are spotted on one success on one die.
Move
Most units are one square (in any direction).
Stacking limit of maximum 3 bases/vehicles per square per side.
Fire
Rifles squads are range 1, most AT range 2 or 3.
Infantry: mainly 1d per base
Direct HE: Gun HE value Vs infantry. Max range 3.
Vehicle target: 3d + attack #d - defence #d
Modifiers
-1d
|
firer moved or
pinned
|
-1d
|
target in hard
cover
|
+1d
|
melee
|
+1d
|
if target in open
|
-1d
|
Range 2+
|
-1d
|
Range 3+
|
Result
Infantry
|
Vehicle
|
|
0
|
If target able to return fire then if one or more 1s
rolled then firer pinned.
|
Target may return fire if any ones rolled
|
1
|
Target pinned; retreat in open; may only move 1.
|
Pinned.
|
2
|
Target suppressed.
|
Pin and Damaged
|
3+
|
1 target destroyed/KO (spec fire treat as 2)
|
|
4+
|
1 target destroyed, rest pinned (5+ suppressed)
|
|
Soft/transport vehicles: pinned/damaged = KO
Suppressed – no move
or fire
Vehicle 2 x damaged
= KO
Note for examples of vehicle attack/defence value: trucks have defence 0, armoured cars 1, Shermans 3. Attack value of a Sherman ot 75mm is 3. A PanzerIV firing at a sherman rolls 4 dice: base of 3 plus 4d for the 75mm gun minus 3d for Sherman armour.
Rally
Roll 1 die for Green, 2 for Regulat and 3 for Veteran squads. Need at least 1 success to become unsuppressed.
Melee
At the end of a player turn, simultaneous fire is conducted in all squares with both friendly and enemy bases.
I used the same test game from above.
Game highlights
 |
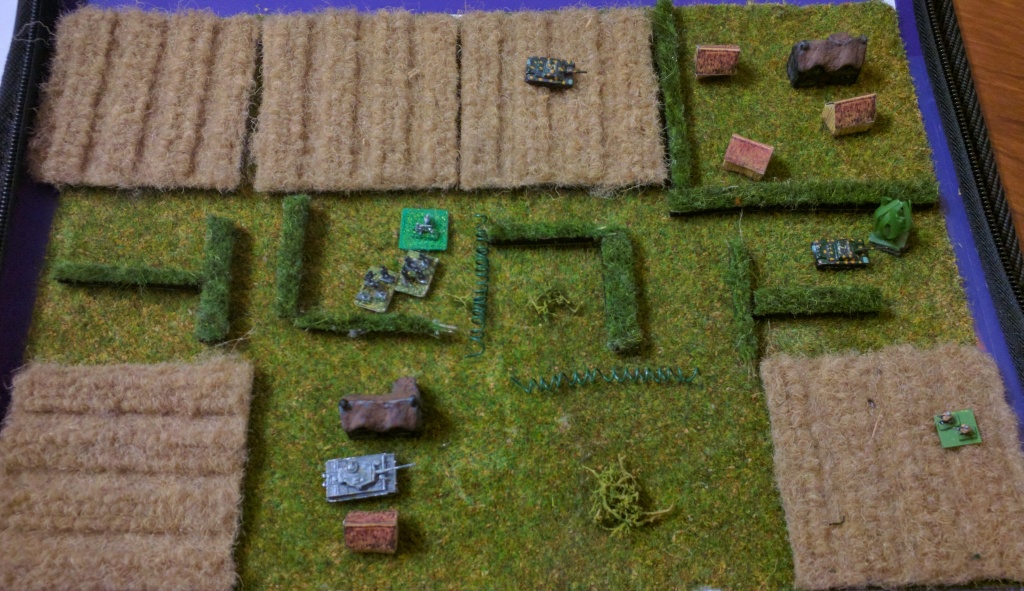
| Overview of the table - Russians dug in on the right, Germans will enter on the left. |
Note I have forgotten to put on the Russian company commander squad. I only remembered this near the end of the game The funniest thing though is when I was setting up for game 2, I found I had not forgotten and found the Russian CO under the tree in the corner farm. I could not see him from the top! Eagle eyes will just see the edge of a base sticking out from the large round tree in the bottom right square above.
 |
| The Germans |
 |
| Germans on turn 2 (two activations to move two different square's forces |
 |
| Germans and Russians battle it out in the woods. The German will lose the squad and a PanzerIV but the Russians will all get suppressed. |
 |
| The Germans not doing well in the woods. |
 |
| Overview of where we are at. I have included a shot of some of the special Goalsystem dice recently made available via the Lead Adventure Forum. |
While the Germans are held up in the woods, the rest are continuing to advance on the farm. Rifle squads only have a range of 1 square, as does the 45mm AT gun. I keep forgetting the ranges are so short. Also units that have not fired or moved are hard to spot requiring 2 successes on one die (equivalent to rolling a 6 on an ordinary d6) from range 1 only.
 |
| Finally, farm action (bottom right) |
 |
| End game, a German win |
Verdict
Well, that was fun if not a little fiddly with such a small space. A lot of lessons learned. There were a few rule omissions and so there were some minor rule additions for situations I had not thought of. I kept the destroyed tanks on the table and I should just take them off - they take up much needed space. The biggest change though is to the "to hit" results. I implemented my standard "1 success is pinned, 2 successes is suppressed and 3 successes is KO". Works really well but in this situation slowed the game down a lot and melees took a long time. This is not a bad thing and I liked how it worked but I am going to remove the pinned status and have 1 success being suppressed and 2 is KO. This should speed up the game - it is supposed to be very fast and this one probably took 40 minutes. I am looking for faster! It also simplified the -1 to hit for pinned as it was confusing on how to handle that with multiple squads in melee and one is pinned and one isn't. I will play it again but with only these two hits results. It may be too deadly - only one way to find out.
Game 2
I used the same test game from game 1.
New result table
Result
Infantry
|
Vehicle
| |
1
|
Target suppressed. Retreat in open; may only move 1.
|
Suppressed and Damaged.
|
2
|
Target destroyed.
|
Suppressed and Damaged.
|
3+
|
Target destroyed. All targets in square suppressed
|
Target KO.
|
Soft/transport vehicles damaged = KO
Suppressed – no move or fire
Vehicle 2 x damaged = KORussian set up is very similar to that of game 1 but more of a focus on the woods.
 |
| German Entry with Russians on the right |
 |
| The Germans move into the woods |
 |
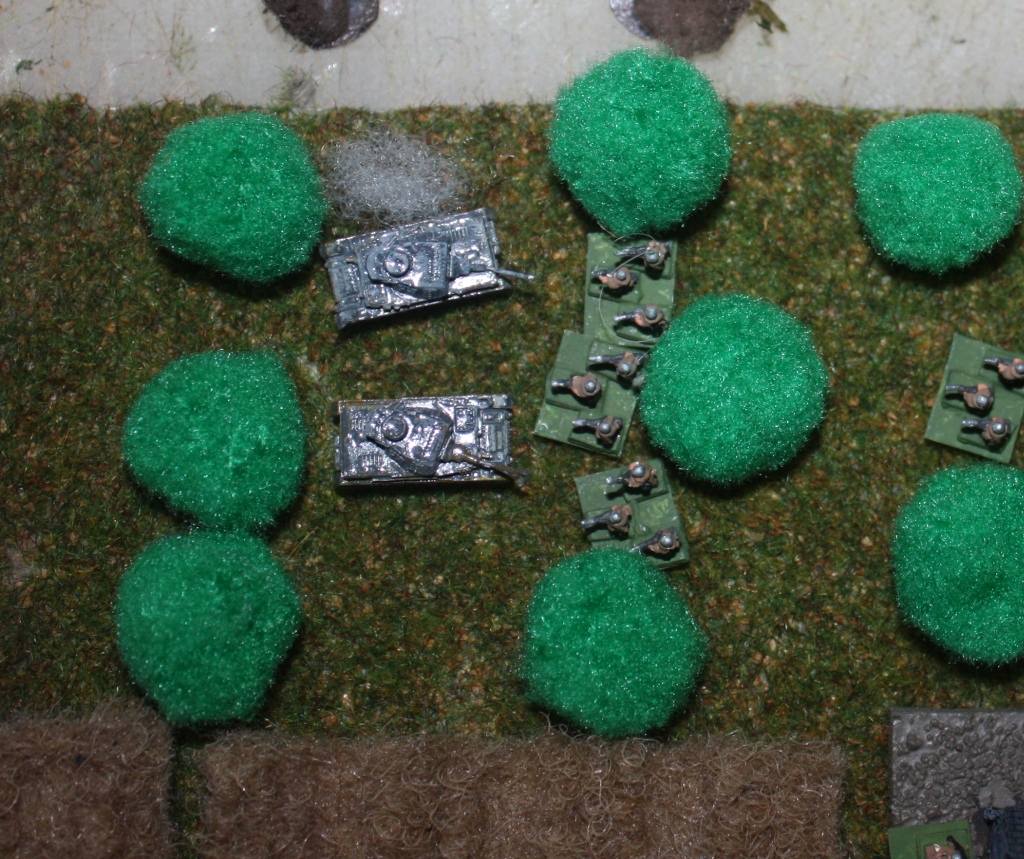
| No Germans, but the Russian defenders are all suppressed (the green markers, no not the balls - they are supposed to be trees). The green "bush" markers next to each stand indicate suppression. |
Germans have lost 3 tanks and 3 squads. Russians have lost 1 section and a AT gun, but have lost a farm square. The Germans advance though up the centre and manage to enter the farm on the Russian right flank.
 |
| No much on the table for the Germans in the mid game. |
 |
| The Stugs, the last of the Germans, approach the centre farm. |
 |
| The remaining Russians. Not a lot but there are no more Germans! |
Arrghhh, and just remembered the Russians had two artillery attacks available that I did not use!
Verdict
I am getting the hang of the rules a bit more. Even though I wrote them, they do play fairly differently to a non-gridded game on a larger table. I really do feel like a company commander moving my units to where they can do best. I do not think I am a convert to larger gridded games (not yet anyway!) but in this small format it is working well. There is no micromanaging for ranges or movement. Combat takes place mostly at range 0 or 1, so even that is reduced to the most basic (just like a company commander).
I am finding this second game a lot more fun that the first - this second game was a lot faster. I also think it worked a lot better due to the revised, simpler combat results table. There is only really one result to track (suppression) rather than pinned and suppressed. I have kept the damage result for vehicles and it has worked for me in the past where 2 damages equates to a KO. This helps with being able to actually destroy vehicles, something that would happen eventually: One firing roll does not equal one shot - it is firing over a period of time.
I found a bunch of minor rule gaps I need to write up (e.g. can tanks fire out of melee with only infantry at other tanks? when can you move out of melee). I think I am using too many units for the defenders - these rules are very unforgiving to the attacker, especially if not in good cover. Probably like in real life, just not used to it in a game! This using of too many defender stands plagued me in the later games as well.
Game 3
Game 3 is a new scenario from the the Day 1 Kursk campaign.
Battle Description
The Germans are attempting to take a farm in the opening of the Kursk Offensive in July 1943. The table is mostly wheatfields with woods down the German left flank.
Troops
The poorly trained Russian defenders are dug in and are:
Terrain
Russians setup in top three rows, all are dug in, including the T34s that cannot move. Germans enter onto the lower row.
Hill/Vill Hill Wheat
Open Wheat Open
Open Wheat Light
Wood Wheat Light
Hill/Vill = Hill with a village
Wheat = wheatfields
Light = light cover such as train banks, hedges, tree lined roads, orchard, scrub etc.
Victory
Germans need to occupy the hill with the village.
Game highlights
Russians destroy 3 PanzerIVs for no losses. Tanks advancing in the open Vs superior guns is really bad. And rolling zero successes a lot does not help either! But the Tigers are really good and hard to kill. Their armour is great and so is the gun. Even though the Russian targets are dug in, the Tigers are still managing to inflict some damage.
Tigers cause a bit of havoc but in melee some infantry manage to destroy a tTger over several turns (by causing damage twice with lucky dice rolls - in real life maybe grenades in the tracks or something). The other Tiger fell victim to the 76mm. But two T34s are gone and some Russian infantry is suppressed. So it did not go all one way. The Germans still have forces to move on and the defence it dented, but still there. The Russians being dug in is making them makes them quite hard to hit - one less die is rolled. It is proving to be a tough nut!
The Germans keep getting one activation that makes it really difficult to bring enough force to bear - some come on, move up, get suppressed and then rout. They never seem to get enough to be able to move into melee.
It is a disaster for the Germans. The last few Gruppe move on with the PanzerIV but two good shots by the dug in T34 damage it then KO it. The Germans only have a few stands left. I roll for force morale and the Germans concede the ground. Onward to the next scenario!
Verdict
Now, on three GoalSystem dice the chances of roll 3 or more successes is aone-third. So the Germans should be getting two activations every third turn. It was more like every 10th turn! This is appalling and cost them the game. They were activating at the same rate as the Russians and so they never got a chance to do a "double move" and find a point of attack. The Tigers being KO'd was a bit unlucky too. There was a stretch at the end where I was constantly unsuppressing the Germans and the Russians were firing right back and suppressing them again. Ah well. The rules are definitely faster and still fun. Even if it did seem like an overwhelming defeat for the Germans. I still did not reduce the Russian forces enough for this scenario but the Germans did play poorly (even if it was a solo game) and had poor dice rolls as well. I am still playing the game off a 1 page QRS and really need to get back to writing up the rules proper. Especially as I have the rules for barbed wire and mines in my head and not sure I will remember them from game to game. I have been playing these games in a map drawer and so have not really tested out the "portable" bit. I am tempted to take them to work and given them a run during a lunchtime.
Preamble to Game 4
So, 4 weeks go by and I am too busy to get some more games in. I am off on a family week holiday to a beachhouse about 90 minutes away and packing a few games to play just in case, and remember I have game 4 setup. Why not take it with me? I grab a document folder and put all the stuff in in and a few more forces if I can squeeze a couple more game in. 10 minutes later it is packed in the bag and ready to go. The remaining three games (games 4 to 6) were played at the beach house. Short version: went well, no issues, 25-30 minute games. A friend that went with us, not into gaming very much but knows of my habit, did think I was taking "miniature gaming" a bit too far! It never struck me before in all these years of testing but a game with toy soldiers on an A4 page may seem strange from the outside - and possibly from the inside as well!
Folder contents
The terrain and dice are loose, the Grass mat is A4 size cut from a railway grass mat. The QRS is under it. The woods, markers and 6mm troops are in the small carry case (the case is about 2cm high). The whole thing is quite light and I could probably make up another carry case or two and have a lot more troop types and different nationalities at well.
Apologies for some of photos coming up
Lastly, the games were played at night and I used my phone camera rather than the digital camera I normally use. The phone camera is pretty good but occasionally lapses into yellow hues due to my poor positioning of the camera and not bothering to check what the picture looks like after I take it.
Game 4
Game 4 is another new scenario in the Kursk campaign.
Battle Description
The Germans need to take a cross roads to open up the path to a major town. It is defended by dug-in Russians.
Troops
Germans (veteran):
Terrain
Russians setup in the top two rows, all are dug in. Germans enter on the lower row.
Farm LCover Wheat
Wheat LCover Clear
Wheat LCover Farm
Wheat LCover Wheat
Note: the corner farm surrounded by AT ditch that I represented by some hedges.
AT ditch – cannot be crossed by vehicles. Infantry can only move one square when crossing ditch. Fire crossing ditch against infantry target count target as in Light cover.
Victory
German victory is to control the Light Cover square next the the farm at the Russian edge, but need to ensure no enemy unsuppressed units are adjacent either.
I am finding this second game a lot more fun that the first - this second game was a lot faster. I also think it worked a lot better due to the revised, simpler combat results table. There is only really one result to track (suppression) rather than pinned and suppressed. I have kept the damage result for vehicles and it has worked for me in the past where 2 damages equates to a KO. This helps with being able to actually destroy vehicles, something that would happen eventually: One firing roll does not equal one shot - it is firing over a period of time.
I found a bunch of minor rule gaps I need to write up (e.g. can tanks fire out of melee with only infantry at other tanks? when can you move out of melee). I think I am using too many units for the defenders - these rules are very unforgiving to the attacker, especially if not in good cover. Probably like in real life, just not used to it in a game! This using of too many defender stands plagued me in the later games as well.
Game 3
Game 3 is a new scenario from the the Day 1 Kursk campaign.
Battle Description
The Germans are attempting to take a farm in the opening of the Kursk Offensive in July 1943. The table is mostly wheatfields with woods down the German left flank.
Troops
The poorly trained Russian defenders are dug in and are:
- 1 Company HQ squad
- 2 platoons of 2 squads each
- 1 MMG
- 1 45mm AT gun
- 1 76mm Zis3 AT Gun
- 1 81mm mortar team
- 3 T34/76 - dug in and cannot move
- 3 offtable 122mm artillery battery
- 2 squares can be mined, 1 real, one fake.
- 1 Company HQ squad
- 2 platoons of 3 squads
- 1 Pioneer platoon of 2 squads
- 2 Tigers
- 4 Panzer IV
Terrain
Russians setup in top three rows, all are dug in, including the T34s that cannot move. Germans enter onto the lower row.
Hill/Vill Hill Wheat
Open Wheat Open
Open Wheat Light
Wood Wheat Light
Hill/Vill = Hill with a village
Wheat = wheatfields
Light = light cover such as train banks, hedges, tree lined roads, orchard, scrub etc.
Victory
Germans need to occupy the hill with the village.
 |
| The Russians setup. The lichen in the wheatfield is the real mine location. |
 |
| The German attackers, left to right: Tanks, 2 pioneer squads, 6 squads and the Company HQ |
 |
| 3 PanzerIVs gone and the Tigers come on and are reeking havoc - they are hard to kill and heavy armour! |
 |
| The Germans only have the two suppressed squads (on the left) on the board while the Russians still have a lot of defenders, albeit some are suppressed too. The Germans keep bringing on more stuff that ends up in them routing :-( |
 |
| End game - the Germans have three stands left in total (on the left) while the Russians still have a significant defence force. |
Verdict
Now, on three GoalSystem dice the chances of roll 3 or more successes is aone-third. So the Germans should be getting two activations every third turn. It was more like every 10th turn! This is appalling and cost them the game. They were activating at the same rate as the Russians and so they never got a chance to do a "double move" and find a point of attack. The Tigers being KO'd was a bit unlucky too. There was a stretch at the end where I was constantly unsuppressing the Germans and the Russians were firing right back and suppressing them again. Ah well. The rules are definitely faster and still fun. Even if it did seem like an overwhelming defeat for the Germans. I still did not reduce the Russian forces enough for this scenario but the Germans did play poorly (even if it was a solo game) and had poor dice rolls as well. I am still playing the game off a 1 page QRS and really need to get back to writing up the rules proper. Especially as I have the rules for barbed wire and mines in my head and not sure I will remember them from game to game. I have been playing these games in a map drawer and so have not really tested out the "portable" bit. I am tempted to take them to work and given them a run during a lunchtime.
Preamble to Game 4
So, 4 weeks go by and I am too busy to get some more games in. I am off on a family week holiday to a beachhouse about 90 minutes away and packing a few games to play just in case, and remember I have game 4 setup. Why not take it with me? I grab a document folder and put all the stuff in in and a few more forces if I can squeeze a couple more game in. 10 minutes later it is packed in the bag and ready to go. The remaining three games (games 4 to 6) were played at the beach house. Short version: went well, no issues, 25-30 minute games. A friend that went with us, not into gaming very much but knows of my habit, did think I was taking "miniature gaming" a bit too far! It never struck me before in all these years of testing but a game with toy soldiers on an A4 page may seem strange from the outside - and possibly from the inside as well!
 |
| The portable folder. |
 |
| The folder open. |
The terrain and dice are loose, the Grass mat is A4 size cut from a railway grass mat. The QRS is under it. The woods, markers and 6mm troops are in the small carry case (the case is about 2cm high). The whole thing is quite light and I could probably make up another carry case or two and have a lot more troop types and different nationalities at well.
Apologies for some of photos coming up
Lastly, the games were played at night and I used my phone camera rather than the digital camera I normally use. The phone camera is pretty good but occasionally lapses into yellow hues due to my poor positioning of the camera and not bothering to check what the picture looks like after I take it.
Game 4
Game 4 is another new scenario in the Kursk campaign.
Battle Description
The Germans need to take a cross roads to open up the path to a major town. It is defended by dug-in Russians.
Troops
Germans (veteran):
- 1 Company HQ squad
- 1 MMG
- 1 81mm Mortar
- 2 platoons of 3 squads
- 2 pioneer platoon of 2 squads
- 1 Tiger
- 2 Stugs
- 2 105mm artillery missions
- 1 Company HQ squad
- 2 45mm AT gun
- 1 MMG
- 1 81mm mortar
- 2 platoons of 3 squads
- 2 KV1S
- 1 122mm artillery mission
- 3 minefields – 2 real, one fake
- 2 barbed wires
Terrain
Russians setup in the top two rows, all are dug in. Germans enter on the lower row.
Farm LCover Wheat
Wheat LCover Clear
Wheat LCover Farm
Wheat LCover Wheat
Note: the corner farm surrounded by AT ditch that I represented by some hedges.
AT ditch – cannot be crossed by vehicles. Infantry can only move one square when crossing ditch. Fire crossing ditch against infantry target count target as in Light cover.
Victory
German victory is to control the Light Cover square next the the farm at the Russian edge, but need to ensure no enemy unsuppressed units are adjacent either.
Game Highlights
This game played out a bit differently as the Russians are regular and so have a reasonable chance of gaining two activations. In previous games they have been "green/poor" and only ever got one. Of course, in the previous games the Germans rolled consistently shockingly for activations and normally got one anyway! For this game, I only took a couple of pictures as I was so involved in playing. Sorry.
 |
| The German attackers |
 |
| Empty table, Russians setup on the right. Germans enter on the left with the objective to hold the centre square on the right edge. |
 |
| Early in the game, the Pioneers are in the centre to clear the wire and mines. Other Germans are approaching up the right flank. |
 |
| End game. The Germans do not have much left - what they have you can see at the left of the table. I rolled a force morale result and they retreated. The Russians are mostly still on the table. |
Verdict
Well, that was a shattering defeat for the Germans. Once again I have vastly underestimated how hard it is to attack dug in troops and also in hard cover. I am obviously not good at converting IABSM scenarios in my ww3x4 rules! I also think I did not really have a German plan - just winged it and should have focused on one flank. I am going to play this again but cut down on the Russian defenders. I also think having the 81mm mortars on the table just takes up extra room. In reality they would not be at the very front line. I will play them being just off table. It does not matter for the rules as it still requires a FO or the Co HQ to call in the fire - regardless of if they are on table or not. These mortars are battalion assets and so require 2 success on 3 dice (about 60%) to be called in.
It was also after this game I slightly modified calling in artillery. I did have a rule where if you failed to call, the next time you called you needs 1 less success (this was more to represent a successful call but unsuccessful registration). I got rid of this as I would have to remember something, or use a marker. The price of simplicity...or age!
Game 5
Game 5 is a repeat of game 4 but will reduced Russian defenders.
Battle Description
The Germans need to take a cross roads to open up the path to a major town. It is defended by dug-in Russians.
Troops
Germans (veteran):
- 1 Company HQ squad
- 1 MMG
- 1 81mm Mortar
- 2 platoons of 3 squads
- 2 pioneer platoon of 2 squads
- 1 Tiger
- 2 Stugs
- 2 105mm artillery missions
Russians (regular):
- 1 Company HQ squad
- 2 45mm AT gun
- 1 MMG
- 1 81mm mortar
- 2 platoons of 2 squads
- 1 KV1S
- 1 122mm artillery mission
- 3 minefields – 2 real, one fake
- 2 barbed wires
I have reduced the Russians by 2 squads and 1 KV-1S compared to game 4 forces.
Terrain
Russians setup in the top two rows, all are dug in. Germans enter on the lower row.
Farm LCover Wheat
Wheat LCover Clear
Wheat LCover Farm
Wheat LCover Wheat
Note: the corner farm surrounded by AT ditch that I represented by some hedges.
AT ditch – cannot be crossed by vehicles. Infantry can only move one square when crossing ditch. Fire crossing ditch against infantry target count target as in Light cover.
Victory
German victory is to control the Light Cover square next the the farm at the Russian edge, but need to ensure no enemy unsuppressed units are adjacent either.
Game Highlights
 |
| The German attackers (same as Game 4) |
 |
| Russian defenders, as per game 4 less two squads and a tank. |
 |
| Opening move with Pioneers coming on. |
 |
| Another early game shot with the Pioneers and some Gruppe on the table. |
The German plan is working! The Germans manage to get to the square in front of the Russian held farm and slowly chip away at the defenders. They are losing Gruppe in the process, but the Germans have more of them.
 |
| The Germans have managed to clear a lot of units from the farm (top right) but at a large cost to themselves. The crossroads is also clear. |
The plan worked - good use of a MMG firebase in the centre, actually having a plan and reducing the number of Russian defenders from the previous game. It felt a lot more balanced and they the Russians could have won this one.
 |
| End game - the Russians only have the Co HQ left (bottom right). |
A much more enjoyable game. A lot more balanced and I think I actually used tactics! A one stage someone looked over at me playing and said "Oh dear, something must be wrong" but it was me actually focusing on the game - I was very engrossed.
This game, and the previous one, took about 25 minutes each including setup. that is pretty good as I am aiming for a game that takes less than 30 minutes.
Game 6
Game 6 is another new scenario in the Kursk campaign.
Battle Description
Troops
Germans (veteran):
1 Company HQ squad
1 MMG
1 81mm Mortar (offtable)
2 platoons of 3 squads
2 pioneer platoon of 2 squads
3 PanzerIVD
3 Stugs
2 105mm artillery missions
Russians (regular):
1 Company HQ squad
2 76mm AT gun
1 MMG
1 81mm mortar (off table)
2 platoons of 2 squads
1 KV1S
1 122mm artillery mission
3 minefields – 2 real, one fake
2 barbed wires
KV1S is dug in and cannot move
Terrain
Russians setup in the top two rows, all are dug in. Germans enter on the lower row.
Wheat Farm Clear
Wheat Farm Wheat
Wheat Clear Wheat
LCover LCover LCover
Note: The two farms squares are protected by an AT ditch on two sides.
AT ditch – cannot be crossed by vehicles. Infantry can only move one square when crossing ditch. Fire crossing ditch against infantry target count target as in Light cover.
Victory
German victory is to control the Farm square on the Russian edge.
Game Highlights
 |
| The battlefield, Germans enter on the left, Russians setup on the right. |
 |
| The Russian defenders |
 |
| The German attackers |
The Germans have a plan - go up both flanks and then focus on taking over the centre farm from both sides. The German Pioneers enter first to find a path in the mine fields.
 |
| Pioneers enter the battle. |
Even with not many Russian defenders, the game is going like Game 4 - the Germans just cannot maintain enough stands on the table to mount a credible offense. dug in units are really hard to get rid of. Especially when you are trying to attack without much cover. I also over did the penetration values of the Russian 76mm by one dice. This may not sound like much, but it did mean they were like a knife through butter versus the German armour. I think the Panzers and Stugs would have made a much bigger difference if I had got this right. They would have stayed longer and supported the infantry; the latter desperately needing it.
 |
| Mid-game and the Germans are struggling to manage momentum. |
It was no use, it was all too much for the Germans - , the supersized 76mm, the lack of cover and the Pioneers only clearing one of the minefields. The Russians were good troops and the Germans never managed to stage a credible attack - they could chip away but the dug in, hard to hit defenders would just fire back. The Germans rolled for force morale and were ordered to retreat from the board.
 |
| End game - Russian victory! A couple of Russians defenders gone but the Germans never really had a chance. |
Verdict
My mistake - I have overpowered the Russian 76mm. If I was playing it again, I would also reduce the Russian defenders to 1 AT gun as well. The Germans may need another Zug to balance it out, or increase the artillery. The range of most stands is one and the Germans were being fired at while in no cover. In real life it would not have worked either.
Mid game I also changed slightly the way HE works - now all hits are distributed evenly across all the stands in a square rather than being able to select a stand for hits and then the other overspill. This means that HE will tend to suppress all units in a square before KOing them. In my rules for larger table, I let HE suppress a target automatically, but the squares cover a much larger area than in those rules so had not figured out how to do this, until now.
Overall Verdict after these last 6 games
Let's tick some boxes
Tank Commander the Card Game abandoned: tick!
20 year journey over: tick!
Fast game: tick!
One page QRS: tick!
Portable: tick!
Playable in a lunch break: tick (but untested)
Playable on a train: maybe - would have to think about magnetising some of it
Includes suppression: tick!
Includes hidden units: tick!
Feels like a company game with you as the CO: tick (my opinion of course!)
Tested: slight tick - only 1943 eastern front attack/defence
Counts towards 6x6 challenge for 2017: tick, and is 6 plays of one game - double tick
Rules link
The final version of the rules I used, WW3x4 Advancing Companies, are at this google drive link.
Some last bits of left over rules discussion
Close assault: One thing I did start work on but then abandoned was some close assault rules to represent fighting at less than 30m. This would only be for stands in melee and not on the first turn of melee. when melee occurs, one side (or both) could choose to close assault. If this occurred, each side would choose from Attack, Defend or Flexible and a simple matrix would give bonuses, or not to a side. e.g. if both sides chose attack, each side would roll 1 extra die for melee. It was just an added complication that I did not think would add to the rules and so never explored it much further.
Roads: Roads are absent. I really intended to add roads but on a A4 page putting on roads just got too tight a squeeze for terrain. If I had "terrain squares' I would think about putting road on the table. I have rules for roads that are not all that complex and have kept them in the rules as optional, just in case I ever decide to play again and want to use them!
The rules are unforgiving for attacking dug in attackers over open terrain. I really did not get this even in the 6th game. Partly that is because I was interpreting scenarios for different rulesets and trying to relate them to a 3x4 table. I need more work on doing this :-)
Final comment
A long standing side project is complete. I may go back and test the rules a little more, and maybe actually run a campaign book with them. For now, I am moving onto other things. I did enjoy playing these games but I still have to finalise my WW2 rules for 20mm company level games, 20mm skirmish games and 6mm 2'x2' company games. All require more testing so who knows when I will get back to ww2 3x4 - the proverbial wargamers dilemma of too many projects!


.jpg)


Shaun an excellent post and enjoyable read. The 4x3 is a useful format, especially if scaling a board up or down. I have just started to write some posts based around a 4 x 3 (and a half) foot board .... yes I know the half is odd, but that is just a table size thing, but I would never have thought about scaling that down to A4 size - good shout.
ReplyDeleteI wonder whether it would be worth helping the attacker a little by them being given 1 or more re-roll opportunities in a scenario against failed activations. Or a number of +1 opportunities that can be spent on the activation dice before they are rolled.
Great idea to combine the project into the 6x6 challenge, it's nice to live with playtesting for a while - at least long enough that the playtesting has a real chance to feed into the system.
Hello Norm,
Delete4x3 is a very convenient size for grids and scales up well to 8x6 and 12x9 grids which can be very useful for various rules.
I have tried to steer away form re-rolls in my rules as I usually play solo and I have found I forget about opportunities for re-rolls! i had this in my ancient rules and still have it there but it is a case of so the really good side get one re-roll opportunity in a game. And even then I forget :-(
Yes, it did dovetail nicely into the 6x6 challenge. I have 4-5 games planned originally 9back in 2014), but by extending it to 6, I managed to complete a sixth of the challenge.
Shaun,
ReplyDeleteExcellent post, thanks for sharing. I enjoyed the rules talk, had never heard of Tank Commander, but I particularly enjoyed the six-game mini-campaign, it was fantastic.
It's funny, the last few nights I've been hanging around the PicoArmor (3mm) website too much. I've been looking at doing some 1:1 company sized (tank only) fights on a 2' x 2' (or 3' x 2') board, but this has definitely got me thinking about company-sized, combined arms operations games.
I hadn't considered the small grid; it's kind of like Peter Pig's "PBI," a set of rules I've always admired. I think there's something to the smaller grid (in terms of overall number of squares) where you're not worried about micro-movement and micro-fire control, it's just 'this unit is firing from this area at that area.'
Cool stuff!
V/R,
Jack
I look at the 3mm stuff (and 2mm ancients stuff) about once per year. It is frightening how close I get to buying some, even though I don't need it (but *want* it).
Delete4x3 is a very small grid and it really lends itself to an "operational" view. I was surprised how much I actually enjoyed the game with only 12 squares. PBI is 8x8 and it quite tactical and different as you can move around a lot more. It played more like the normal games we are used to but you don't worry so much about rulers and LOS is much easier in PBI.
I was thinking of doing a skirmish with the 4x3 but could not figure it out - the smallest grid I could feasibly think a skirmish game (with 5-10 soldiers a side) could be played out on was 4x4 but more realistically 6x6. And I was looking for 4x3. But you have got me thinking as all your recent AARs, and Kyote's Vietnam discussion, has made me think about running a few skirmish games again...
Hi Shaun,
ReplyDeleteExcellent report! I did spot a statistical oddity in the rules.
Consider, each die rolls an average of 2/3 of a success per turn. So 3 dice will roll 6/3 or 2 successes on the average and will vacillate between 1 and 3 successes. 4 and 0 will be somewhat uncommon. Now for the odd bit. You say on 3 successes, Regulars and Veterans get two (2) actions. But, on a less likely result (4+) only Veterans get 2 actions. This seems backwards to me. I would think only Veterans get 2 actions on 3 successes and Veterans and regulars get 2 actions on 4 successes. This way, Veterans will get 2 actions more often than regulars. This still gives regulars a chance to get 2 actions but the chance would be unlikely. Or maybe I am missing something?
I'll be giving them a try soon. I already have my portable boards and terrain and even some painted 6mm armies.
John
With 3 dice, the chances of 3 successes is 20.4%, 4 or more successes is 13%. So yes, 4+ successes is more than 3. But I only wanted to give both Regular and Veterans a few more activations over Green, and Vets a bit more. So regulars gt two actions 20.4$ of the time and (3 successes), Veterans 33.4% of the time (3+ successes) So Veterans still get opportunity for actions than Regulars, but only 13% of the time (say 1 in every 8 rolls). It does not sound like much but I did not want to give Vets too much of an advantage in moves of Regulars. The important bit with Vets is they have a better chance to recover from suppression.
ReplyDeleteRegardless, if you think Vets should get more chances than this of two activations, then your options of swapping the 3 and 4+ successes works fine!
Shaun, I love the idea of this miniature game. I intend to give it a go at some stage. I am not usually a WW2 man but this is well worth the try. Thank you.
ReplyDeleteI've finally sat down and read the rules properly, and they look excellent. I'll have to get some models, or counters, from somewhere, and give them a go.
ReplyDeleteI have a couple of queries with regard to the Fire Values table though:
(i) Am I correct that the Infantry AT value is 0 if you are in melee only *unless* the target has an armour of 0 or 1, in which case it applies at a range of 1 as well? (This makes sense for normal infantry, but not for SMG infantry, who only have a range of zero anyway.
(ii) What do the two values (2/-1) under the 'Arm' column for LMG / vehicle MMG mean? Is it just a typo, with the '2' being a carry-over from the 'Inf' column?
(iii) Under MMG it says '1:0" -6" '. And under HMG there is something similar. What do those bits mean?
(iv) What does 'hit auto' next to 'Flame' mean?
Many thanks.
Wow - you read the rules!
ReplyDelete(i) You are correct. AT value of 0 in melee. If they have a range of 1 (not SMG infantry for example), then they have an AT value of 0 Versus vehicles with armour defence of 0 or 1 only.
(ii) It is an error carried over from the rules these are based on. LMG/Vehicle MMG should be -1.
(iii) Another hangover from the original rules. Should just read MMG or HMG - ignore the 0-6":1
(iv) another hangover (I really must double check tables when I re-purpose them!). Ignore the auto hit.
I have just updated the rules with these changes so if you click on the link in the blog post it should be new version.
Thank you!
Delete