Introduction
This is game 17 in replaying the scenarios from the Briton Publishers Operation Jupiter skirmish scenario book. Links to previous games are on this blog page.
Rules used
My own rules. I have scaled up my rules for 6mm on 2’x2’ table to play on half a table tennis table with 20mm figures.
Scenario
The British force has six turns to secure the woods, The woods are secure when over 50% of the Germans are KO or routed.
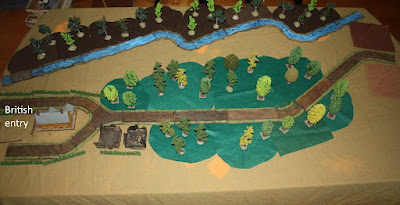 |
| Battlefield |
Note
the terrain is fairly basic – I don’t have all my terrain boxes easily to hand
so this is a subset. My terrain
collection is just average anyway but this game is played on the sparse side
and make do.
 |
| British |
British
1
Company HQ
6 figures
2 Universal Carriers
3
Platoons
1 platoon HQ (1 figure)
1 2" mortar
3 Sections (3 figures each)
4
Churchill VII
2
3” mortars
British
are all regular
 |
| German defenders |
1
Kompanie HQ
3 figures
1
Zug
1 Zug HQ (1 figure)
3 Gruppe (3 figures each)
1
MG42 team
1
Pak40 ATG
1
Tiger I
1
80mm mortar
3
Fire missions of 80mm mortar
The German infantry begins hidden in the woods, split them fairly evenly. The Pak 40 and MG42 are dug-in anywhere east of the river. I put the Pak40 at the rear as it has a long range and has a good line of sight to anything comng down the right flank. The MMG is placed closer to the farm so can harass any enemy infantry at a better range than they can return fire.
The
Tiger I must begin on the southwest slope.
It is covering tanks coming down the left flank.
The
British enter on turn 1 from the north edge of the board, west of the river.
The British have six turns to secure the woods. The woods are secure when >50%
of the German infantry is destroyed.
 |
| German deployment |
 |
| View from the British side |
Game
All Germans start on overwatch and all the British move on with the second platoon down the road. It is good to get 20mm figures out to play a company level game after what seems like forever (only earlier this year and they have been out for a few skirmish games).
 |
| Second platoon advancing |
Now the British bring on the rest of the infantry, except the company HQ
 |
| The three British platoons |
No rooms for tanks - the Churchills
will have to come in later
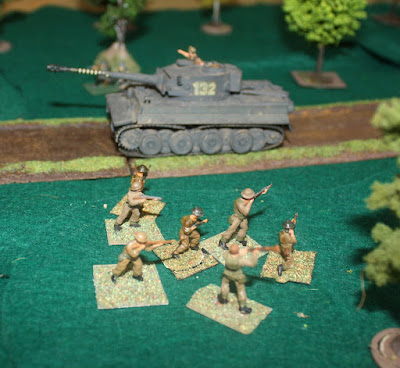
Might as well open up with the German
machine gun to see how my new rules work in action. Two shots, oh, actually 3 shots. I figure
KO. 3 figures – 1 section so a KO
represents a permanent loss of firepower due to many reasons but summed up as
“KO”.
 |
| Machine gun firing at the British |
So now I put the machine gun card back
in the deck as it is no longer on overwatch.
As it is the second turn I need to start drawing cards. With the first British activation I firstly check
second platoon’s morale. Pinned. So the
whole platoon can't move but they can fire.
The second platoon fire back at
the machine gun. The machine gun has
lost a figure and is suppressed. Not
unexpected with a whole platoon firing at them.
Conveniently, the German Machine gun is over 18” from the second platoon
so the British are firing at -1, while the machine gun, with superior range,
has not negative range modifier.
The first platoon moves next to the
house.
And this is where I remember the
Germans have a Commander that can call in some mortar support. I put take the Company HQ off overwatch and
try and call in fire on the third Platoon (the the one coming up to British
right flank. Success! The rounds land on the first two sections and
are suppressed.
The German machine gun recover from suppression
but that's all they can do this activation.
The British activate the 3rd platoon
firstly check morale because they have a section suppressed, They are Ok and
suppression removed.
Maybe I should bring on the Churchills.
 |
| The state of the British after turn to and some fire |
The 75mm PAK opens up on a Churchill as
the range suits the PAK.
With the Churchill’s armour I would
have needed a 6 to KO the Churchill. The PaK rolled a 6. 1 Churchill down
 |
| Long shot at the tank |
The Tiger does the same thing at
another Churchill –it's a long shot at the front Churchill and the Tiger misses
completely.
 |
| The Tiger fires but misses |
2nd platoon checked morale (forgot to earlier) and is still pinned.
(new turn)
Germans get the first activation and the machine gun fires any complete misses the second platoon. The British return fire and do nothing. The range is past effective range for the British sections and so will only inflict any result on a 6.
The British Platoon on the road moves to the right side of the woods
The German Commander calls fire on the
troops still on the road and suppresses the 2” mortar.
 |
| Third platoon nearly in the woods |
The Tiger fires at the Churchill again
and manages to damage it. The first platoon
continues to advance on the right flank. Still not close enough to see the Germans.
 |
| Advancing British not quite close enough to spot the Germans. |
(new turn)
Get the Churchills away from the Tiger!
 |
| Churchills hiding in the road in the woods. |
The German MG fires again at 2nd
platoon but does nothing.
The first platoon continues into the
right flank woods. The suppressed 2” mortar
routs.
And finally the first platoon moves
into contact with some Germans in the woods
 |
| A meeting in the woods |
The Germans lose two figures, the British three.
The first platoon also contacts Germans
on the left side of the woods.
| Contact in the left side of the woods. |
The Tiger continues up the road.
 |
| Tiger coming to the Churchills |
 |
| Overview of the game so far |
The German commander calls down mortar
fire on the British on the left side of the woods and KOs one figure and
suppresses another section.
 |
| Mortar rounds in the woods |
The platoons that have lost figures will need to check morale when they are activated. Could be bad for the Brits.
The Tiger moves and fires. Lucky rolls see it damage the lead Churchill
that is already damaged, so it is destroyed.
And blocking the woods road.
 |
| Lead Churchill destroyed. |
 |
| The Tiger Vs the Churchill |
Finally, the second platoon is unpinned
and can move next turn. They fire a the MG and suppress it. Shortly after the MG recovers!
 |
| 2nd platoon Vs the MG |
The 1st platoon - on the left side of the woods - is now unsuppressed. Mortar fire rains down on them and they are suppressed again, and lose another figure. They have lost their CO and also now down to less than 50%, so morale will be interesting next turn. Luckily they never end up having to test morale.
The Tiger moves up to support the
infantry
 |
| Tiger helping the infantry defined the woods. |
Churchills have no choice but to go
around the blocking wreck to get at the Tiger.
 |
| Churchills on the move |
I keep forgetting to mention it but the MG and the PaK with HE keep the second platoon from moving.
The Tiger is whittling down the first
platoon (left woods). Not much of them
left now.
 |
| The much reduced first platoon |
The third platoon (right woods) gets an
activation and manages to rout the remaining figure and continue the advance
 |
| Third platoon overcomes the enemy and advances |
Third platoon continues to advance into
the German Zug command and wipes them out.
 |
| 3rd platoon in combat with the German Zug command group. |
The Germans only have one Gruppe left in the woods and so retire.
Something I thought of a lot earlier is
that the British CO should have come on and used the off table mortars on the
German MG nest. Ah well.
 |
| End game |
 |
| British losses |
 |
| German loses |
 |
| Victorious brits in the shadow of the Tiger |
Rules Changes
I will try without the Joker – units get suppressed and cannot do anything in the turn they get activated and pass a morale check. Also, with a Joker in the deck, the side activates those units that do not need a morale check (or more likely to pass) and so the badly shot up unit never gets to check morale so just sits there. I get the Joker represents to vagaries of time and distance in a battle. In my previous rules all units checked morale on the Joker. Or all units got to activate in a turn and so all checked morale. So I am going back to random unit activation via cards but no sudden end of turn.
Verdict
I thought the game would go fairly easy – the British just enter the woods and fight the Germans. 2nd platoon getting pinned by the MG put all the plans into awry. And it was not simple to remove the Germans. They have the advantage in the woods and the German mortar was very annoying. A good game that ended up being much closer than I thought it would be.


.jpg)


Plenty of action and nice to see the 20mm get an outing …. Especially the Churchills, though the ‘kill rings’ on the Tiger barrel must have unnerved them.
ReplyDeleteA few years ago, I did a card activation system and put 2 end of turn cards in the deck, so that it wasn’t so random based on just one end of turn card being drawn - both had to be drawn. It has the effect of smoothing out each turn and players start each turn confident that it will not abruptly end, though once the first ‘end of turn’ card is drawn, that confidence goes.
Thanks Norm.
DeleteIt was great to get some 20mm non-skirmish gaming on the table after what seemed like years.
I have heard of the two joker system before but have not had the time to test it out. For the way my rules work, I think it will be fine for everyone to have a chance to activate as pinning and suppression results should stop all units having a go.
Oh, and when I acquired the Tiger (back in 1981) it had the kill rings painted on it already.
For the life of me, I can’t paint rings on gun barrels and can’t paint those twisting lines that go down medieval lances, that look like a barbers lamp.
DeleteI tried painting kill rings once and failed miserably. Never tried lances either - that sounds impossible for me!
DeleteTry scale model pin striping tape. Comes in a variety of widths.
DeleteHello Dale,
DeleteWhere were you 40 years ago when I was trying to paint kill rings :-)
An interesting game report and good to see the 20mm miniatures.
ReplyDeleteThanks Peter. I was glad to get the 20mm WW2 out. My favourite WW2 scale.
DeleteGreat report, thanks, and nice to see some proper plastic figures in action.
ReplyDeleteI'm not a huge fan of end of Turn card mechanics. It is fine for solo play but for opposed games it can lead to very abrupt changes which don't support the game narrative. Norms solution is an interesting idea to smooth it out though.
Most of the plastic is over 40 years old being form the late 70s or 1980. In fact, most of my British and half of my Germans date from this time!
DeletePlaying solo most of the time, I did use to like the Joker mechanism. But as I replied to Norm, I think my rules will work fine without a sudden end of turn.
Ah, that sort of game takes me back to being a kid and playing with Airfix and Matchbox soldiers and tanks:). A nice scenario and some interesting mechanics re: the Joker. Let's hope these get time on the table again soon.
ReplyDeleteThanks Steve. I started playing 20mm WW2 back in 1979 (14yo) and still use most of the same kit and at least half the terrain dates from that time. I may be able to get them out again on the table soon as I have a few weeks holiday at the moment.
DeleteI did not know about the Final Combat skirmish scenario books. The Skirmish Elite series is really for a lot more figures for me to consider it "skirmish", but I will have to give one of these a go. 75 scenarios in the Arnhem book! Too bad I have no Red Devils.
ReplyDeleteI agree they are not really skirmish, more "mass skirmish". Both the Arnhem and Operation Jupiter scenarios have on average about 30-40 figures + support for an attacking side (i.e. about a platoon). Some of the actions have been bathtubbed and there are exceptions such as a 1 Vs 3 battle.
DeleteI have had the Arnhem book for a while and bought some painted 20mm Red Devils years ago to play them. But at the rate I am getting through the Operation Jupiter games it may be a long while before the paras see action!