Tuesday 15 January 2019

Battle of White Tunis 310BC using Ancient Battelines Clash

Introduction
This is game 32 in play testing my ancient rules by replaying historical battles.  The latest version of ‘Ancient Battlelines Clash’ is on its own blog page. I am play testing the rules by replaying all the Peter Sides scenarios from his Historical Battles books. However, I sometimes play some battles not in the books. The Battle of White Tunis in one of them and is from Phil Sabin's Lost Battles. ABC is designed to finish in under an hour on a 2'x2' table.  This is the first time I am using version 3 of the rules, these have undergone some changes from version 2 (last updated and played in late 2016).  Version 3 has been posted to the ABC rules page.

Battle of White Tunis
Syracuse was besieged by Carthage. Rather than fight the besiegers, the Tyrant of Syracuse, Agathocles, led an army into Libya. The Carthaginians chose two rivals - Hanno and Bomilcar - to lead the army to attack Agathocles.

Very little on the internet but here is an article of interest:

Wikipedia article 

I used the Lost Battles information for this scenario.

Troops

Carthaginians

Carthaginians (Hanno and Bomilcar)
2 Chariots, Medium chariots
1 Heavy Cavalry, Medium cavalry, low fortitude
1 Sacred Band, Heavy infantry, phalanx, high fortitude, some missile protection
3 Foot Troops, Heavy infantry
3 Poor Foot troops, Heavy infantry, low fortitude
2 Skirmishers, Skirmish infantry, short missile
1 General with Sacred Band

Breakpoint:10

Syracusans (Agathocles)

Syracusans

1 Veterans, Heavy infantry, phalanx, high fortitude, some missile protection
4 Hoplites, Heavy infantry, phalanx, some missile protection
2 Allied infantry, Heavy infantry
2 Gallic allies, Heavy infantry, warband
1 Peltasts, Medium infantry
2 Skirmishers, Skirmish infantry, short or long missile
1 General with Veterans
Army Command ability +1 to reflect both Agathocles and the poor showing of Hanno and Bomilcar.

Breakpoint: 10

Deployment
Deployment:

Deployment

The Game
The Carthaginians advance but the lone Medium Chariot on the left does not move (fails movement role for being a single unit and so far away from the leader).

Syracusans advances all along the line.

Both sides advance.

The Chariot and Cavalry on the Carthaginian left flank charge into the Syracusan allied warbands.

First combat on the Carthaginian right flank.
The screening skirmisher infantry fire and retreat, the Carthaginian cavalry is pushed back and disordered.  The warband opposite the chariot charges (this was actually a good move on the Chariots side as It stopped within the Warband zone of control and forces the warband to charge out from it supporting units and be single unit.  A single unit is -1 in melee).  In the subsequent melee both units are disordered.

First melee sees a skirmisher lost and a few disorders (grey javelins).

The Carthaginian left flank chariot moves.  The opposing Syracusan right flank does not move – it may be better to stay on the defensive here,  the Chariot may win Vs the Peltasts and the allied infantry are a good deterrent for the end of the main Carthaginian line.

The Syracusan  battleline advances and clears the lone skirmisher.  The Hoplite opposing the skirmisher continue into the main Carthaginian line.  The rest of the Syracusan hoplites moved as far as they could but just not into contact.  However they still maintain contact with the lone meleeing hoplite so it is not a single unit.

Centre lines nearly in contact - one Syracusan hoplite is in melee on the left.

The result is all units in melee are disordered.

The Syracusan Veterans charge into the Carthaginian Skirmishers in front of Sacred Band and the adjacent Syracusan warband moves into the heavy cavalry.

The Carthaginian right flank sees more contacts and all disordered. At the top the two leader units are about to enter melee.
Results:
The Veterans Vs Sacred Band - both disordered.
Warband Vs Cavalry – Warband disordered, the cavalry stays disordered
Warband Vs Chariot - Warband disordered, chariot stays disordered.

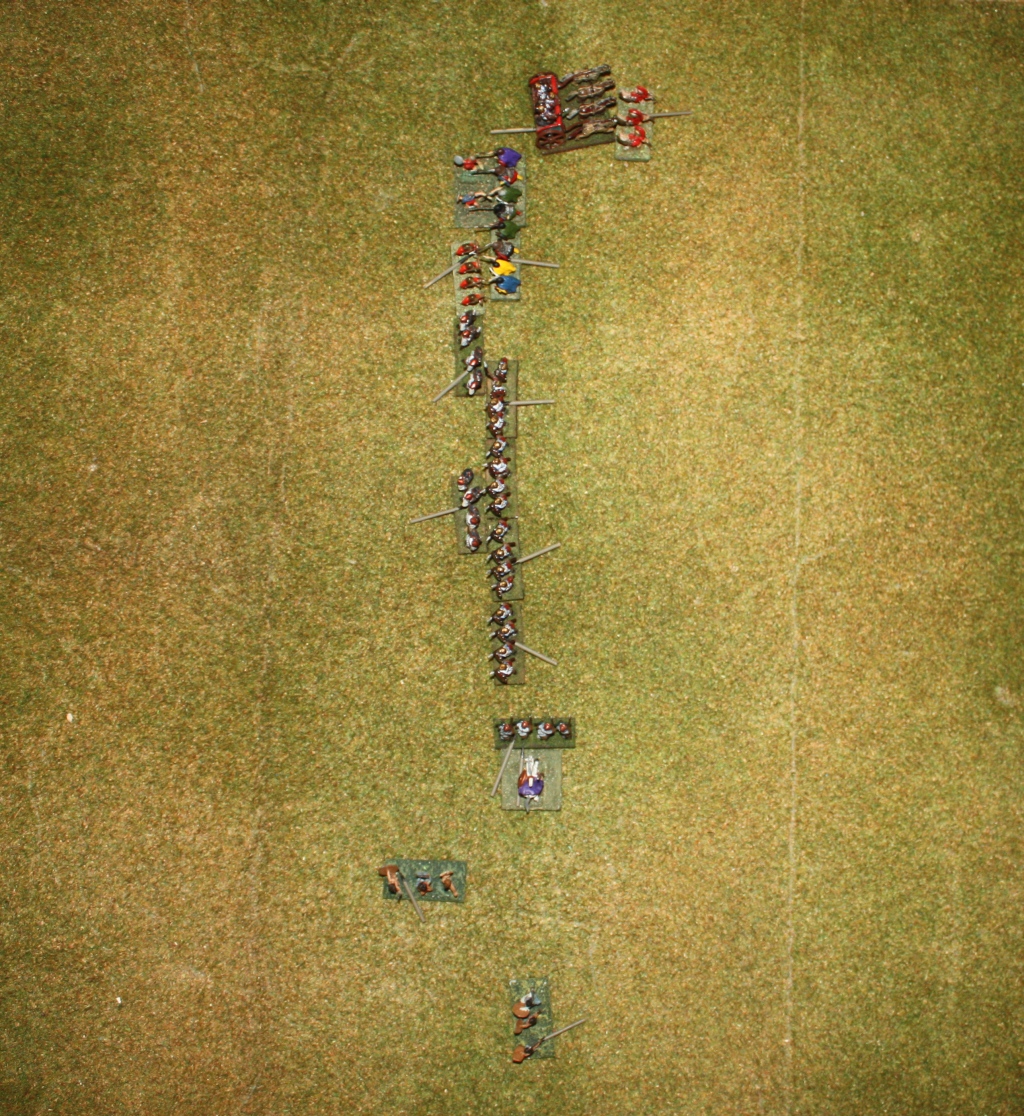
Overview at mid game.

The Carthaginian turn sees no change along the line.  They don’t charge in the centre as the Syracusan battleline is better.  The Carthaginian left flank chariot does advance a bit to be able to charge the Syracusan peltasts next turn.

Syracusan hoplites charge the centre line.  A Carthaginian low fortitude heavy infantry is routed.  Bad news also for the Syracusan Veterans as they are routed, along with Agathocles.  A blow to history.  It was inevitable with the way I had set it up as Agathocles ended up being at a disadvantage for being a single unit.  There was a 1 in 6 chance of being routed.  To make up for this the Syracusan warband routs the Carthaginian heavy cavalry.


Battlelines clash and is quite a bloody turn.  Carthaginians lose a heavy infantry and cavalry, Syracusans lose the Veterans and Agathocles.

The Carthaginian main leader wheels to flank the Syracusan infantry next turn.  Another heavy infantry unit lost to the Carthaginians.  The Carthaginian left flank chariot charges the Syracusan peltasts and both are disordered. The Syracusan Allied infantry charges into the tail end of the battleline.  Both units in the resulting melee are disordered.


The Syracusan right flank infantry charges the opposing allied infantry.

Another Carthaginian low fortitude heavy infantry unit lost. And then the Carthaginian chariot loses its battle with the Syracusan Warband. The Carthaginian side  reaches their breakpoint and loses the battle.  Victory to Syracuse.


The Syracusan left flank has a few warbands. The Sacred Band is ready to flank the Syracusan heavy infantry line but is thwarted when they lose another heavy infantry and reach their breakpoint.

Overview at the end of the game.

Verdict
Two years is a long time but I really enjoyed the game.  My solo mojo, lost for the last year or so, may be coming back. Maybe not and maybe it has just been so long it was like a fresh game!  Anyway the new rules went very smoothly.  The biggest change from the previous version to this one is that both units are adversely affected on a 0-1 or a 6-7 on the die roll (previously  just one side is depleted; now one side is depleted, the other is disordered).  This  came about due to the fact that disorder is -1 on the die roll – if a side was disordered and not the other, the -1 was a huge advantage and meant the disordered side was unlikely to ever win, if though the odds at the start were the same.

Minor rules change (back to old rules for victory)
Other things I have to reflect on is I have changed the the 6 turn limit for victory conditions -  this is now optional. The 6 turns and victory point calculation was the default with an option for a quicker game for simply when breakpoint is reached.  This breakpoint rule was the only victory conditions in the previous rules.  I have reinstated the breakpoint reached as the default and optionally the victory points calculation.  I prefer the breakpoints and it also guarantees a winner.  The 6 turn limit and victory points is still good for games in a campaign (which is where it came from – I was using the other rules in a campaign game).

Saturday 12 January 2019

Battle of Heraclea 280BC using an combination of Ancient Battlelines Clash and when Warriors Collide

Introduction
This is game 31 (take 2) in play testing my ancient rules by replaying historical battles.  The latest version of ‘Ancient Battlelines Clash’ is on its own blog page. I am play testing the rules by replaying all the Peter Sides scenarios from his Historical Battles books.  ABC is designed to finish in around 30 minutes on a 2'x2' table.

I actually played this battle a year before this post (about January 2018 I think).  I had the draft post without the images ready to go and have forgotten all about it! Anyway,originally this was not a battle I was going to play.  I played the battler in late 2017 using a new homegrown set - When Warriors Collide (based on my grid-based rules but without grids). But I did yet another pivot with my rules.  The rules are a mashup of all the good bits of the Ancient Battlelines Clash (ABC) revised with some concepts from Warriors Collide.  The ABC rules changed a lot or a little and the intention was to move forwards with these rules as the new version of Ancient Battlelines Clash.  But after playing one game the concept was good but the rules were not as solo friendly as Ancient Battlelines Clash.  Mainly a lot of the reactions and movement was deterministic (not rolled for) and so the unpredictability was gone.  So while a OK ruleset, not for me.

The mashup of Ancient Battlelines Clash and When Warriors Collide (for interest)
When Warriors Collide (WWC) was mashup of applying Ancient Battlelines Clash concepts to Bill Banks Ancients (BBA). So the troop types align to BBA, combat was based on force ratios and rolling multiple dice.  I still think the rules have value but I strayed to far from where I wanted to take Ancient Battlelines Clash. I reread some secondary sources and looked closely about what I still thought needed improvement in ABC, most of which was in WWC. Hopefully it reduces some of the dice rolling where it was adding little value, but still just as mush decision making and just as much randomness - important for solo play.  It should also be faster!  The rules changes in ABC are:
  • Movement is like WWC where a unit can only face one of four directions.
  • Gone is rolling for orders - army is split into three divisions and one move/rally per division.
  • Combat is streamlined with less modifiers.  It is still 1d6 but now shock and flank attacks are built into the results (get 6+ for a shock/flank attack and defender routs).  And also results of defender depletion also cause disorder for the attacker.
  • Disorder is no longer a negative modifier to many of the tests (only melee)
  • Phalanx rules have been modified to make them less fragile when disordered.
  • Peltast-type infantry now have short missile ability,
  • Reaction to charging and missile fire are automatic rather than rolled for.  This also allowed for a streamlined missile system and a fire contest to occur immediately rather than do a two misses duel first (this last bit was from WWC).  It is also harder to rout units just by missiles
  • Victory is not when you break the enemy, although it will likely; there are victory points for breaking enemy, routing enemy leader, looting camp, having units left on the table at the end of 6 turns.
I have written up these rules and have posted them for historical purposes.  The automatic reactions and not rolling for movement I did not like as mush as I thought but did incorporate some changes from When Warriors Collide into Ancient Battlelines Clash to create a new version that is  mostly the same as ABC v2.5 but has some streamlining.  Expect to see the new ABC version 3 rules posted in 2019 followed by some games with the new version.

Battle of Heraclea
Pyrrhus comes to Italy to assist the Greek cities their against the Roman aggressors.  For more detail on the battle and the units see this blog post I did prior to my replays: Heraclea deployment and background.

Troops
Pyrrhus

Pyrrhic army


1 Agema, Medium Cavalry, high fortitude, impetuous
1 Elephant, Elephant
1 Hoplites, Heavy Infantry, phalanx, some MP (missile protection)
3 Phalangites, Heavy Infantry, phalanx
1 Hydaspists, Heavy Infantry, phalanx, high fortitude
1 Peltasts, Medium Infantry, short missile
1 Light cavalry, Skirmish Cavalry, short missile
2 Skirmishers, Skirmish Infantry
1 Leader with the Agema

Breakpoint: 8

Romans
The Romans


2 Cavalry, Medium Cavalry
4 Leves, Skirmish Infantry
4 Hastati/Principes, Heavy Infantry, line relief, some MP (missile protection)
2 Triarii, Heavy Infantry, high fortitude, drilled
1 Light Infantry, Medium Infantry, short missile
1 Light cavalry, Skirmish Cavalry, short missile
1 Leader with one of the legions

Breakpoint: 9

Deployment
As per Heraclea deployment and background

Deployment - Pyrrhus to the left, Romans on the right

The Game
Both centre battlelines advance.  The Elephant and the Agema advance but not too far so they do not have to charge the Roman cavalry.  The skirmish and light cavalry of each side advance but not to within missile range.

Both centres advance, as does most of the flanks. Roman cavalry bottom right does not move as they are outclassed on that flank.

Pyrrhic infantry battleline advances slightly to bring skirmishers into range, but not the phalangites.  On The Roman's turn, the skirmishers fire - all Pyrrhic skirmishers gone, one Roman Leves lost.

Centre infantry is close and the skirmisher screens interact with the Pyrrhic skirmishers gone and one Roman Leves lost.

Pyrrhic line advances into the levies - all retire but do disorder one opposing pike unit.  The pikes and legions clash.  Orders phalanxes are +1 (disordered get no bonus so a disordered phalanx has same combat value as a legion).  To lucky rolls see two legions retreat and all are disordered (change in rules - previously only defender would be disordered on a roll of 6).  The hoplites and a pike unit pursue (another change - pursuit is automatic for heavy infantry).  In the subsequent melee the hoplites are routed.  The other two melees see all four combatants disordered.  The Hydaspists cannot move - they already did this turn.  In hindsight maybe should have moved them into melee.

Battlelines clash, Pyrrhic hoplites routed.

The Elephant and Pyrrhus move as far as they can.  Should have really done this last turn, I am forgetting that there is a time limit in these games now!  Roman cavalry do not react.

The Elephants and Pyrrhus advance..

In the centre, a roman legion is destroyed and the opposing phalanx advances.  Hypaspists advance and rout the opposing legion and are themselves disordered. They also pursue.

Two more Roman legions lost in the centre. 

The Romans advance the Triarii towards to now open right centreline.  Triarii are drilled so may wheel and move. A phalangite is routed (far left).

On the left a  Phalangite unit is routed.  The Triarii, bottom right, is coming to help on the right.

The elephant and Pyrrhus slam into the Roman Cavalry. Pyrrhus rolls a 6 and forces the roman Cavalry to retreat with no adverse effect to the Agema.  Pyrrhus pursues and rolls another 6 for melee and routs the opposing cavalry. Very lucky with both rolls.  Pyrrhus pursues nearly off the edge.  Meanwhile, the elephant forces the opposing cavalry to become disordered and they retreat; the elephant fails to pursue.

One Roman cavalry unit routs off the field of battle; the other retreats from battling the elephant.

The lone centre battleline phalangite that has been hanging back manages to rejoin the main battleline.  The Triarii wheel and advance into the line.  The heavy infantry line is looking like a proper battleline again. The resulting combat was not decisive for any side - all units were disordered but no routs.

Triarii join the line and battle continues along the centre heavy infantry clash.  The resulting combat saw all units disordered. 
Last turn Pyrrhus was not disordered.  This will help do a complex move, but the Agema heavy cavalry simply does not have the movement capability to be able to wheel sufficiently large and then charge the remaining Roman cavalry.   So, as the next best option, the Elephant does instead.

... and rolls a 1 for melee; anything else would have routed the roman cavalry.

The elephant have a 5 in 6 chance of routing the Roman Cavalry.  It rolled the 1 in 6 result!

In the centre battleline a Pyrrhic phalangite is lost.

A Pyrrhic phalangite is lost. in the centre.

The game now lasts 6 turns.  It is the end of turn 6 and the last die roll of the game is the roman cavalry melee with the Elephant - the cavalry rolls badly and routs.  Elephant does pursue this time.

The game is a draw - neither side panicked (reached their breakpoint) and neither side has lost two times the units of the other.

End game - Pyrrhic units on the left of the white line, Romans on the right.

Verdict
I like the rules, even after one game.  The reactions system flowed faster as it no longer needs dice rolls, phalanxes are not so easily defeated and the revised combat table (where if one side is depleted, the other will tend to be disordered) seems to better balance battleline clashes.  Less modifiers also helps.
But it is a step too far - some of the rules changes I liked, but the rolls in reactions helped with solo play by adding in some uncertainty.
I have revised Ancient Battlelines Clash into version 3 with some minor changes to fix some of the niggling issues I had with the existing rules that led me to create this mashup of rules. So not wasted as helped me shape what ABC version 3 should be. I am hoping to post the ABC Version 3 rules in 2019 and play some games.

Sunday 6 January 2019

WW2 6mm gaming on a 24cmx24cm gridded table - a full game battle report

Introduction
I have been testing out some WW2 grid based rules to play on a 24cm x 24cm table with some 6mm bases.  The journey on why I created these rules and some initial testing is in this blog post.
This post is a full battle report using the latest rules that are available here.

Note: The Scenario and Troop section are identical to that in the previous blog post so if coming from there just skip to the Game section.

Scenario
It is not historical and I came up with it quite quickly. I decided it would be 1943 and I would have a road with a village defended by the Germans.  And some wheatfields.  This is what ended up as the battlefield.  There are not really hedges in Russia so even though they are hedges on the table, think of them as some sort of cover – ditches, rocks etc.
Each square is about 30mx30m so the whole board is 360mx360m.

Setup - Russians attacking from the left, Germans defending on the right.
Objective: Soviets need to clear the village of Germans.

Troops
Germans (Regular)
1 MMG team
1 Gruppe with Zug leader
2 Gruppe

Soviets (Regular)
1 HQ squad (with leader)
1 MMG team (Maxim)
5 Squads

The Germans have the edge in command structure but morale wise they are equivalent.

The Game
This time I am going to focus on the middle and right flank to push through and hopefully take out the village from that side.  The plan starts off well with 2 activations for the Russians so advance all the bases in the centre and the right flank.

Moving up the centre and right flank Russians.

Whenever one side gets activations the other side then gets to activate.  In this case the MMG spots the advancing centre sections and fires. The MG fires misses them entirely (zero successes on 2 dice and also on the 1 die at the adjacent section).

German MG fires at the advancing Russians for no effect whatsoever.

A random event sees a Russian sniper line up a German section (snipers are 2 dice rolled against a random base).  And misses....
The Russians activate again and move up the units on the left flank.  They spot the guarding German Gruppe and fire and pin it.  Pinning means the unit can either half-move OR fire at closest target until rallied.
The Russians are going to attempt to apply pressure everywhere and then focus their efforts on where a weakness is exposed.

Left flank platoon (of two sections) advances and pins the defending Gruppe at top right.

The Germans get an activation and fire again with the MG.  This time they manage to pin the central advancing MG.

The Russian MG is pinned (brown marker)..

The Russians put the pressure on the left flank Gruppe, but all they do it continue to pin it.

Russian left flank continues to pin the defender.

The Russians also activate their pinned MG and fire on the Zug HQ Gruppe in the building, suppressing them.  Suppression means no firing or moving until rallied, and rallying from suppression carries a small chance of routing.

The Russian MG manages to suppress the Zug HQ Gruppe (green marker = suppression).

The Germans return fire with the MG and destroy the Russian MG! First kill to the Germans.

The Russian is destroyed. 

Germans activate again and successfully rally the HQ Gruppe.  Germans losses: 0 Russian losses 1.  but it is about to get interesting...

German HQ section rallied.

The Russians activate two sections (including the HQ section) on the right flank and charge the German Gruppe in the woods.  The German section does not get to fire back as the Russians charge in - the Russians are known units and the Germans should have fired at them when activated if they wanted to stop them!  Anyway, the close combat results in a tie so all units are locked in melee (Germans rolled two dice and Russians three and all dice showed zero successes).  An activation is needed to perform another close combat, there is no specific "close combat phase" each turn.

Right flank Russian sections charge the German Gruppe in the woods.

The following German activation sees the MG continue to focus on the centre Russian sections, pinning them both.

German MG pins both centre Russian sections, the melee from the previous activation can be seen at the top right.
The Russians activate the close combat and rout the opposing Gruppe.  Winners can advance 2 squares and do so - straight into close combat with an occupied house of the village.  It is a tie and so locked in melee.

Note: I forgot, but the winner of close combat is supposed to lose a base to represent casualties..  I did not do this and so the Russians had both their sections available for the close combat on the house when it should have been one left for the advance. 


Russians win the melee with the Germans in the woods and then advance into melee with the Germans in the village.

The German MG continues its unrelenting firing on the centre sections.  Nothing like someone with focus!  Another Russian section is routed.

Another Russian section routed by German MG fire.
The Germans get an activation..Cannot activate the same base twice in a row so fire at the Russian units advancing on the other flank and routs one (about a 1 in 7 chance)

The forgotten flank sees one Russian section routed.

A random event sees a German base activate as a Veteran unit.  The random base happens to be the one that just fired.  It fires again.  Acting as a Vet it gets one more dice to roll that is enough to rout the other, and last, Russian section on that flank.  That flank is clear, the centre is nearly free of Russians and it is only on the Russian right flank they are making a bit of progress.  Things are not really looking great for the Russians.

...followed shortly after by the other one.

The Russians continue with the close combat in the village. It was not to be (at least for the Russians).  They only just lost and are forced to retreat 2 squares and are suppressed.  Note: one Russian section should have been routed but forgot this rule too.  Surprising I cannot remember the close combat rules about winners and losers removing a base - my close combat rules have been unchanged for 6 years and are lifted from Take Cover!! that I used to play for 10 years prior to that! 

Russians lose the melee in the village and retreat suppressed (the green marker = suppression)

The German HQ, fresh from victory in the close combat can advance 2 squares which they do to enter into close combat with the Russian section with the Company leader.  They are successful.  They decide not to advance as they would be close to the other suppressed unit and their luck may not hold out to another close combat.


German HQ Gruppe advances and successfully routs the Russian  section and leader in close combat. 


This is an example of a close combat roll - top is the 3 white dice for the Germans (1 for the section, 1 for charging, 1 for leader) Vs 1 red dice for the Russians (1 for base, 1 for leader, -1 suppressed).  The dice are a special order arranged by the author of the Goal System series of rules..
The Russians have lost over 50% of their bases and so need to check force morale.  They roll 2 dice instead of 3 as the overall force commander is lost. They roll 2 successes means all units are pinned and must also all retreat 2 squares.  I call the game at this time as a win for the Germans - the Russians are not going to really be able to take the village with the couple of sections remaining.

Russian force morale roll

Verdict
That was very fast, the whole game was about 5 turns.  For these games with only a small number of bases on each side, I am finding the dice based activation quite good (after tweaking it 4 times over 5 games!), at least compared to my favourite of card based activation.  I think for these rules I will keep using the dice based activation and leave the card based to games with more bases/figures.
I know at the end of the last post on the rules I was talking about going 8x8 etc. but during the last week I am inspired to not only get back to my 15mm ancient games, but also play a few more of these 12x12 WW2 gridded games with these rules.  On Friday I spent my lunchtime modifying my half-baked company battle generation spreadsheet (based on Platoon Forward).  It hangs together just and will now generate some games for East Front for these rules.  So hopefully you will see a few more battle reports based on these rules.