Thursday, 20 October 2011

Heraclea replay with Justified Ancients

Background
My next ruleset I was going to try replaying Heraclea with was Crusader Ancient Rules.  But I haven't finished reading and digesting them.  So, I am going to give Justified Ancients a go.  With the last replay I did for Callinicum with JA, I still wasn't sure I liked them.  But I have been musing over them for the last year and think I have a plan.
  
The slight changes
Rather than changing the game wholesale,  I will play Justified Ancients with most of the John Davis House rules and the following minor amendments.  Note I am collecting these into a document that I will publish soon.
  • Single units are -1 to the orders roll. the -1 can be avoided by ordering a group.  A group is one or more units that are in edge to edge contact. Groups are defined when rolling for orders. I discussed this in the comments in the Callinicum replay.  Author does not mind this.
  • Any unit with one or more adjacent friendly units (non-skirmishers in edge contact beside or behind it and not contacted) gets +1 for melee.  Only +1, even with 2 or 3 adjacent.  This seems OK by the author. Note: after this game I do not recommend this rule.  After re-reading the rules, units don't have to line up corner-to-corner (they do have to line up edge to edge) and so two units can melee with one unit While this is not the same as +1, it does give more of a chance of a poor result..
  • Each unit/group does its entire turn before moving onto the next group - so do orders, move, missile, melee for each group.  This was also a suggestion from the author.
  • A unit that charges but does not contact the target due to a push back from missile fire is not fatigued.  It is deemed not to have charged as it did not get into contact.  Non-pushed backed units that charge a unit that evades or flees are fatigued.  I found in the games I played that cavalry would charge units that then fired at them as a reaction with a 30%-50% chance they were pushed back.  Because the cavalry charged, they were fatigued.  Next turn, they cannot charge (due to being fatigued) and then were fired at again with a possible pushback, and then fatigue removed at the end of that turn.  It is only the turn after (2 turns later) they have a chance to charge again, with a 30%-50% chance of being pushed back again.  The change I am proposing means they can have another go at charging the turn after, rather than waiting another turn.
  • Units are either trained or untrained.  There is no third training level between trained and untrained.
  • The largest change is around charging - The Charging combat bonus is only for Mounted (cavalry and chariot) charging any foot; and the bonus is +2, not +1.  This is to give cavalry the impact charge against infantry.  Otherwise, I assume that charged units would countercharge if it to their benefit. Also, Berserkers, for the same reason, get +2 to charge against infantry only.
  • Any Vs skirmishers is +2, not +1 as in John's changes.  I really think skirmishers should be fragile.  And on that note: Skirmisher foot take only one depletion before being destroyed.
  • I will use John's experimental rules than any winning side that wins by 2 or more and charged must pursue.
  • In the rules, the base depths for all but chariots are 2cm (Chariots are 6cm).  So when the rules say to be pushed back a base depth, I will do 1" (as the rest of the rules are in inches), except Chariots and Elephants will be 2".
  • Skirmisher and LO infantry javelins will have a range of 1".  This will allow skirmishers to actually have a chance to damage opposing units, otherwise they - enemy units - just sit there and do nothing. 
  • Lastly, there are no breakoff rules, so while John's house rules have a skirmisher can evade as a normal move on an order roll 1+, ANY unit can flee (with all the downsides of a flee) on a order roll a 3+.
 
Troops
 
Romans
4 Leves: Trained Skirmish light infantry, javelin
4 Hastati/Principes: CO Trained Heavy Infantry, javelin
2 Triarii: CO Trained Heavy Infantry, high morale
1 Light Infantry: LO Untrained Light Infantry, javelin
2 Heavy Cavalry: LO Trained Heavy Cavalry
1 Light Cavalry: Trained Skirmish light cavalry, javelin
1 General with +0 order bonus
CO = Close Order
LO = Loose Order
 
Epirot
1 Hypaspist: CO Trained medium infantry, phalanx, high morale
3 Pikemen: CO Trained medium infantry, phalanx
1 Hoplite:CO Trained heavy infantry, phalanx
1 Light Infantry: LO Untrained Light Infantry, javelin
1 Skirmisher:Untrained Skirmisher infantry, bow
1 Slingers: Untrained Skirmisher infantry, sling (treat as bow)
1 Agema: LO Trained Heavy Cavalry, high morale
1 Light cavalry: Trained Skirmish light cavalry, javelin
1 Elephant: Elephant.
1 General with +1 order bonus
  
Deployment
See deployment description and here is a photo:
 
Deployment - Epirot on left, Romans on the right.
 
Turn 1
Roman and Epirot moved forwards, the Triarii veering to their left, based on experience with other Heraclea replays games where the Roman Heavy Cavalry is destroyed and leaves the Roman flank open.

Turn 2
Leves attack the Epirot Skirmishers that evade.  The elephant and Agema slowly make there way down the flank.  Strange to use slow moving units after all the recent rules with really long move distances.

Leves - one is pushed back from Epirot missile fire
    
Turn 3

Leves move and throw javelins at the phalanx and disorder two of them (6 required and got two of them out of four rolls).  Note in the original rules, the Leves would have been useless here, as skirmishers can only receive and fire (i.e, wait for the phalanx to advance).  But there is no reason for the phalanx to advance.  But now there IS a reason for the phalanx to advance - to get rid of annoying skirmishers that can disorder them.
Phalanx advance and skirmishers evade and are fatigued (fatigue lasts a turn and basically prevents the fatigued unit from fleeing if contacted again).  I chose not to reform and remove the disorder form the phalanx as the Skirmishers will just keep disordering them....

The centre just before battlelines meet (green bush indicates fatigue)

 
Turn 4
Romans Charge.  Note that pila uses the same rules as a javelin in these rules and can only be used defensively. I make an executive decision and let it be used on a charge.  Disorders the Hypaspists. Now a phalanx unit Vs a legionary unit is at the advantage with +1 combat; a disordered phalanx Vs a legionary unit has the legionary at an advantage with +1 to the legionary.
Hypaspist flee, Legionaries pursues into contact.  Note that Legionary won by 2 so must pursue (this is one of John Davis' experimental houses rules that I am using - and liking).  All the other battles end in a tie (given the chance of a ties was only about 30% for each battle, this was a little unusual).

The first melee in the centre - brown markers are disorders


Agema and Elephant charge the Roman Heavy Cavalry.

Agema and Elephant Vs the Roman heavy cavalry

 
Elephants disperses (JA term for destroys) its opponent and must pursue.  Agema cause opponent to flee, which is does - off the board!  The Agema must pursue as it won by two, which mean Pyrrhus goes too.  So an immediate rule change - units with generals do not have to pursue.
 
Turn 5
Triarii charge the Agema in the flank.

Triarii charge the Agema with general


Triarii are at +2 for combat (this includes the +1 for supporting unit as there are two Triarii units) and cause the Agema to flee.  Fleeing is directly away from the attacker, which causes the Agema to flee off the board.  Ok, Pyrrhus is gone this time.  So how does this effect order rolls.  I will make all rolls at -3 (as though the general was 24" away).  I later found an old JA forum post that I like better - replace with a general with one lower command rating.

Hypaspists flee and are destroyed. Next in line Legionary unit flees through Leves.  I used John's rule that interpenetrating Skirmishers cause the Skirmishers to be depleted.  And I only allow skirmishers one depletion before dispersion.  So the two Leves the Legionary units flees through are dispersed.  Phalanx pursue and cause it to disperse.

Centre.  Pike on right pursued the Legionary that dispersed two Leves.

 
Turn 6
Not much of a turn for the Romans - managed to get the Triarii to face the Elephant that charged and pushed the Triarii back.
Elephant vs Triarii
 
A Legionary fleed from a Phalanx, that then pursued and then destroyed the Legionary unit.

The centre - the pike of the right have broken through.
 
The Roman general attached itself to a Legionary unit and manged to make its opposing phalanx flee.

Legionaries with General pursuing a pike block
    
Turn 7
The general and legionary unit manage to destroy the opposing phalanx.
The Epirot has reached their breakpoint so the game is over.  It was close.  The Romans had to lose just one more unit to reach their breakpoint.
 
End game.
   
Verdict
I really like these rules. I was not sure after the Callinicum replay, but after a couple of tweaks on the combat modifiers, particularly the charging ones, I am very happy with these rules.  The other changed factor that nailed it is executing the entire sequence of play for one unit at a time.  Oh, and making skirmish foot more fragile.  These are great rules.  So much fun, I am in the process of setting up Heraclea for another game with Justified Ancients.

Friday, 7 October 2011

Rally Round the King battle report - Hittite Vs Egyptians

Introduction
I am testing out my own fast play rules with chariots.  But Rally Round the King (RRtK) is very solo-friendly and so I thought I would give them a run through with some chariot-armies as I have not done so before.
 
Rule changes
When I first discovered Warrior Kings (RRtK predecessor) about three years go, and after a couple of games, I went crazy on documenting rule modifications for a 2'x2' board - an extra Armour Class, longbows, crossbows, disorder for complex moves, longer bow ranges, skirmishers with javelins, changed point calculation.  I never played them.  Then RRtK came out.  Good stuff.  I have played a few games with RRtK.  But naturally I cannot stop tinkering so for this game, I have a few changes - just my view of what I want to play, not saying they are right or wrong:
  • Play is on 2'x2' board.
  • Armies are 300pts.
  • MISSILE damage is 1+d6 for 3 figures, 2+1d6 for 4 figures, skirmishers are 1d6-1. 
  • Reduced movement rate slightly to account for smaller board.
  • Don't use the undisciplined attribute.
  • Extend bow ranges slightly (sort-of offsetting reduced damage) and included skirmisher javelins
  • Units do not have to line up (as per Warrior Kings).
  • Introduced a breakpoint for army loss that will trigger "leader lost" morale check each subsequent turn.
But the rest is unchanged.
 
Troops
I used slightly modified Warrior Kings army lists.
 
New Kingdom Egyptians
5 Light Chariots, Mounted Missile (bow), REP5, AC3, 1 figure
1 Guards, Foot Melee, REP5, AC5, 4 figs
4 Spearmen, Foot Melee, REP4, AC3, 4 figs
3 Archers, Foot Missile (bow), REP4, AC3, 4 figs
3 Nubians, Foot Skirmisher (bow), REP4, AC3, 2 figs
 
NKE's deployed
   
Hittites
3 Heavy Chariots, Mounted Melee, Dual (javelin), REP5, AC5, 1 figure
5 Light Chariots, Mounted Missile (bow), REP5, AC3, 1 fig
1 Guards, Foot Melee, REP5, AC3, 4 figs
2 Spearmen, Foot Melee, REP4, AC3, 4 figs
3 Skirmisher, Foot Skirmisher (bow), REP4, AC3, 2 figs

Hittite's deployed
 
Deployment
 
At deployment.  Only terrain is a gentle hill in Hittite centre.

Strategy
Hittites: Charge in the centre with the Heavy Chariots. Mop up what is left with the spearmen.  Hold the flanks.  Having no reserve is leaving a lot to chance.
Egyptians: Hold the centre and hopefully win out there.  Advance on the left flank in support of the spearmen.  Hold the right flank.
 

Game
Hittites are the attacker and full speed ahead with the heavy chariots and spearmen body to the chariots left, hoping to break the centre. The Egyptians focus on the flanks, thinking their centre should hold.

The Hittite chariots get into range of the skirmish archers protecting the Egyptian Spearmen. Could be ugly.

Chariots charge the Spearmen and Skirmishers

The skirmishers took a beating, but so did the heavy chariots.  The skirmishers dice were on fire!  By making the chariots DUAL-ARMED, the chariots did not charge in, but just fired back.  This proved dire when the Skirmishers finally routed, but the heavy chariots had two points of damage each.  The Egyptian Spearmen charged in and received fire (where a Chariot counter-charge would have been better, but then, making them DUAL maybe reflects their use better - heavier more mobile version of the light chariots - heavier 'shock' chariots were later on) and received no damage, but a pass of one dice meant they did receive a point of damage anyway.

Middle chariot retires, other two rout.  For the spearmen, the middle (with leader) halts with no pursuit and the others rout (pass 1 dice in melee with mounted).

Post combat, lots missing!  Rings are hits.

The Egyptian Light Chariots on their left flank come off worse for wear against the opposing Hittite Light Chariots.

Hittite Light Chariots - they did very well in the missile exchange.

The Egyptian Archers managed to strip off the skirmishers from the advancing Hittite spearmen but the latter are getting close.

Hittite Spearmen face off against the Egyptian Archers (the green guy indicates the leader's stand)


So, at the end of Hittite turn two, we have a battlefield that looks a bit like this:

Overview - note each black ring is a hit.

This is what I like about RRtK - you have a plan, point it at the enemy and hope.  The reaction tests keep you interested, and nothing is certain.  And fast.  It certainly captures the chaos of battle as I envisage it.

Hittite Light Chariots on the right flank clean up the opposing Light Chariot, and reach the lone Light Chariot.

A single Egyptian Light chariot faces double the number of Hittites.
 

The Hittite Spearmen charge the Archers and enter melee with 3 hits.  In melee, both sides inflict another few hits on one another, but missile units are fragile and will rout if they do not pass both dice for the reaction test.  They fail and rout.  The Hittite Spearmen only pass one die and get another hit.  They are in bad shape - 5 hits!
  
Hittite Spearmen - note the stack of hits behind them.
  
So, under my house rules, 50% of the troops have been lost and so they undertake a "leader lost".  All the Missile (Chariots) rout.  While the Egyptians are left with only 3 Spearmen, all of these are relatively unharmed.  Compare this to the Hittites who heavy units average 5 hits a unit. But with fast moving missile units (light chariots) Vs slower spears, it is likely one-sided.

Near the end.  The Egyptian units are the Spears at the top and single unit in the centre.

And so I did fight it to the bitter end.  The Hittites also suffered some losses with there own "leader lost" check but eventually the chariot mobile missile platforms picked off the remaining Egyptian spearmen.  In reality, and especially in a campaign game, one side would have retired from the field earlier than this.

Game end: the only (and all) Hittite units left.

Verdict
A fun game, as always with Rally round the King.  Very solo friendly.  Not too predictable.  And a great historical feel.  I am sorely tempted to setup for a re-match.

Thursday, 22 September 2011

Heraclea replay with The Age of Might and Steel (AoMaS)

Background
I've have previously tried a fantasy set - Fantasy Rules! - to replay a historical battle (Callinicum) under 1 hour on a 2'x2' board and it worked well.  The Age of Might and Steel (AoMaS) is a ruleset I bought awhile ago to also do a historical refight.  I was over Callinicum before I got around to AoMaS. I am now doing Heraclea and AoMaS is the fourth set I will try.

Resources
AoMaS can be acquired here.  Here is a short review, and another one. There is a quiet yahoo group.


Options for  Troops
AoMaS has units that are comprised of 5-12 stands.  Stands are 40mm wide.  For heavy units, stands must be roughly arranged in a square for each unit.  Stands are removed as casualties.  And while there are light and heavy versions of units, it is the size of the unit that makes a difference, there are no veteran/green units.  On a 2'x2' board and with the different troops types in the game, 5-12 stands per unit are a bit much.  There is a combat penalty for units with less than 5 stands.  So I could go with either:
  1. smaller units for the troops like the cavalry and the light infantry and leave the heavy infantry alone as 5-12 stands.
  2. assume all stands are 2-stands and use casualty marker to indicate 1 'stand' loss.  This would make it hard to implement 9 stand units that are 3x3 stands but would help with reducing the scale of the game as a heavy infantry moved 5".
I was almost going to go with option 2.  It helps scale the game down onto a 2'x2' table: reducing the scale of stands by 2 (each stand represents 2 AoMaS stands), and reducing movement distances by 2.5 by converting inches to centimetres.  But I went option 1 as it will be a much faster game, and no changes to the rules, other than some units will start with less than 5 stands.

Troop Definitions
 

Romans
Leves: 1 unit of 4 Light Foot stands
Hastati/Principes: 2 units each of 6 Heavy Foot stands
Triarii: 1 unit of 6 Heavy Foot stands
Light Infantry: 1 unit of 4 Medium Foot stands
Heavy Cavalry: 1 unit of 4 Heavy Cavalry stands
Light Cavalry: 1 unit of 4 Light Cavalry stands
 
Epirot
Hypaspist: 1 unit of 6 Heavy Infantry stands with Pikes
Pikemen and Hoplites: 1 unit each of 9 Heavy Infantry with Pikes
Light Infantry: 1 unit of 4 Medium Foot stands
Skirmisher and Slingers: 1 unit of 4 Archer stands
Agema:  1 unit of 4 Heavy Cavalry stands
Light Cavalry: 1 unit of 4 Light Cavalry stands
Elephant: 1 Special Stand Monster - Elephant (attached to Agema)

Notes
To reflect the pila, the Hastati and Principes units can do one ranged volley before a melee, similar to  medium foot.
I made the Epirot skirmishers Archers so they could volley, as they were archers and slingers while the Leves had javelins.
Pikes I am treating like halberds (+1 to melee if defending).
 
I vacillated between a) making all the "heavy infantry" Medium Foot and the peltasts Light Foot and b) making all the "heavy infantry" Heavy Foot and the peltasts Medium Foot.  I went with b) in the end but either way would work.

Lastly, I am using WRG/DBM-type basing which has a different number of figures to a base than recommended in the rules.  I am not going to re-base.  

A note on resolving combat
While combat seems straightforward (it takes up one page in total), it is possibly confusing.  I am not saying my way is the right way.  The issue is that the attacker base number is used to determine casualties for BOTH sides.  The base number is a default 2, but is modified by comparing the weight of unit (e.g. heavy foot Vs light foot is -2) and a list of modifiers (e.g. charging -1).  Straightforward but I've come across two unclear results:
1. The rules state attacker will lose 1 or 2 stands based on the base number.  Base number can be anything from 0 upwards so when does the attacker lose 1 and when do they lose 2? or can they lose more or less (determined by base number?).
How I am playing it: Attacker always will lose 1 stand.  If base number is 2 or more and 2 or more is rolled, attacker will lose 2 stands.
 
2. The rules state that if the modifiers cause the die roll to be less than 0, neither side loses any stands.  However, for melee, there is only 1 dice roll modifier (hero adds +1 to roll).  So it is impossible to modify the die roll down to 0 or less.  But maybe the answer is in ranged combat.  Ranged combat has both base number modifiers and die roll modifiers and it uses the melee page to work out results, so for ranged combat, it is possible for the die roll to go to 0, but then the attacker never loses any stands in ranged combat, so the rule that neither side loses stands still is unclear.
How I am playing it: assume comment applies to ranged combat.

I have looked at all related posts in the yahoo group.  How to resolve combat and losses - my two questions - have come up three times, never with a clear answer. So a fourth attempt is unlikely to have more success.  Actually, the answer on 1-2 stands for attacker loss was answered as no more than 2, and then in a different much later post it was answered as it can be as high as the base number.  Aarrgghhh. It  does shows I am not the only one that is unclear on the rules. I'm playing the game as I described above.  If someone authoritatively posts some examples of how melee combat should work, that would be great so the the game can be played as designed, rather than as interpretation.  I do like my interpretation though!

Lastly, as I am using only a few units in a small space and half of them start with less than 5 stands, I will make the combat (hand to hand and ranged) modifier only +1 IF less than 5 stands, rather than +1 PER stand less than 5.  Otherwise I will be left with a small units not wanting to attack. 
 
Deployment
Deployment is very similar to my standard deployment, except the flank units are one unit wider, and all units are deeper.  I've used about 3 times as many figures as in the other replays!

Deployment

  
Turn 1
To reflect the advantage of the Romans, they will go first.
 
Romans
Orders are as follows:
Heavy Cavalry: Stand
Light Infantry: Charge (to get to the Epirot light archers)
Light Infantry, Light Cavalry, Leves and other Heavy Infantry:  March.

Activation is 2+ for the Light Infantry, Light Cavalry, Leves and other Heavy Infantry as the General is within 12"and gives a +1 bonus to the roll.  The Light Cavalry fail their activation and retreat and are Disorganised.

All that move, move (heavy foot move 5").  The Leves contact the archers (light foot charging is 12")

Archer Defensive Ranged Combat: 3 +1 (for only 4 stands) =4.  Roll a 2.  No effect.

Hand to Hand combat, Leves vs Archers: 2 +1 (for only 4 stands) -1 unit charging +1 archers defending = 3.  Rolled a 1.  Leves lose 1 stand.

Leves battle the Epirot "archers"


Epirot
Orders:
Agema: Charge
Archers: Attack
Others: Stand
 
Activation is automatic for the Agema (Pyrrhus attached gives +2).
 
The Agema charge (can charge up to 15") into the Roman Heavy Cavalry and conduct Hand to Hand: 2 (base) -1 unit charging -1 cavalry charging =0.  Rolled a 2.  Epirot loses 1 stand.  Romans lose 2.

Agema and Elephants versus Roman Heavy Cavalry

Archers attack: 2  +1 (4 stands) =3.  Rolled a 2.  Epirot removes 2 stands.

Note: I may be doing melee wrong but I am following what I can glean from the rules and the yahoo group.  I am assuming the attacker will always lose 1 or 2 stands. It may not be right, but it feels right!

End of turn 1


Turn 2
 
Roman
Orders are as follows:
Heavy Cavalry, Leves: Attack
Light Infantry: Stand
Light Cavalry: March.
All Heavy Infantry:  March.

Light cavalry passes activation, is no longer disorganised and moves straight ahead.
Both the Hastati Principes Heavy Infantry units failed activation.  Result is both do not move.
 

Hastati/Principes with Triarii and General to the rear


The Heavy cavalry attack: 2 +1 less than 5 stands +1 attacker outnumbered 2:1 = 4 base number. rolled a 2.  Heavy cavalry unit destroyed. Not unexpected.
 
Leves attack: 2 + 1 less than 5 stands =3 base.  Rolled a 1.  1 Leves lost.

Note: Although the rules do not state it, I am assuming you have to attack if in contact with an enemy unit.
 
Epirot

Orders:
Agema: Charge (with a charge distance of 15, I am going to wheel and hit the Heavy Infantry)
Archers: Attack
Others: Stand
  
Agema pass activation, wheel and charge into the Hastati/Principes.  They are disorganised so give a -1 for melee so chose to charge them rather than the Triarii.
 
Archers melee: 2 +1 less than 5 stands +1 archers defending = 4. rolled a 5.  1 Leves gone.  Also 2 archers.  So the archers unit is gone, and the Leves is only 1 stand strong.  A unit with only one stand is considered destroyed and the last stand is removed too.  So, no more Leves.
 
Agema melee: 2 -1 charging -1 defender disorganised -1 cavalry charging +1 less than 5 stands -1 outflanked  = -2 which translates to a 0.  Rolls a 1 +1 hero attached = 2.  2 Hastati gone, 1 Agema.

The Hastati have javelins that are thrown when charged.  But I am playing that they cannot do this if flank charged.

Agema flank charges the Hastati


Turn 3

Romans

Orders are as follows:

Light Infantry: Charge (gets a -1 for charge and go for broke)
Light Cavalry: Charge (gets -2 for charge - go for broke)

Contacted Heavy Infantry:  Attack
Triarii: Charge (will wheel and charge Agema)
Other Heavy Infantry March.

All passed activation.


The battleground after the Roman move


Epirot Light Cavalry Javelin throw: 3 +1 less than 5 stands = 4. rolled a 1.  One Roman cavalry gone.
Epirot Light Infantry Javelin throw: 3 +1 less than 5 stands =4.  rolled a 4.  One Roman Light infantry gone.
 
Light Cavalry Vs Light Cavalry: 2 +1 less than 5 stands -1 charging -1 cavalry charging = 1. rolled a 6 so all Epirot Light cavalry gone and 1 roman cavalry gone.
Light Infantry Vs Light Infantry: 2 +1 less than 5 stands -1 charging =2.  Rolled a 2 +1 hero attached =3.  So 1 Epirot Light infantry gone and 2 Romans gone.  Note that this leaves one stand left for the Romans so that is destroyed too (as the Leves earlier).  No more Roman Light Infantry.

Similar combats, but so different the results!
 
Triarii Vs Agema: 2 -1 charging -1 defender outnumbered 2:1 =0.  Rolled a 5 +1 hero =6. 1 Triarii destroyed and all Agema, and the Elephant, destroyed.

Combat is fast.  Faster than I thought it would be.  And a good thing.  I like it.

Overview after Roman combat - lots of missing Epirot
  
Epirot
Orders:
Hoplite and Pikes: Charge (they can just make it)
Hypaspists: Charge
Light Infantry: Charge (the Light Cavalry)
 
All passed activation.

Hastati pila throw Vs Hoplite and Pike: 3 +1 less than 5 stands =4.  rolled a 2 -1 heavy infantry target.  No effect.

Hastati pila throw Vs Hypaspists: 3.   rolled a 5 -1 heavy infantry target =4.  1 Hypaspist destroyed.


Hoplites and Pikes Vs Hastati and Principes: 2 -1 defender outnumbered 2:1 -1 charging = 0. rolled a 5 +1 hero =6.  1 Hoplite/pike gone.  All Hastati and Principes of the unit gone.
Hypaspists Vs the other Hastati/Principes: 2 -1 charging =1.  Rolled a 6! +1 hero = 7.  1 Hypaspist destroyed and 6 (all of them) Hastati and Principes gone.  Unit destroyed.
Light infantry Vs Light Cavalry: 2 -1 charging +1 less than 5 stands (Light Cavalry is not classed as flanked as there is not more attacking stands behind the flank as in front) = 2.  Rolled a 2.  2 Light Infantry destroyed that then leaves 1 in the unit, so unit is destroyed.

 
After Epirot move and combat


Turn 4

Roman
Orders:
Light Cavalry: Charge
Triarii: Charge

All pass activation check.

Light Cavalry Vs Hypaspists: 2 -1 charging -1 cavalry charging -1 defender outflanked +1 less than 5 stands +1 outnumbered 2:1 (I am going to rules that defender with pikes does not count for flanking attacks) = 1. rolled a 1.  1 Light Cavalry destroyed that leaves one left, so unit is destroyed.
Triarii Vs Pikes: 2 -1 charging +1 less than 5 stands (only front two rows count for this, but all stands are counted to see if outnumbered) +1 defender using pikes =3.  Rolled a 1 +1 hero.  But makes no difference.  Triarii loses 2 stands.
 

Triarii battle the pike phalanx (Triarii lose)


I will just move straight to the return attack and then finish the game:
Pike Vs Triarii: 2 -1 defender outnumbered 2:1 =1. rolled a 2 +1 hero =3.  Triarii loses 2, Pike loses 1.  the Triarii is down to one stand and so the entire unit is destroyed.
  
Epirot wins - no Roman units on the table.

At the end of the game these are the only two units (both Epirot) left


Verdict
A great game.  Plays well on a 2'x2' board under one hour.  Needs a lot of figures.  Of course, it would play better on the larger table sizes it is designed for.  It does not really have a historical feel but that is more due to the constraints of the table size rather than the rules.  With more room and larger units it would certainly have a more historical feel -in my opinion of what historical feel is of course.  I was concerned that playing with units with less than 5 stands - there is simply not room on the flanks for more stands - would be an issue.  But I think the rules tweak of only penalising for less than 5 stands rather than for each stand less than 5 worked.  I would certainly not use this rules change for larger games as all units would start with more than 5 stands.  some combat examples would help but I liked my interpretation (naturally!).  Definitely favours aggressive play due to the -1 for charging and a -1 when rolling for hand to hand combat is significant - less stand loss, and a much increased chance of destroying enemy stands.  For a quick game, this is a good thing.  On a 2'x2' table, I would prefer less figures.  I like differentiation of troops morale/fortitude being a die modifier rather than more or less stands (which is how it would be represented in AoMaS).  Again, that is just my preference.  Regardless, these rules fit the bill of fast play ancients on a 2'x2' table.

Saturday, 27 August 2011

Mighty Armies Ancients AAR - Greeks Vs Persians

Background
Andy (andyfb at TMP) came over for a game of MAA (Mighty Armies Ancients).  I have played it solo twice before refighting Callinicum and Zama.  Andy had the rules for about a week.  Andy used his excellently painted Xyston Greeks and I fielded some ebay acquired Early Archaemenid Persian.
 
Troops
From memory:
 
Greeks - 15 units: 1 Hoplite General 7 Seasoned Hoplites, 4 Peltasts, 2 Thessalian Light Cavalry and 1 Heavy Cavalry.
Persians - 16 units: 1 Infantry General, 1 Immortal, 3 Sparabara, 5 Subject Foot, 2 Heavy Cavalry and 2 Scythian horse archers.
 
Setup
So, first thing - setting up terrain.  How does that work?  I don't know - Zama and Callinicum had no terrain!  To the rules: OK, set up 2 pieces each.  So we both set up 2 hills on the flanks.  Ok, deployment.  I don't know either - I've only used historical deployment.  To the rules again - dice to see who deploys first, and then dice again to see who moves first.  Andy setup first and I moved first.  This poor die rolling was just the start for Andy.

Deployment, Greeks at the top
 
We used the rules from the forum (and I used in the other games) where combat is all the front rank fighting value and rear rank support value (not primary fighter FV and all others support).  Other things quickly decided on where the rules were unclear was that the start and end 90 degree turn allowed in movement does not subtract from  the movement rate.  And reading the rules seemed that whole groups had to line up - not  just at a unit level, but we decided to play the way I have in previous games where you line up only contacted units in a group, which means possibly not all units in a group get to fight.
 

Andy's hoplites.  Slightly blurred which is a shame as they are excellent.  There is a close up of some of the figures later.
 
Note: After a turn, I realised that all the Persian front rank units, except the heavy cavalry and the general, all have shooting.  While it was not my original intent to do so, this gave a lot of shooting attacks and played a significant part of the game.
 
The Game

The Scythians were on the Persian right flank, moved up for shooting opportunities,  No hits.  Greeks responded by charging them with a heavy and light cavalry. Javelins got one horse archers, and combat took out the other one.  Loses: Greeks 0; Persians 2. After one turn.  Combat is fast.  That is one of the fun parts of MAA - in combat, at least one unit will always be destroyed.
  
The happy Greek cavalry after destroying 2 Scythian horse archers.  The red die is indicative of Andy's rolling during the game

Andy had cleared the Greek left flank, but never rolled enough PIPs to exploit it.  Meanwhile, I managed to destroy a Thessalian Light Cavalry with the Persian Heavy Cavalry.  The last thing the Heavy Cavalry did in the Game!  I was thinking of charging the Peltasts on the hill.  There is nothing about differentiating terrain types so we decide all terrain is difficult.  Note: looking at the new fantasy MA reference sheet, I believe hills would not be classed as difficult, just blocking LOS.  The odds were not greatly in my favour.
 
Meanwhile, with poor PIPs, Andy slowly moves the Hoplites forward.  As they do, I snipe at them with all my shooting, killing about 2 Hoplites, one from each group, over 3 turns. Note: leftover PIPS can be used for commands.  One command allows you to add 1 to a units shooting.  I did this a lot - going from a 6+ to hit to a 5+ is doubling the chance of a kill.


Looking across the Persian infantry at the (slowly) advancing Hoplites.
 
3 Hoplites made it to my Persian infantry 6-unit group and the group lost, turned 180 and moved back.  I then turned them around again next turn.  This was my 'soaker' group, to take a bit of punishment over a few turns.  What I forgot it each time it is driven back, it retreats 3".  And it was only 5" from the table edge.  Should have moved them up a bit. But they ended up not being driven back again (luckily).

Meanwhile, the remaining cavalry was lining up with more Hoplites to charge my general and immortals.  So I pre-emptively charged and destroyed a Greek heavy cavalry.  The light cavalry ran to the flank.
 

The General and Immortals charge the Greek Heavy Cavalry.

The Hoplites that forced the general the soaker group  to retreat charged in again but lost.

The two remaining Hoplites charge the large Persian infantry unit (and lose)

I also managed to shoot and destroy another three hoplites over the next two turns.  The Greeks were now at their break point - 8 units lost - and the Persians claimed victory.  The Greek General holds the centre (by himself though!).


At game end. Note Persian blue die and Greek red one.

Verdict
A very enjoyable game and great company. Thanks Andy.  We were in the rulebook a few times but to be expected for a first game.  Shooting is more powerful than Andy or I expected, especially with the command to increase the shooting chance. Andy only lost 5 Greek units to shooting, and 3 to combat. Persians lost 3 by combat as there was no missiles, other than Javelins, on the Greek side. I note - a day after the game on the just released reference sheet - the new Fantasy Mighty Armies has reduced the chance to hit for shooting.  Andy's clearing a flank worked well, but was hard to exploit due to poor PIPs. In hindsight he believed he should have move faster with the Hoplites in the centre to reduce opportunities for shooting; or alternatively use the Peltasts to screen the Hoplites from shooting.  My soaker 6-unit group actually worked as planned. Most combats were a foregone conclusion (or just about) as to who would win. I think the game play may have lasted an hour including rules discussions.  But cannot really be sure as we chatted during the game as well.

Wednesday, 10 August 2011

WW2 battle report - Russia 1941 Izdeshkovo (Take Cover)

Introduction
I've collected a lot of WW2 6mm miniatures over the last couple of years with the intention of playing some games on a 2'x2' table (I have little room or time at present).  So this is my first attempt at playing a game on that scale on a small board.

Rules used
I am using Take Cover (see review of this Rapid Fire like game) as the rules, but with slight streamlining of some processes -I estimate it ended up around 25% faster.  I am going with 1 20mm figure = 1 6mm base.  Hopefully I can fine tune the rules over more games.

Scenario
I had just flocked some hills so wanted a scenario with hills.  I chose Scenario 1: Izdeshkovo from Robert Avery's IABSM Vyazma or Bust Eastern Front campaign book, available at the Too Fat Lardies website.  I've modified it to work with a battalion level game like Take Cover/Rapid Fire so no Big Men, and some special rules not used (e.g. Ammo shortage). A platoon in the scenario becomes a company in Take Cover.


Russian Forces
Battalion HQ
   1 rifle base
1st Company
   10 rifle bases
Support Company
   1 MMG base
   1 81mm base
AT Platoon
   4 45mm/L46 AT guns
   4 trucks
Armour Company
   1 KV-1
   3 T-26
Artillery Support:
   3 missions of 4x120mm mortar


Russians forces

Note that crew served weapons (MMGs, mortars, AT Guns) can take two hits (was three in original Take Cover), I have represented an MMG unit as two MMGs, and the other units have a extra crew base with them to remove as a casualty.  I was going to just use 1 hit, but hope to re-use these rules with 20mm figures that have crew based with them.

German Forces
Battalion HQ
   4 Rifle bases
   1 Truck
   1 Horsch car
1st Company
   8 rifle bases
   1 PzB39 ATR
   3 SdKfz 251
2nd Company
   8 rifle bases
   1 PzB39 ATR
   3 Trucks
Support Company
   3 MMG
   2 81mm mortar
   1 flamethrower base
   5 Trucks
Armour Company
   1 Panzer III H
   3 Panzer III F
Air Support
   2 bombing missions


German Forces
 
Russians are Green, Germans are Veteran.

Deployment and Victory
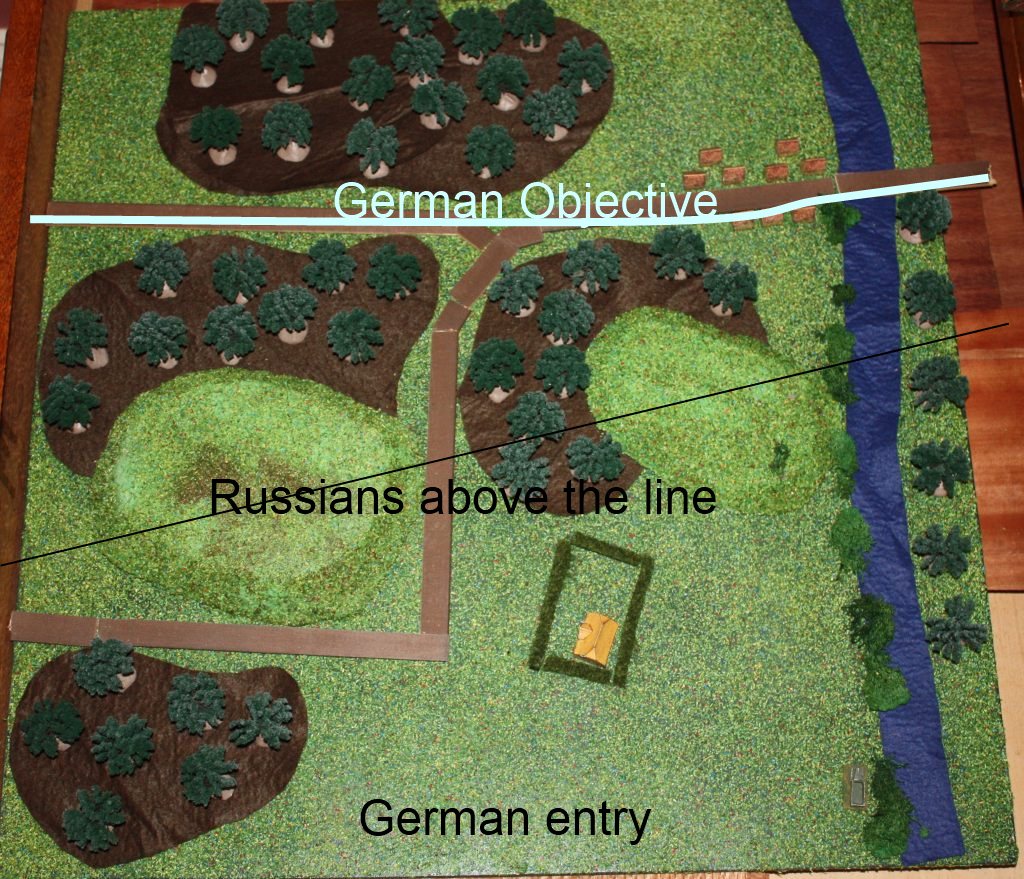
Russians start anywhere north of the hills and are in shell scrapes.  Germans come in anywhere from the southern edge.  Germans win by clearing the highway (road from the south that exits east).


Board prior to deployment

Note that I am new to 6mm for terrain, the hill and trees are fine, the roads are just some pieces of wood.  the houses are paper houses.  The Russian squads I put behinds the buildings to remind me of which building they were actually in.


Russian deployment


The Germans aim to advance to two main groups - the 1st company, support company, Battalion HQ and 2 PanzerIIIFs will advance on the right through the farm and take the woods and hill on that side, and then advance on the village.  The 2nd company with a PanzerIIIF and Panzer IIIH will advance up the road, take control of the hill and woods on the left, and clear the highway to the left.

What the Germans did

 
The game starts the Germans having 1st company (in the 251s) aiming for the right hill and woods to the right of the road.

German 1st company disembark in the woods.

The 2nd company, in trucks, aims for the road to the right of the left hill and deploy in the woods to the left of the road. One of the trucks was bogged moving, and took two turns to recover.  The carried infantry disembarked, and the trucks did catchup and they were able to speed up when they reached the road.  They did come under fire from an ATgun but for no effect.  The trucks did not spot the firing gun.

The obligatory children helping out shot (nearly 3 and a 4 year old). He has a Bauhaus T-shirt and she has fairy wings and a tutu...  While they did help (sort of) moving the troops, they much preferred moving the trees around everywhere.  Also note the game is setup in a map drawer. It is hidden away and stays safe as it takes weeks (elapsed) to play a game.

Right Flank
The support company aimed for the farm in the middle of the board.  The mortars unlimbered behind the hedge, while the MMGs moved through the farm and on to the woods.  Battalion HQ came on and followed up the MGs.

 1st company advancing through the farm
 
Note: I removed most of the transports (251s and trucks) after the infantry had disembarked and moved away.  From reading historical accounts, transports did not really play much of an aggressive part in an attack on their own.

Battalion HQ advancing through the farm
 

2 PanzerIIIFs followed up three infantry scouting out the right hill.  While coming over the crest, three Russian squads opened fire, scoring one kill.  Return fire scored a Russian kill.  Next turn the Russians also came under fire from an MG that had moved up to the edge of the wood.  The German fire scored another kill and suppressed the remaining Russian squad.  The next turn the infantry charged the suppressed infantry and destroyed it in close combat, but lost one squad as well.

German 1st company and support company arrive on the edge of the wood overlooking the highway.  The hill is behind them.


The Panzers stop advancing as unsure what is in the wood and 2 squads are sent to clear the wood in front (there is a AT gun there, but also one hidden on the other side of the river that will have a clear shot at the Panzers as they clear the crest. heh heh).  The KV-1 hidden behind a building in a wood spots the infantry, and suppresses an MG. The German squads rush the ATGun, which is destroyed.

Germans advance to the edge of the wood and about to spot, and then charge, the AT-Gun.


The Panzers advance and they come under fire from the ATGun on the other side of the river - one panzer is destroyed.

Panzer destroyed by ATGun across the river.

The Germans call in a airstrike on the village that destroys a squad and suppresses the occupants of village. The German company advances to the edge of the wood across from the town, kills another Russian squad but comes under fire from the KV-1, an MG across the river and the town.

 The KV-1 commands the woods

The German company is down to just a few squads and decides (well, the morale check did) to retire.
 

Left Flank
On the left flank, a PanzerIIIF and the PanzerIIIH  followed up two infantry that were scouting out the left hill for hidden enemy (there are none).
 
Panzers following the infantry over the hill
 
The trucked Germans advance through the woods and reach the edge of the highway.  They do not spot the enemy on the opposing side.  But the Russians spot the Germans and fire at them, also dropping mortar fire on them.  Half of them are suppressed, and the other half also come under MG fire from the T-26's in the woods.

The 2nd company at the edge of the woods at the highway, under mortar fire and suppressed (I play at night and it is hard to spot facing - the units on the right are running away when they should not be!)

The  Germans eventually spot the Russians, and use mortar fire on them.  The Russian infantry, down to one squad survives its morale check (lucky!).  but then it is the next turn.  The infantry has cleared the hill, the Panzers are advancing through the woods and the Germans open up with everything they have against the Russians in the woods.  The last remaining squad is destroyed, one anti-tank gun is destroyed.  The other stays unscathed.  But the return fire from the T-26's decimate the Germans and all but 1 squad is gone.The 2nd infantry company (of 1 remaining squad) fails morale and retires.  The two Panzers move to the edge of the wood, receive fire but for effect.

Tanks facing each over off over the highway (there is a third Russian tank behind the tree to the left).

The  Panzers trade shots with the Russian tanks and an anti-tank gun over a few turns, resulting in one destroyed T-26 and the ATGun being destroyed.

 Destroyed T-26

Wrap-up
With lots of troops lost, a morale check for the group forces all units to pull back.  The game is over with the Russians hanging onto the road and the village.  A Russian victory.

I have to work on the terrain, make some better markers to indicate artillery and tweak the rules slightly; but otherwise, my first 6mm ww2 game was great!