Tuesday, 19 November 2013

Heraclea replay with Phalanx (alienstar) and rules overview

Introduction
I am replaying Heraclea with different ancient rulesets on a 2'x2' table looking for a fast play set (under one hour).   This is game 15. I downloaded Phalanx (the alienstar version) quite a few years ago.  When I came around to playtesting fast play ancients on a small table they came to mind as they are designed to play on a small board.  However, they are were not high on the list as there were so many others I was keen to play.  I am finally getting around to them and I am interested to see if they produce a good game.

Alienstar Phalanx rules, army lists and QRS are available free for download at the alienstar phalanx homepage.
 
This replay is a bit detailed to show how the rule mechanisms work, and if these are rules you may like.

Rules Overview
Summary
Designed for a fast game with 12 bases per side.  Troop types DBA-like but with 5 morale classes. Heavy units must deploy in one main battle line.  System is IGO-YGO with each sides action based on activation points with differing costs for actions you wish to perform. Groups can be activated as well as single units.  Movement is a bit slower than many other rules.  Combat is base to base and is resolved by looking up combat values for each side based on troop type and morale type.  1 die is rolled for combat and the results looked up on a table based on the difference in combat values to determine the result for both sides.  The result may be a retreat, double retreat or a rout.  Optionally retreats results may build up over multiple turns and count towards a break.  Shooting is resolved similar to combat with most missile units having a range of one to two base widths.

Bases, scale etc
Phalanx is a 24 page A5 format colour rulebook, version 3 being available in 2002.  It is designed for figures from 6mm to 25mm.  It does this by detailing 3 different figure scale ranges with 3 optional base sizes for each.  The default for 15mm is 8cm wide bases on a 4'x4' (Option 2) but also provided for is 4cm bases.  All measurements are in base sizes.
Each base is referred to in the rules as a vignette.  There are 12 vignettes to each army.

Troop classes 
Troops types are similar to DBA with different names with a few additions such as Light Warband (equivalent to DBM Wb(F)) and Light Infantry Spears (equivalent to DBM Ax(S)).  There is a DBM/DBA to Phalanx troop conversion table in the rules and an expanded one in the army lists.

Troops are further classified into Regular or Informal.

Lastly troops are classed into one of 5 integrity (similar to morale in other rules) classes, where Class V is the best and Class III is average.

The acronyms are not the normal ones used in other rules but not hard to remember.

One base is designated the base with the General.  It is used as the centre for command distances and if the General's base is broken, the army has lost.  A Generals' base infers no melee advantage.

Deployment
The table defines the number of terrain tiles.  A 4'x4' table has 16 12" tiles.  Terrain is placed by rolled an d8 for each terrain tiles: 1-4 none; 5 or more various types. Add +2 if the terrain tile is on an edge.  Some terrain incurs a combat penalty on some troop types and most terrain slows movement of most troop types.  After this both players roll a d6 with the winner chooses their table edge and also has the option to remove or swap up to two terrain pieces. Players take turns deploying one base at a time (this rule is actually in the game tern sequence).  Players then roll another d6 each with the winner has the first move
 
All bases are deployed within 25% of the table size from the rear edge (e.g. 4' table it is 12 inches).  All bases must also be deployed in a single line called the Main Battle Line.  The distance between bases on this line can be no more than 3 base widths.  If a base can be deployed to the rear of a unit for a combat advantage, it does so at deployment but this is permanent for the entire game (only some heavy infantry and heavy cavalry can be supported, and only by normal light infantry and skirmishers).  Light units such as skirmishers are not restricted to the battle line and may be deployed anywhere in the deployment zone.

Importantly for movement later, any battle line base that is deployed in flank sectors (25% in from the side edges) is classed as on the Wing.  There is a movement penalty for units to move from the wing to the centre and vice versa.

Game turn sequence
A game turn is two player turns.
 
Each player turn is:
  • Activate a base of a group of bases
  • Move the activated bases; charging units declare a target that may evade and shoot if allowed to do so.
  • Unactivated bases act on their own initiative
  • Activated bases may shoot, target may then return fire
  • Melee.

Command and Control
Each army has a default of 8 Activation points.  At the start of each turn a d6 is rolled to modifier this number up or down by a maximum of 2. Each base or group of regular bases costs 1 AP to activate, informal bases/groups are 2AP.  Groups are bases side by side only. Additional APs are required for some circumstances such as distance from the general, crossing from flank zone to centre or vice versa, Class of the base. Activated bases can move and shoot (note unactivated bases do not shoot).

More importantly, activated bases will do what you want them to do.  Bases that are not activated roll 1d6 to see what they actually do.  This ranges from charging the enemy, shoot, retreat, advance, do nothing and doing what the player wishes.  There are some modifiers based on class and regular/informal. 

Movement
Movement is a bit slower than other rules - light cavalry move 2 base widths while heavy infantry move 1.  Turning allowance varies from 180 degrees for light cavalry and skirmishers to 45 degrees for heavy infantry. It does not state when turning occurs and infers only one turn per player turn.  Bad going reduces the movement rate for most troop types.

Shooting
Acvtivated bases may shoot and may shoot at bases that have just moved into melee with them. Skirmishers and light cavalry shoot all round while all other shoot directly ahead.  Heavy bows shoot 2 base widths, the rest 1.  To shoot, roll 1 die and add some modifiers (there are 4 to choose from).  Heavy bows have more chance of a better result.  Results range from halt, retreat, retreat twice to broken if mounted.  Broken units are removed from play. If able to, the target may then shoot back.

Melee
Melee is one base against an opposing base.  Lining up bases is up optional for the player but a base can still only melee against one base. The melee process consists of the following steps that look imposing but that is only because I describe them in detail.  In reality it consists of two table lookups, a few modifiers to apply and a die roll:
a) On a table, cross reference your troop type against integrity class (I to V)  and whether opposing foot or mounted.  The result is the base combat factor ranging from 1 to 9.
b) Apply some modifiers (there are 8 in total) such as 1/2 combat factor if contacted in flank, -1 for each Retreat result, -1 if overlapped on flank (there are some restrictions on this), -2 if you are fighting a particular troops type you are disadvantaged against (there is a table for this, an exmape si Heavy mounted bow gets -2 fighting against any mounted or scythed chariots)
c) Each player does a) and b).  The player who turn it is subtracts their combat value from the opposing value.  This is the result combat factor (may be negative).
d) Roll 1d6 and cross reference against the result combat factor.  There are two results - one to apply to your base and one to apply to the opposing base.  Results are symmetric.  By that I mean the result for a -2 resulting combat factor column on your unit and the opposing is identical to if the other player was meleeing and was looking at the +2 column.

Results are either stand, retreat or break (remove from play).  Some types of informal units must followup if they can.

Victory
When a 1/3 of the bases of the main battle line are broken or the general is broken, that side has lost.

Optional rules
there are some optional rules around one key base per army, recovering from retreat results (to reduce combat modifiers), artillery, field defences and main battle line detachments that can move further than 3 vignettes from the main battle line.

Army Lists
A separate army list book lists 191 armies from 3400BC to 500AD.  Each army is 12 bases with some variations possible.

My changes
For 40mm wide bases, the recommendation for 12 bases is a 4'x4' table with 12" terrain tiles.  I will be using 2'x2'.  I will also not be using 12 bases and aligning to my battle deployment.

I will use the optional rule to allow battleline units on the flank to move more than 3 basewidths away else, otherwise the Agema and elephant cannot dash down their flank.

Troops
Romans
4 Leves: VLI, Class II, IF
4 Hastati/Principes: HIN, Class III, RA
2 Triarii: HIS, Class IV, RA (one with General)
1 Light Infantry: LIN, Class II, IF
2 Heavy Cavalry: HSC, Class III, RA
1 Light Cavalry: LSC, Class IIII, RA
 
Epirot
1 Hypaspist: HIP, Class IV, RA
3 Pikemen:  HIP, Class III, RA
1 Hoplite: HIS, Class III, RA
1 Light Infantry: LIN, Class II, IF
2 Skirmishers: VLI, Class II, IF
1 Agema:  HCC, Class III, RA (General)
1 Light cavalry: LSC, Class IIII, RA
1 elephant: IND, Class III, IF

VLI = Very Light Infantry
HIN = Heavy Infantry
HIS = Heavy Infantry Spears
HIP =  Heavy Infantry Pikes
LIN = Light Infantry
HSC = Heavy Skirmish Cavalry
HCC = Heavy Charging Cavalry
LSC = Light Skirmish Cavalry
IND = Indian elephant
Class is similar to morale in other rules - I is bad, III is average, V is fantastic.
RA = regular; IF = Informal (i.e. irregular)
 
Deployment
Similar to other games following my standard deployment

Deployment - Epirots on left, Romans on the right
Turn 1

I will give the Romans the first player turn as per other replays.

The first interesting thing that hits me is that I am not going to have enough activation points (8 each side) to activate everyone and also the Light Infantry and Cavalry on the flank.  If I don't activate them, you need to  roll randomly to see what they do.  It will be interesting to see what happens on that flank as all the other games it has been a standoff the entire time.  Note I cannot link (group) the light infantry and the light cavalry as one is regular and one is informal.  Links cannot contain a mix of Regular and Informal.  The Epirots will have it worse as the general is on one flank and so the distance from the general modifier will hit hard.

Roman
Roman activation roll sees no change the the number of activation points (8). Romans move the Leves forwards (3AP (2AP for IF and 1AP for Class II), Hastati/Principes (1AP) and wheel the Triarii (1AP) and light infantry is in range of the general (1AP if greater than 4 base widths) so will hold them.  Roll for what the light cavalry do - charge enemy directly ahead, so they move forwards.

Movement rates are quite small.  It is all in base widths (in this instance 4cm).  Leves move 6cm, Heavy infantry 4cm and the Light cavalry is managing 8cm!

Epirot
Epirot activation roll sees no change to activation points(8).  Epirot move the Agema (1AP) the elephant (2AP), Skirmishers (4AP - 2AP for informal, 1 AP for distance, 1AP for class II) and Pike group (1AP).
Light infantry roll for own initiative and act like unit on right (pikes) so advance. Light cavalry charge.

End of turn 1 - moving slowly towards each other.

Turn 2
Romans
Only 7 APs.
Leves and Legionaries advance, Triarii continues turning. light infantry advance and the Light Cavalry initiative roll sees it charge an enemy within 3' or do nothing is no enemy.  So does nothing.

Leves shoot for no effect (a 6 is needed to score a retreat; a 4-5 will cause a halt).  Epirot skirmishers may return fire and 1 Leves gets a Halt result so cannot move next turn.

Epirot
Epirot get 6AP. Agema, elephant, pikes move.  Light Infantry rolls for move and advance.  Light Cavalry rolls for move and does nothing.  Skirmishers were activated so shoot (need to activate to be able to shoot). Halts another Leves. Retun fire sees one Epirot skirmshers cannot move next turn.

End of turn 2 - bit of Skirimishers exchanging fire. Bit blurry - sorry.
Turn 3
Romans
10AP! Activate everything except the Leves.  One Leves charges forward and shoots (for no effect), the other retreats (the 2 centre ones cannot move this turn as they were halted last turn) but is blocked by friends so routs.

Epirot
8AP.  Move the elephant up close to the Agema.  Agema does not move (elephants move 4cm, Agema move 6cm)  Skirmisher moves into combat (one one can move into combat - the other is halted by shooting last turn).  Common in some rules is that skirmishers fire at each other for ages with no result and so the main battlelines are waiting to clash but the skirmishers are in the way.  I am going to speed up the skirmisher battle by meleeing with them.
Charged Leves fire back for no effect.
Light infantry does nothing as does the light cavalry.

Epirot Skirmisher Vs Leves:
Skirmisher has combat value 1, -1 for the Leves having a support unit on flank = 0.
Leves has combat value of 1.
Modified combat value is attacker CV minus defender CV = -1, single die roll is 6. The result gives an outcome for attacker and defender. Skirmishers stand, Leves repulsed (retreat 1 full move) but cannot as blocked by friends less than 1/2 move distance behind so break (rout).

End of turn 3 - a bit more combat in the centre.

Turn 4
Romans
10AP.
2 Legionaries move to melee skirmishers that shoot back and cause a halt (which does nothing as in melee).
Leves move into melee with other skirmisher (that shoots for no effect).
Last Leves shoots also for no effect.
The Light infantry and cavalry both roll for own initiative and retreat 2 full turns.

A shot of the battleline and skirmishers.
Legionary Vs Skirmisher:
Legionarie is CV 3, no modifiers.
Skimsher is CV 1, -1 for overlapped unit = 0
Modified CV is 3, die roll of 1 sees the Legionary stand, Skirmisher repulsed that becomes a break as no room to retreat.

Leves Vs Skirmisher:
Both are CV 1 so modified CV of 0.  Die roll of 5 see Leves stand, Epirot skirmishers repsulsed that is a break as no room to retreat.

The end result of the Roman melee. Another blurry one.

Epirot
8AP.
Agema move full distance (need to get to Roman Cavalry before Triarii can assist; the Agema will have to do the combat without the elephant to assist).  Pikes advance to contact Leves who do nothing with return shooting (note have +1 to die roll for HIP target, but -1 as target ended move in contact).
Light infantry and light cavalry on own initiative do nothing.

Pike Vs Leves (1):
Pikes have CV 7 (oops - just noticed the high CV of pikes - this is going to cause the Romans a lot of trouble soon methinks).
Leves is CV 1, -1 for overlapped unit = 0.
Modified CV = 7, roll is 6. Leves break.

Pikes Vs Leves (2):
Same modified CV as above of 7, roll is 3, Leves break.

End of turn 4 - the skirmishers have gone.

Turn 5
Romans
9 AP. Get the Legionaries into a line.  Move the Triarii close to the oncoming Agema.  Have enough AP to move the Light Infantry forwards, and the light cavalry roll for own initative and do nothing.

Epirot
8AP.  Agema moves but is 1cm from the Roman Heavy Cavalry!  Elephant moves, Pikes are in two groups and are greater than 16cm from general so it is 2AP each to move them into contact with the Legionaries.  Light units on the flank on their own initative do nothing.

Hypaspists Vs Legionaries:
Hypaspists are on CV 8 (Class usually increases combat value by 1; normally pikes are 7 as Class III, but Hypaspists are class IV)
Legionary is CV5.
Modified combat value is 3 (anything over 3 is on the 3 or more table, so modified CV of 3 is bad). Legionaries break.

Pikes Vs Legionaries (1):
Pikes are CV 7, Legionaries 5 so modified value of 2.  Legionaries break.  A 5 or 6 does this, a 3 and 4 was repulse and a 1-2 was stand; so a bit unlucky to lose two legionary units.

Pikes Vs Legionaries (2):
Pikes are CV 7, Legionaries 5 so modified value of 2.  Legionaries break (another 5 rolled!)

Pikes Vs Legionaries (3):
Pikes are CV 7, Legionaries 5 -1 for overlap (the Hoplites) so modified value of 3.  Legionaries break (the third 5 rolled!)

Legionary battleline is completely wiped out for no damage to the Pikes.  Rough.

At this stage, the game should be over as a third of the main battleline units are destroyed (all the non-light units in this case are the Roman main battleline).  But I will do a turn with the Triarii and Agema to see how cavalry combat works.
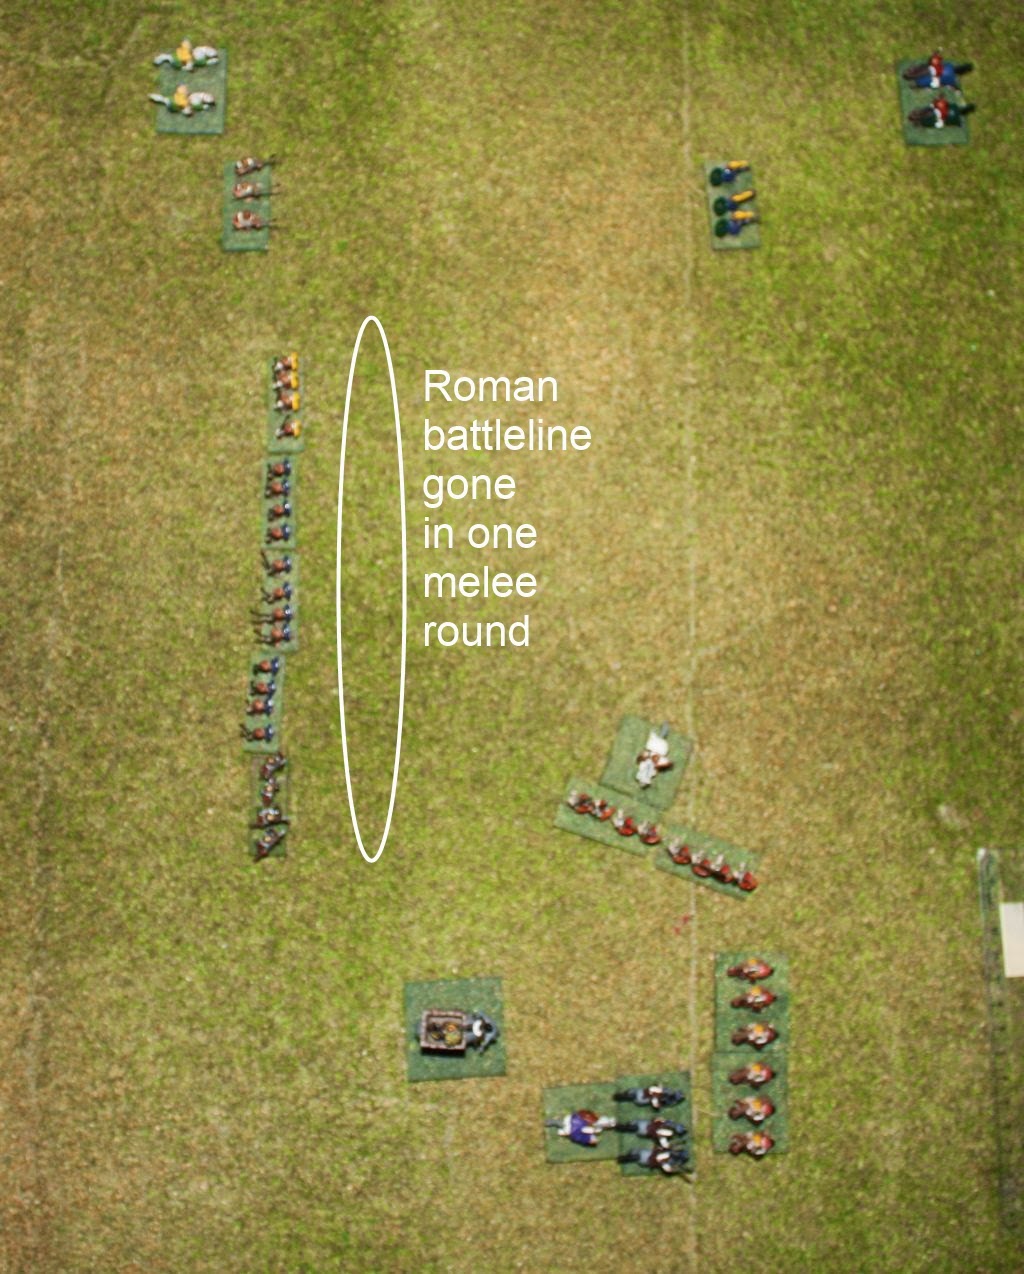

End of official game.


Turn 6 (bonus and one flank only)
Romans
Triarii move to inbetween the Elephant and the roman heavy cavalry.

Epirot
Agema charge the Heavy cavalry,  Elephants wheel slightly towards the Triarii.

Agema are CV 5 -1 for overlap = 4.  Generals add nothing in melee.
Romans  are CV 3.
Modified combat value of 1. The die roll sees the Agema repulsed - moves back one turn without changing facing.

Combat of the left flank Yes, that is an Indian elephant.  I forgot to replace it (I used it in the last replay).


Turn 7 (just the elephant)
The Elephant charge into the Triarii.

Elephant CV is 4  -1 for overlap = 3
Triarii is CV 7.
Modified combat value of 4.   Elephants replused.  They did not roll a 5 like all the Legionaries did!.

Elephant retreats from the Triarii.

Verdict
Well, that was a fast combat - one turn and the entire Roman battleline disappears.  There was some unlikely die rolling from the Romans, and really only one or two should have gone and the rest retreated.  Regardless, it was only ever a one sided fight in the centre.  Possibly increase their class to IV (later lists have them at this class) increasing their combat value by 1, but they would still be at a disadvantage. The Triarii would have been better going in with the Legionaries as their combat value is the same as that of the opposing pikes.  But not very historical.  The rules are simple and are fun - it would be more fun if I was playing with more balanced armies!  The slow movement rate was fine - I thought it would annoy me as units are moving at half the speed I am used to.  The slower movement rate does mean you really need to focus on where your troops go - as they move to slow, and combat is very fast it is hard to move them elsewhere - once committed, they are committed. I did like that feeling.  I would need a few more plays to decide if I really liked them but so far I see nothing wrong about them and would play with them again.

Wednesday, 13 November 2013

Heraclea replay with Ancients D6

Introduction
I am replaying Heraclea with different ancient rulesets on a 2'x2' table looking for a fast play set (under one hour).   This is game 14.  When I first started out replaying battles back in early 2010, I was not going to use rules that used lots of dice and so had discounted Ancients D6 straightaway.  But a few months on, I actually read the rules and the number of dice rolled each time is not that great - it is a not a bucket of dice game.  And it is designed to be a fast game on a 2'x2' game so it fits perfectly into my constraints. This game has been on the 'to play' list for about 3 years.  Why so long to get to the replay with AD6?  The "oh shiny" principle - I kept getting distracted by other rules.

Ancients D6 is available from the author's Ancient D6 page.  There are also army lists available on the same page.

A review (by the author) can be found here at deepfriedhappymice.com.
 
This replay is a bit detailed, bordering on tedious, to show how the rule mechanisms work and so if these are rules you may like.

Troops
Romans
4 Leves: SK, Figs 2, MV 2, Arm 6+, Javelin, Non-Melee, Skirmisher
8 Hastati/Principes:HI, Figs 4, MV 1.5, Arm 4+, Battle Drill, Charge Bonus, Support
2 Triarii: HI, Figs 4, MV 1.5, Arm 4+, Battle Drill, Spear, Support, Veteran
1 Light Infantry: LI, Figs 3, MV 2, Arm 5+, Charge Bonus, Support
2 Heavy Cavalry: HC, Figs 3, MV 2.5, Arm 5+, Charge Bonus, Frenzy, Mounted
1 Light Cavalry:  LC, Figs 2, MV 3, Arm 6+, Javelin, Mounted, Skirmisher
1 General (2 order points) with Triarii
1 Captain (1 order point) with Principes

Army morale (number of figures): 59
 
Epirot
2 Hypaspist:HI, Figs 4, MV 1.5, Arm 4+, Pike, Support, Small Shield, Veteran
6 Pikemen: HI, Figs 4, MV 1.5, Arm 5+, Pike, Support, Small Shield
2 Hoplite: HI, Figs 4, MV 1.5, Arm 4+, Spear, Support
1 Light Infantry: LI, Figs 3, MV 2, Arm 5+, Charge Bonus, Support
1 Skirmisher: SK, Figs 2, MV 2, Arm 6+, Javelin, Non-Melee, Skirmisher
1 Slingers: SK, Figs 2, MV 2, Arm 6+, Sling, Non-Melee, Skirmisher
1 Agema: HC, Figs 3, MV 2.5, Arm 4+, Charge Bonus, Fear, Frenzy, Mounted
1 Light cavalry: LC, Figs 2, MV 3, Arm 6+, Javelin, Mounted, Skirmisher
1 elephant: Vehicle, Figs 3, Mv 2, Arm 3+, Behemoth, Charge Bonus, Terror

1 Superior General (3 order points) with Agema
1 Captain (1 order point) with Hypaspists

Army morale (number of figures): 55

Note that the units are based on the Republican Roman and Macedonian  lists from the Punic Wars army lists. 
 
Deployment
Similar to other games following my standard deployment except the pikes, Hoplites and Legionaries are in 2 ranks as there is a support bonus for this, so I thought I would play with this setup. I did not double depth the Triarii as I think this may overbalance the Roman side.

Deployment

The Roman Captain is with the Hastati - I could have placed him with the Roman Heavy Cavalry but as that is a delaying flank, I do not think adding a Captain would help or hinder the end result there.

Turn 1
Romans are the attacker so will give them initiative in the first turn.  Moved the Leves and Legionaries up and gave both an extra order. In AD6 all units may move and each General/Captain has a certain number of orders that may be given to units/group to perform an extra move/rally etc.  Orders are automatically successful within 8" and have a 50% chance of success out of this range.
Triarii wheel and continue wheeling with an extra order.  Light units on the right flank move forwards as well.

Epirot move the skirmishers to just outside Leves javelin range.  The rules are move and shoot but units of the first player that moved and did not shoot can shoot back at the end of the movement phase. Missile fire is 1d6 per figure so I have 2 skirmishers with 2d6 firing at 2 Levels.  Hit is 5+.  Just about everything in this game is a 4+ on the die except shooting and armour saves. Modifiers change the number of dice (that is normally based on figure) not the to hit number.  Nice.

Slingers cause 1 hit on a Leves and Leves get a chance to save - 6+ required but does not save.  1 hit and a morale check required due to fact casualties are received. Morale check is number of figures remaining, 1 in this case.  Need at least a 4+ on one of the dice.  Yes so OK (otherwise pushed back).
Archers cause 2 hits and the Leves save none of them.  Unit is routed and removed from the game.

Epirot Skirmishers shooting at the Leves


Other moves see Pike block move twice (with an order), Light units move forwards and the Agema/Elephant move twice (with another order)

End of turn 1

Turn 2
Epirot wins initiative.

Rally
General spends an order to rally off the hit from the Leves.

Move
The Roman Leves are going to move forward and I want the pike block as far forward as I can go, so I move the Epirot skirmishers up close to the Leves and fire. 1 hit inflicted on one of the Leves; they fail their morale check and are pushed back one base depth and cannot shoot for the rest of the turn (so cannot shoot back).
 
Pikes move up to behind the skirmishers. Agema/elephant move twice again.

Romans fire with one of the Leves at the opposing skirmisher but the Epirot skirmisher saves.

Now, the Skirmisher on the right moves up slightly and fire at the Hypaspists. 2 hits! Hypaspists save 1.  Subsequent morale check (using 3d6) sees a pass.

The right half the Roman line move once, General spends an order to moves the Leves unit back through the Romans, and then the General uses an order to move the roman Legionaries into the Hypaspists and one pike unit.  I want to see how melee works, and the Hypaspists are one figure down (so 1 die down in combat) that the Epirots could get back via rally at the beginning of next turn.
Note that in hindsight I should have moved the skirmisher to the flank so that it could fire some missiles at the light infantry. 
 
The start of the meeting of the pikes and legionaries.

Melee
Romans Vs Hypaspists:
Romans have 4 figures +1D for support +1D charge bonus -1D for facing pikes = 5D6.  4 Hits. Hypaspist armour save is 4+ but save none of them.  4 hits on Hypaspists
Hypaspists are 3 figures +1D for Veterans +1D for support = 5D6. 3 hits. Romans save 1. 2 hits on the Romans.
Hypaspists lose and also the stand is routed as casualties exceed the number of figures.  Romans don't advance - they have two hits and will hope to remove some during the rally phase. At the end of the turn (so not reflected in the picture below) I remembered they have the battle drill ability so I swap the unit with two hits with the supporting unit.  This is done at the end of melee with no advance after combat.

Romans Vs Pike unit:
Romans have 4 figures +1D for support +1D charge bonus -1D for facing pikes = 5D6.  2 Hits. Pike armour save is 5+ and 1 hit is saved.  1 hit on Pikes.
Pikes are 4 figures  +1D for support = 5D6. 2 hits. Romans save both of them.
Romans win the combat as they took less hits.  Pikes undertake morale check with 3D6 (number of figures) and pass (needed a 4+ on at least one die). Pikes retreat one base depth (including the support pike unit) and Romans followup.

End of turn 2.

Turn 3
Epirot wins initiative.
 
Rally
Romans remove a hit from the Legionaries.  Can only remove one hit as can only give one order to a unit per turn. 
Epirot removes a hit from the Pikes.

Move
Epirot uses and order and moves twice to charge with the Agema/Elephant into the Roman Heavy Cavalry.  Elephants have Terror that means the Cavalry undergo a morale check to see if they take casualties - they only pass with one die that translates into one casualty.

Epirot Skirmishers move sideways to get out the road of a pike block and also form a group with some pikes and hoplites.  Skirmishers can move in any direction and maintain their facing.  The pike block in the centre now chaerges the Leves.  Aseond order of the Hoplites/Skirmishers/pikes sees them move up close the the Leves.  The pikes/hoplites were more than one move away from the Leves or I would have arranged it so they charged them.

Skirmishers fires at Leves but misses.

Hypaspists charge the Roman Legionaries.

More units now involved in the battleline melee (as seen from the Epirot side).
Romans double move the Triarii and contact is made with one of them on the side of the Elephant.  However, it is still classed as a frontal attack.  I think the Triarii have to perform a morale check due to contacting a Terror unit. 5D6 (4 figures + 1D6 veteran), fail all of them.  2 hits. I wanted to added 2D6 using an order but that is  only for morale checks from shooting and melee.  Ah well.
Triarii get to the Elephant after it contacts the Roman Heavy Cavalry (the cavalry casualtyis from the Elephant and its Terror ability)

The Leves not in combat fire at Skirmishers and do one hit.

Melee
Agema Vs Heavy Cavalry first:
Agema is 3D6 +1D6 general +1D6 Charge bonus = 2 hits but I rolled a '6' and the Frenzy ability means a '6' counts as two hits so 3 hits all up. Roman Cavalry has a 5+ saves and saves 1, so 2 hits.
Roman is 3D6 = 2 hits, Agema saves 1 so 1 hit.
Romans lose and roll 1d6 for morale - do not pass and so are destroyed.  Agema must advance (Frenzy) and also passes a leader check for taking a hit and having the general attached.

Elephant Vs Cavalry and Triarii:
Elephant chooses the Triarii to be primary target. When distributing hits, the primary gets more with an odd numberof hits to distribute - the Triarii are more of a threat.
Elephant counts a 3 figures - 3D6 +1 charge bonus = 4D6.  Note that the Spear ability of the Triarii only applies to mounted and I believe the Elephant is not classed as mounted.  3 hits - 2 on Triarii (primary) and 1 on the cavalry.  All save their hits.
Heavy Cavalry is 2D6; Triarii is 2D6 + 1D6 general +1 D6 veteran = 6D6.  4 Hits.  Elephant has a 3+ save and saves 1.  2 hits on the elephant.
Elephant loses and retreats.  Cavalry advance (so that in rally phase can take off a hit from the Triarii).

Elephant retreats.  It counts as 3 figures so it near its end.

Pikes Vs Leves:
Pikes are 4D6+1D supported = 2 hits; saves 1.
Leves are 2D6 -1 fighting pikes.  no hits. Note that as they are non-melee unjits, they need to hit on a 5+.
Leves lose. Morale check passes.  Pikes advance

Pikes Vs Legionaries
Pikes are 4D6 +1D6 supported is 5D6 = 1 hit. not saved.
Legionaries are 4D6 + 1D6 charge bonus  +1D6 supported -1D6 fighting pikes is 5D6 = 3 Hits; 2 saved.
Both sides have 1 hit each. Support unit swaps to the front (battle drill ability)

Hypaspist Vs Legionaries:
Hypaspists are 4D6 +1D6 veteran is 5D6 = 2 hits, both saved.
Romans are 4D6 -1D6 fighting pikes +1D6 support is 4D6 = no hits.
both side receive no hits.

The result of the centre melee (Roman view).

Turn 4
Romans win initiative

Rally
Epirot Rallies Agema and Pikes

Roman rallies two of the Legionaries, each with one hit.

Move
Romans move general to the other Triarii unit that charges the Elephant. Terror morale check sees 1 hit.
A Leves move back though some Legionaries so the Legionaries can move up against some pikes.
Leves on the left flank move and fire at the Light infantry and score a hit.
Leves and Skirmshers fire at each other, Leves take a hit and rout.

Agema pivot 90 degrees and then use an order to attack the Triarii (with two hits already). Fear morale check sees another hit inflicted.
Slingers move and fire at a Leves that moved and score two hits, neither saved.
Hoplites move to near the Triarii.

The Roman left flank

Melee
Triarii and Cavalry Vs elephant
Elephant names Triarii as primary. elephant is 1D6 = 1 hit on Triarii that is saved.
Triarii is 3D6 +1D6 general + 1D6 veteran, Heavy cavalry is 2D6, is 7D6.  5 Hits, 3 saved, 2 hits inflicted.
Elephant is routed  as had 2 hits from last turn.
Heavy cavalry advance.

Agema Vs Triarii
Agema is 3D6 + 1D6 charge +1D6 general +1D6 veteran -1D6 fighting spears is 5D6. 2 hits that the Triarii saves.
Triarii is 1D6 +1D6 veteran is 2D6. No hits.

Pikes Vs Legionaries (new combat)
Pikes are 4D6 +1D6 supported is 5D6 = 1 hit. not saved.
Legionaries are 4D6 + 1D6 charge bonus  +1D6 supported -1D6 fighting pikes is 5D6 = 3 Hits; 2 saved. 1 hit inflicted.


Pikes Vs Legionaries (ongoing combat)
Pikes are 4D6 +1D6 supported is 5D6 = 4 hits. only 1 not saved.
Legionaries are 4D6 +1D6 supported -1D6 fighting pikes is 4D6 = 3 Hits; none saved.
Pikes retreat one base depth and take a morale check with 1D6 +1D6 supported. Failed. Routed.

Hypaspist Vs Legionaries:
Hypaspists are 4D6 +1D6 veteran is 5D6 = no hits!
Romans are 4D6 -1D6 fighting pikes + 1D6 support is 4D6 = 2 hits, both saved.
Both side receive no hits.

Overview of the battle from the Roman side.

Turn 5
Romans win initiative.

Rally
Epirot do not remove any casualties.
Romans remove 1 from the Triarii not in combat and the heavy cavalry.

Move
Romans pivot Triarii with General.
some Legionaries charge some skirmishers.
Legionaries charge the unsupported Pike unit.
Heavy cavalry moves twice to  to attack the hoplites next turn..

Epirot fires with a skirmisher at the Triarii for no effect.

Melee
Agema Vs Triarii
Agema is 3D6 + +1D6 general +1D6 veteran -1D6 fighting spears is 4D6. 1 hit that the Triarii saves.
Triarii is 1D6 +1D6 veteran is 2D6. 1 hit that the Agema saves.

Legionaries Vs Skirmisher
Legionaries are 4D6 + 1D6 charge bonus  +1D6 supported is 6D6 = 2 Hits; none saved. 2 hits inflicted.
Skirmisher are 1D6 = no hits
Skirmishers casualties equals number of figures and are routed.  Legionaries advance into the pikes behind them.


Pikes Vs Legionaries (centre)
Pikes are 3D6 +1D6 supported is 4D6 = 3 hits. all saved.
Legionaries are 3D6 +1D6 supported -1D6 fighting pikes is 3D6 = 1 hit that is saved.
No hits to either side.


Pikes Vs Legionaries (roman right flank)
Pikes are 4D6  = 1 hits that is not saved.
Legionaries are 3D6 +1D6 supported -1D6 fighting pikes is 3D6 = 1 Hit that is not saved.

Hypaspist Vs Legionaries:
Hypaspists are 4D6 +1D6 veteran is 5D6 = 2 hits, one saved so 1 hit inflicted.
Romans are 4D6 -1D6 fighting pikes + 1D6 support is 4D6 = 2 hits, neither saved.
Hypaspists lose, retreat and roll a morale check using 3D6 (2 figures and attached captain). Passed. Legionaries advance.


End of turn 5.


Turn 6
Epirot win the initiative.
 
Rally
Everything is in melee except one Roman Leves unit so remove the casualty.

Movement
Hoplites charge the Triarii with the general.
Roman cavalry pivots then charges the hoplites in the flank (required an order). Hoplites pass the Fear morale check.

Any missile fire caused no hits.

Melee
Agema Vs Triarii
Agema is 3D6 + +1D6 general +1D6 veteran -1D6 fighting spears is 4D6. 4 hits that the Triarii saves only 2.
Triarii is 1D6 +1D6 veteran is 2D6. 2 hits that the Agema saves 1.
Triarii routed.

Legionaries Vs Pikes (left flank)
Legionaries are 4D6 + 1D6 charge bonus  +1D6 supported is 6D6 = 1 Hit that is not saved.
Pikes are 4D6 +1D6 supported is 5D6 = 3 hits. none saved.
Legionaries retreat and morale check with 2D6 (1 figure and supported). Passed. Pikes advance

Pikes Vs Legionaries (centre)
Pikes are 3D6 +1D6 supported is 3D6 = 2 hits. all saved.
Legionaries are 3D6 +1D6 supported -1D6 fighting pikes is 3D6 = 2 hits, 1 saved so 1 inflicted.
Pikes retreat and morale check with 3D6 (2 figure and supported). Passed. Legionaries advance.

Pikes Vs Legionaries (roman right flank)
Pikes are 3D6  = 2 hits, both saved.
Legionaries are 2D6 +1D6 supported -1D6 fighting pikes is 2D6 = 1 Hit that is not saved.
Pikes retreat and passes morale check.

Hypaspist Vs Legionaries:
Hypaspists are 2D6 +1D6 veteran is 3D6 = no hits.
Romans are 3D6 -1D6 fighting pikes + 1D6 support is 3D6 = no hits.

Hoplites Vs Triarii and Roman Heavy Cavalry
Note: The Hoplite is flanked, it loses its abilities so it is not supported and does not count as spears against the cavalry
Hoplites are 4D6 1 hit that is saved.
Triarii is 4D6 + 1D6 general +1D6 veteran; Cavalry is 3D6 +1D6 charge bonus = 10D6 = 2 hits (!) and 1 is saved.
Hoplites retreats and does morale with 1/2 the dice normally as it is suffering a flank attack (2D6 rather than 4D6).  Passed.

End of turn 6.

Turn 7
Roman's win  initiative.

Rally
None available.

Movement
Epirot pivots Agema and charges into the rear of the Triarii with the General (required an order). Triarii pass the Fear check.

Leves hit the Light infantry.

Melee
I will  not bore you (if you have got this far) with the detail on the combats except the Agema/Hoplite one.

Agema and Hoplites Vs Triarii and Cavalry
The logical split ans not all attacker and defenders are in contact is Hoplites Vs Cavalry and Triarii Vs Agema.

Triarii Vs Agema:
Agema receive 2 casualties and retreat, morale check fine and general check fine. Note that after this I remembered that the Agema is Mounted and so gets a +1 to armour saves in first melee - they rolled a 3 that I counted as a hit when it should not have. 
Triarii receives 1 casualty.  Leader check rolls a d6 =6 and subsequently a 4 so Leader dies.  All leaders have to go before game is over.

Cavalry Vs Hoplites:
Hoplites receive one casualty and Cavalry receive 3 and rout.

Legionaries Vs Pikes (left flank)
Legionaries are routed and pikes receive no hits. Pikes advance into support unit.

Pikes Vs Legionaries (centre)
Pikes receive not casualties while the Legionaries receive 2, retreat but using battle drill, swap with the support unit.
Pikes advance.


Pikes Vs Legionaries (roman right flank)
Pikes receive 1 hit, retreat but fail their morale check (only had 1D6).  Legionaries received no hits.

Hypaspist Vs Legionaries:
Hypaspists receive 1 hit, retreat and pass their morale check.   Legionaries advance (I was tempted to swap ranks but then the Legionaries could not advance and the Hypaspists could then rally off a casualty.  With only one casualty to go, I would prefer to keep the momentum going.

End of turn 8.

Turn 8
Roman's win  initiative.

Rally
Epirot rally off one casualty from the Agema.

Movement
Romans move one centre right flank Legionary unit out the way so the rear rank can pivot into the flank of the Hypaspists.

Agema charge into the rear of the Triarii.  Triarii pass the fear inflicted morale check.

Melee
Agema and Hoplites Vs Triari
Triarii receives two hits and inflicts none (good saves by the Epirots).  Triarii morale check is at 1/2 dice (resulting in one die) and fails.  Triarii routed.


Legionaries Vs Pikes (left flank)
No hits.

Pikes Vs Legionaries (centre)
Pikes receive 2 casualties and rout. Legionaries advance.

Pikes Vs Legionaries (roman right flank)
Pikes receive 1 hit, retreat but fail their morale check (only had 1D6).  Legionaries received no hits.

Hypaspist Vs 2 Legionaries:
Hypaspists receive 3 hits and are routed, attached captain is killed. Legionaries receives 1 hit.
 
End of turn 8.

Turn 9
Romans legionaries organise themselves on their right flank.
Agema charge the rear of a legionary unit; eventual combat sees the legionary rout.
Centre combat sees the legionary unit get unlucky and receive 3 hits and rout.

End of game.
Romans have now reached their breakpoint (lost 30 figures that is over 1/2 the original figures).  Epirot are at 25 figures lost (from an original 55) so it was a close game.

Verdict
Well, that went on longer than I thought but to be fair there were more units on the table than for a normal game of Ancients D6. Units lasted longer than I thought -  with all the 4+ and 5+ armour saves, I was surprised how often I saved all the hits against a unit!  And the Battle Drill ability of the Romans is very handy at lengthening out combat as you can not advance and then rally off some casualties.  I found I did forget occasionally about  a units abilities, usually the Agema that has Fear, Frenzy and Mounted.  I put it down to my first playing with the rules.  I did not expect it to be as dice heavy as it was but that is just expectation management as it was fine. for each combat, each unit was rolling between about 3 and 5 dice to hit, then 1-3 saving rolls, and then the loser was rolling about 2-4 dice for morale checks. The advantage is that you are only looking for 4+ on each die so in that regard it is quick to read the result (a stated aim of the rules).  Anyway, the rules are fun and are fast (if playing with the recommended army size, not with what I used!).  I would play them again.


Saturday, 9 November 2013

Heraclea replay with Baron Wars (slightly modified) and rules overview

Introduction
I am replaying Heraclea with different ancient rulesets on a 2'x2' table looking for a fast play set (under one hour).   This is game 13. I came across reference to an AAR with Heritage's Warlord fantasy rules that sounded interesting. So I thought, why not use them for replaying Heraclea?  They have been republished by the author, Max Carr, as Baron Wars. They are available as a PDF for USD$6 from Barony Miniatures. (via the Catalog link)

This replay is a bit detailed to show how the rule mechanisms work, and if these are rules you may like.

Rules Overview
Baron Wars by Max Carr is a 16 page PDF.  It is based, and largely the same, as the author’s Warlord rules from the 1980s.  It is intended to play on a 6’x4’ table with individual 28mm figures (on .75” frontage).  All measurements are in inches and a single d6 is used for all the mechanisms with rolling low being good.

All units (leaders and troops) have a fighting value (1-5), armour value (1-4) and morale value (1-5).  Additionally, units may have a missile value (1-3), handheld throwing weapons value (1-2) and some optional attributes such as Warhorse and Long Reach (get to strike first in combat).  There is a point system based on these values and attributes.  There are some examples of leaders and figures but no army lists.

Leaders are similar to figures and treated the same in combat.  However, leaders also have a control radius (average leader control radius is 6”).  Being outside of a leader command radius gives use a -1 to a morale check.  If a leader dies, all figures within 6” need to take a morale check.  An optional rules increases the requirements of leaders as units are very limited by what they can do if outside a leader’s command radius.

Turn sequence is:
  • Roll for initiative.
  • Movement -  highest roll moves all units first, then the other player.
  • Missile fire – firing is simultaneous.
  • Combat – units in contact fight, also simultaneous.

A figure can move in any direction. Movement is fairly well covered with rules for hills, obstacles. charging, and moving and firing.  Movement rate is quite long based on armour value. An example is an infantry figure with an armor value of 2-3 may move 10” with a charge bonus of +5”; cavalry with armor value 2-3 moves 14” with a charge bonus of +7”. Fast.

Missile fire is simple – roll your missile value of under to hit a target.  Target may save by rolling their armour value or under.  Bow range is 18”, handheld weapons are 6”.  Handheld weapons are thrown are figures charge into combat. Missile fire may be indirect over obstacles. Missile fire is done at all eligible targets before firing at a target a second time (to stop ganging up on a target figure).

Combat is resolved simultaneously between individual figures.  Roll equal to or under fighting value to hit.  Defender rolled equal to or under armour value to save. Both figures may be casualties.  Winner may move into loser’s space.  Charging cavalry may perform a breakthrough movement of up to 6” to fight another figure.  Multiple figure combats are possible if you have figures on you flank and rear. In this case, all attacking figures have their combat value increased by 1 for each extra figure attacking.

Morale is checked when attacked by a fearsome creature, infantry charged by cavalry, being close to a leader that dies and if a nearby figure rolls an unmodified 6 on the armor save throw (gruesome death!).  To pass the morale check a figure rolls equal to or under their morale value.  If a figure fails the morale check they rout which is a charge move to their rear. Routing figure may not fire and if contacted by the enemy they are captured/killed. At the start of a turn and if within 6” of a leader, routing units may attempt to rally by rolling under their morale value. If they fail this check, they charge move to the rear again.

There is a page of optional rules such as a hit in combat that is saved pushes you back, shieldwalls and speeding up the game by doing 3 combat phases per game turn.

There is also a free fantasy rules PDF add-on adopted from the Warlord "blue cover" book. I have not used the fantasy rules so the following is a brief description of the contents.  Points are included for everything in the expansion.  It mandates an additional hero/creature attribute Constitution (2-4) that allows for a  bonus saving throw.  Constitution was an optional rule in the basic rules. It also contains creatures that have different characteristics to normal figures - different movement rates, 1.5" bases, multiple attacks, and different attack types (fire, ice, gas). Creatures may also have additional attributes such as flying, lightening, jumping and mind control.  Any figure may be classed as a wizard and have a magical attribute (1-4). Spells are cast once per turn in movement or missile phase.  There are 11 spells to choose from and each has a point value.

My changes for the replay

Baron Wars is designed for 28mm figures on .75" (19mm) with distance measurements in inches and, although not explicit, figures would be formed into units. I am playing with 15mm DBM based units (40mm wide) and I will halve distance measures.  I started with measuring the distances in centimetres but felt it was just a bit too too small so moved to the halving. The units will be a lot wider than they should be.

I will also add in a modifier for the morale test that have two adjacent bases adds +1 to your morale value. (To assist with forcing bases to stay aligned - in the rules you can gang up on a figure by attacking it from different sides. So units of 10 or more make sense to protect units except those on the edge.  I am not using as many "figures" so need a reason.)

While in the examples in the rules, leaders all had an FV of 5, I will simply have leaders add +1 to the FV.  Just easier for me to keep track this way.

Last note, I played that if any base of a group was in command range of the general, the whole group was in command.  This was handy as the command ranges are quite small.

Troops
Romans
4 Leves: FV: 1, AV: 1, MV: 3, MissV: 2, Hand Held Weapons
4 Hastati/Principes: FV: 4, AV: 3, MV: 3, MissV: 1, Hand Held Weapons, Shield
2 Triarii: FV: 4, AV: 3, MV: 4, Long Reach, Shield
1 Light Infantry: FV: 2, AV: 1, MV: 3, MissV: 2, Hand Held Weapons, Shield
2 Heavy Cavalry: FV: 3, AV: 3, MV: 3, Shield
1 Light Cavalry: FV: 2, AV: 1, MV: 3, MissV: 2, Hand Held Weapons, Shield
1 Average leader (3" command range)
 
Epirot
1 Hypaspist: FV: 4, AV: 3, MV: 4, Long Reach
3 Pikemen: FV: 4, AV: 3, MV: 3, Long Reach
1 Hoplite: FV: 4, AV: 3, MV: 3, Long Reach, Shield
1 Light Infantry: FV: 2, AV: 1, MV: 3, MissV: 2, Hand Held Weapons, Shield
1 Skirmisher: FV: 1, AV: 1, MV: 3, MissV: 2, Bow
1 Slingers: FV: 1, AV: 1, MV: 3, MissV: 2, Sling
1 Agema: FV: 4, AV: 4, MV: 4, Shield
1 Light cavalry: FV: 2, AV: 1, MV: 3, MissV: 2, Hand Held Weapons, Shield
1 Elephant: FV: 4, AV: 4, MV: 3, Fear Vs Cavalry
1 Excellent leader (4.5" command range)

Notes:
FV = Fighting Value
AV = Armor Value
MV = Morale Value
MissV = Missile Value
In Baron Wars, Shields add +1 to Armor value from front and left side attacks.

Deployment
Similar to other games following my standard deployment 

Epirot to the left, Romans on the right.

Turn 1
Normally, both sides roll to see who has initiative.  Instead, As per other replays, I will give the Romans the initiative on the first turn.

Movement
Already I can see I have hampered both sides by using only one leader. I guessed this might be the case but I am hoping it does constrain the degree of freedom on actions. (Note in hindsight - it did). The Roman commander only has a 3" command range.  Any unit outside that range moves at half speed and cannot initiate combat.  So the Leves are just out of range of the general at the rear.   The general is attached to the unit permanently for the game.  The general is a unit in its own right - I have just put the general figure behind the unit representing the general.

Leves move 1/2 speed (3") forwards.  They are outside command range and so move 1/2 speed. All units bar the heavy cavalry move forwards. 

Agema and elephant are with the general and move their full distance.  The two Epirot skirmishers move 1/2 their possible distance (that was 1/2 to start with as they were out of range of Pyrrhus) so they can missile fire (units that 1/2 move can fire).  All other Epirot bases moved as far as they were able.

Missile fire
Bows/slings need a 1 to hit.  Missed.

Overview at end of turn 1

Turn 2
Initiative is opposed d6 roll, reroll ties. Pyrrhus wins initiative.

Movement
Agema and elephant charge into the roman heavy cavalry.  I am going to line up the bases as it makes it easier to figure out who is fighting who. Elephants cause a morale check on the Roman Heavy Cavalry (Morale value 3 +1 for adjacent unit - the adjacent unit bonus is my special rule) but heavy cavalry pass.

Roman battleline advances (at half rate so Leves can fire) and Triarii turn to the left in anticipation of being required to defend the left flank.

Missile
Missile fire is simultaneous.
No hits for either side.

Combat
Combat is simultaneous.
Agema (FV 5 due to leader) Vs Roman Heavy cavalry (FV 3).  Agema hits, Romans miss.  Roman has an armour value of 3 +1 for shield= 4. Rolls a 4 so saves the hit.  I am using the optional rules that if one side scores a hit and one does not, the loser retreats 1" , winner follows up and another round of combat.  For the next round, Agema hits but Roman cavalry saves;  Romans hits as well, but Agema saves. 
Elephant (FV 4) Vs  Roman Heavy cavalry (FV 3). Both hit.  Both save.
I can see there will be a lot more dice rolling than I thought there would be.  By the time of the elephant combat I am rolling 4 dice at once - one for each side hitting, and then other dice for the save (if I need to look at them).  Nothing like saving time!


Agema and elephant in combat with the Roman heavy cavalry.

Turn 3
Romans win initiative.

Movement
To move into combat requires you to be within command range.  Luckily the Leves group is just within that (3 inches). They charge into combat with the skirmishers. The Hastati move in behind them.  Triarii move a bit closer to the Elephant but maintains the Hastati within command range of the Triarii general.

Missile fire
The Two Leves not facing the Epirot skirmishers fire at the Pike battleline. Miss.

Melee
Agema Vs Roman Heavy Cavalry: both miss.
Elephant Vs Roman Heavy Cavalry: Both hit but the Roman cavalry fails to save and is destroyed.   Elephant moves into vacated spot. Note moving into the vacated a spot is optional but I did it as it does not hurt.

2 Leves Vs 2 Epirot Skirmsihers, all FV 1 and AV 1 - this may take awhile! Bizarrely one of the Epirot Skirmisher bases hits a Leves that saves but is pushed back; the subsequent combat sees the Skirmisher hit the Leves again, only for the Leves to save that hit again and be pushed back.


The skirmishers in combat.


Turn 4
Romans win initiative and have a cunning plan for the skirmishers.

Movement
There is 1 ) no turning restrictions in the rules (like DBx) 2) there is a bonus for ganging up on a base 3) the pikes are too far away from Pyrrhus to be ordered into combat.  These three things mean that the Leves and Hastati can gang up on the Skirmishers without fear of an attack by the pikes.  Note there is a 1" (1/2" in my shrunken movement rates) zone of control in the rules where if you move into it, you must contact the figure.  So I could not go crazy by moving them all in front of the pike.  But I managed to get a few  on each Epirot skirmisher.


The swirling mass that is surrounding the Epirot Skirmishers.


One Triarii charges the elephant in the flank, elephant turns to face. Turning to face is in the rules.

No movement on the Epirot side.

Missile
None

Combat
Hastati with two helpers on the Skirmisher (Hastati is on the flank but it has the best fighting value so I am using that, each helper adds +1 to the fighting value total): Hastati miss (rolled a 6).  While not explicit, it seems that the maximum hit is a 5, and attack values of 6 or more are done at 5 and reduce the armour value of the defender instead of having an automatic hit on a 6 (or at least in the optional rules it has this).  Skirmishers hit (on a 1)! and the Hastati (armour of 3 +1 for shield) do not save and are destroyed.
Note: Pila can normally be thrown if the Hastati charged in, but charging is in a straight line and they did not do this.

2 Leves on one skirmisher: both miss.

Agema Vs Roman Heavy Cavalry: both hit, but Roman Heavy cavalry does not save and is gone.
Triarii (FV4) Vs Elephant (FV4):  Elephant hits but Triarii save.  Triarii miss. Triarii retreat as were hit, Elephant hits again but Triarii save.

Overview at end of turn 4

Turn 5
Romans win initiative again.

Movement
Romans move another Hastati to the flank of the Skirmishers.  The Triarii general charges the flank of the elephant, the Agema then charge the flank of the Triarii. Triarii perform a morale check for infantry charged by cavalry and pass.

The two Triarii in combat with the elephant and Agema.

Missile
No missile fire

Combat
The side with the initiative gets to choose combats so Triarii Vs elephant first

Triarii (FV4) Vs Elephant (FV4): both miss
Triarii general (FV 5) Vs Agema general (FV 5): Triarii has a long reach weapon so goes first - hits but Agema saves. Agema hits and Triarii fails (Armour value 3 +1 for shield ).=4 but rolled a 5).  Oops.  Every base within 6" needs to check morale - only the other Triarii is in range and they pass.


Hastati with two helpers on the Skirmisher: Hastati hits and Skirmisher does not save and is routed; Skirmisher misses.

2 Leves on one skirmisher: both miss.

End of turn 5.

Turn 6
Romans win initiative

Movement
The Romans line up the Hastati in anticipation of combat soon.

Agema move against the Triarii.

Missile
2 Leves can fire at the pikes.  Miss

Combat
2 Leves Vs one skirmisher.  Hits and the skirmisher doe snot save.  Destroyed!  At last, the Romans destroy a second skirmisher.

Triarii Vs elephant and Agema: Triarii hits and Elephant saves.  Agema is attacking back as it has the higher Fighting value (5), adding one to it because of the Elephant reduces the Armour value of the Triarri by 1; Agema hit, Triarii rolls a 2 and fails to save and destroyed.

I call the game over as the Romans have no leader and they only have 3 legionaries compared to an elephant, Agema and all the pike block.

End of game

Verdict
Interesting rules.  They did not play how I thought they might.  High fighting values and armour saves means combat goes on longer than I expected.  This is a good thing.  The way the leaders worked and the restrictions on troops not in command is great.  Low fighting values and armour values (as per the skirmishers) means those combats went for awhile until someone rolled a 1 to hit.  It definitely would play better with more figures.  I did like the simplicity of the rule mechanisms that nicely meshed together.   I am not sure Baron Wars is suited to Ancients (it was never intended to!) but with a couple of extra rules around skirmishers (e.g. morale check after combat) it would have worked for this replay.  A fun game.

Sunday, 20 October 2013

Gaming on a Cruise, including Mighty Armies AAR

The Short Story

So I end up going on a cruise with the family. So what do I do - I take some figures to get a game in.  It gets better as the other families I am going with all have gamer dads. Yes, we gamed.  It included:


The Pacific Dawn off Lifou in New Caledonia - it was tough!

The Longer Story
Background
So a female friend of a friend organises to go on a 7 night cruise on the Pacific Dawn to New Caledonia and Vanuatu (from Brisbane were we live) and keen to get others to go.  My wife's best friend decides to go as well so naturally we booked to go as well.  All up there was 31 of us - about 16 children from 5 to 10 years old and 15 adults.  All the dads ( the 6 male adults) that went are gamers of one form or another.  It just turned out that way - some of us had never met, some were acquaintances etc. Most of us had never gamed against one another. We had fantasy role players, War Machiners, boardgamers, ex-WK40K's and me, the historical miniature gamer (although I have a large boardgame past).

We all brought something (although again, none of us actually worked anything out before or even talked about it).  This post is mostly my point of views of the games I played.

The miniature rules
I knew if I took minis then there would be at least one person to play - the guy I play Armati against about once a year was going.  I did take along the Armati rules - just a cheat cheat, I know the rules fairly well I was not going to cart all the rules.  But in case others wanted to play, I tarted up my one-page Mighty Armies Ancients rules.  Simple and yet great fun.  The tarting was upgrading the unit combat values in line with Mighty Armies 2nd edition and modifying a couple of the rules to be in line with the 2nd edition.  I also made sure that just about every rule was covered, or at least had a reference to it to jog my memory,  on the one page. It also had a couple of my tweaks included. I only have the MA and MAA PDFs and did not want to print out all the rules, short as that may have been.


The one page Mighty Armies ancients rules reference.
Note that I was planning to run either or both Intro Armati on 2'x2' (core + 50 points) and Mighty Armies Ancients with 40AP on 2'x2'.

The minis
I was hoping to use a document box to store a couple of armies, the rules, a felt mat and dice etc.  I bought some foam to layer in the box to shock proof the minis

What I had to put together - document box, some foam green felt and a bunch of small terrain pieces.

It turned out that once I put the two layers of 20mm foam with miniatures between them there was enough room for the 2'x2' felt mat and a few pieces of paper.  So I got a small plastic container and put the terrain, dice, rules etc into that.

Things that were more tedious than I thought: 
1. I had picked up a green throw rug from IKEA a few years ago as you can never have enough terrain mats!  I had no used it, so I would just cut out a 2'x2' square.  Felt does not cut as easy as I thought - it stretches a lot.  Next time I would just go with green cotton, although now I have the felt mat, it does have a bit of weight to it which was good.

2. I selected about 40 15mm DBx bases that could form an army of Greeks, Macedonians and early and Late Achemenid Persians.  Making the indents in the foam was more tedious than I thought.  I used scissors and fingers to rip the holes.  I thought it would be easier, but with hindsight it was always going to take a while.

Anyway, everything packed in fine, and there was no damage at all.

How it packed together - document box with figures on right and small plastic container for everything else.
I also packed Family business and Naval War is they were staple games I played in the 80s while wait for people to arrive for games.  I have no played either since about 1990.

The gaming setup
It was a 7 night cruise and 3 days of those was on islands.  The best time we found for gaming tended to be mid to later afternoon - that was when there seemed to be a gap in activities of interest (playing games after Martini Masters may not have been the best idea).  The other time was evening after the main show finished - about 9:00 onwards.  to be fair, we did socalise at this time as well and I think only gamed two nights.  Games longer than 1.5 hours were a struggle.  With so much on, 1/5 hours was about the longest break we got!

Since day one we seemed to have drifted to a standard spot on the promenade deck.  We had smooth sailing the whole trip and the place we staked out was out of any wind.  It was a place all of us knew we could go any there would be someone from our party there.  The tables were a good size - nearly 3 feet round glass tables.

Munchkin and Super Munchkin
I had actually not played either of these.  They form an excellent narrative and I found Super Munchkin (I only played one game of this) fun but long.  These were played in the first few days of the cruise but finishing a game proved difficult for the guys and the only time one was finished was when they started with level 5 heroes.  The "real gaming" started on the 2.5 days on the journey back from Port Vila.

Super Munchkin in action on the promenade deck.
 Star Wars: X-Wing
One of the guys had packed the Star Wars: X-Wing starter set.  I had three games of this - once as each tie fighter and once as Luke.   This game fit perfectly on the round table.  It was loads of fun.  I had played Wings of War about 8 years ago and had a blast with that but I like Star Wars: X-Wing just as much, if not more.  As soon as I came back I scoured the internet looking for the cheapest place to get it but have so far resisted.  I know I am going to break down and get it, the question is just how long!  Christmas is looking like a good excuse....

Family Business
Only one other person was familiar with this game but all that played it wanted to play it again.  It was as good as I remember it.  Fast, full of light hearted revenge and banter-driven.  What more can someone ask for.  I originally had the first edition which had a lot of information on the cards so you never had to refer to the rules.  I lost it and picked up a second edition which is not so good as it just has the heading.  I am tempted to write the description of the cards on the cards - it really makes the game go faster.

Family business in action on the promenade deck (different day to Super Munchkin)

Mighty Armies Ancients
We got in one game.  I had not bothered to write up army lists but had worked out AP points for the various units.  so I just selected what seemed like 40AP of Greeks and Early Achemenid Persians.  From memory the army lists were something like this:

Greeks:
7 Hoplites, phalanx (extra +1 if front and back row is phalanx) and fearless (no drive back)
2 Peltasts
2 Skirmishers
3 Heavy Cavalry

Persians:
1 Immortals
4 Sparabara
2 Heavy Cavalry, with bows
2 Light cavalry, with bows
2 Light Infantry

We played 2 a side but did not split the sides.  I think by the second move everyone had figured out the rules.  I briefly explained the rules and said "I may have left something out, but it will only come to me if it is to my advantage and I can say 'actually, you can't do that'".  So, on about turn 4, they bowfire (shooting I) at the general with a number of troops and I then remember a rule and say "actually, the general has 6 combat value so you cannot actually cause any damage.  I did say that I may remember some rules if they are to my advantage!"

A good move by the Persians sees the Horse archer move to the centre of the field to escape some hoplites on that flank.  On the other flank the pride of the Greek cavalry charged directly ahead into the Immortals and Sparabara.  Two were lost to bowfire, and the other died in the resulting melee. 

The game after about 3 turns.  The greek cavalry on the lower right was wiped out for no losses to the Persians
Meanwhile, the Greek smaller hoplite group and peltasts ganged up on the Persian cavalry and it was lost.  The horse archers tried to rescue them, but they were also lost.  The main battle was set between the main Hoplite unit and the Sparabara unit.  It was very close, one unit dying per turn until finally the Greek general, last base standing, was destroyed.

A bit later on.  The Persian cavalry to the top right was wiped out.  The main battle units clashed in the centre.

Playing the game was so much fun, everyone wanted to play until one side was eliminated.  The Greeks lost, but there was only about 3 Persians left on the table!  The whole game from unpacking, explaining the rules and playing until one side was gone was 1 hour.

One side had lots of bows, and the other side had none.  I used the shooting rules as it was in the rules.  It helped that all the bow-armed units were only Shooting-I.

Other games
3 people tried Naval War but it does not work well with 3, as they found out when the Destroyer squadron turned up early, they could not get rid of it and one player was out on turn 3!
2or 3 people tried out King of Tokyo - from all reports a fun game.
There were a number of games of Sequence going during the cruise.  I did play one game.  You have to think all the time so it is very quiet - not much room for banter.
Strangely no Eurogames.  Which is not a bad thing as I am not really a fan of them!

Verdict
A hoot!  I go more gaming in on the cruise than I have in the last few years.  And a wide range of games too. I was not the most prolific gamer in the group but gave it a good go - some stayed up a few nights to play.  If you ever get to go on a cruise with some gaming mates, you need games that take about 1 hour, and do not take up that much room.  And you can easily play miniatures.  I think if we had got in a game of Mighty Armies at the start, we may have got in another couple games later on.  No matter though as there was plenty of gaming choice available and we all had a great time, both gaming and non-gaming.