Friday, 23 August 2024

Operation Jupiter 23 - Into the Jaws of Death. 20mm WW2 battle report.

Introduction

This is game 23 in replaying the scenarios from the Briton Publishers Operation Jupiter skirmish scenario book.   Links to previous games are on this blog page.

Rules used

I am using a variant of my 4x3 grid rules without grids and sections are 3 person units rather than 1 base. I have changed them a little and now if within 3” count as fighting in melee but all have cover modifiers. Also activation is now (mainly) 2 section/vehicle per side per player turn.

Scenario

The British player has eight turns to capture the two objective buildings.

Troops

British

1 Company HQ

    3 figures

2 Reduced platoons

    1 platoon HQ (1 figure)

    1 2" mortar

    2 Sections (3 figures each)

1 Churchill VII

1 Achilles M10

British are Green (this is to simulate the demoralisation of the troops)

Germans

1 Zug

    1 Zug HQ (1 figure)

    2 Gruppe (3 figures each)

1 MG42 team

1 PzKpfwIV

Germans are all regular.

Deployment

Deployment

The Germans cannot really defend both objective buildings as it would split the force too much (there is a road to cross between them that would be deadly). And the British have quite a few paths they can take and cannot cover them all.  Although they could support one another, the building on the cross roads is a bit isolated.  Have gone with defending the rear objective building with a Gruppe at the T-intersection to cover both roads.  The MMG is set up with a good field of fire and the PanzerIV is at the rear to provide support for attacks on infantry.

The British have a number of paths – downs the road, down the sides and though the woods.  The key is that both objective buildings have to be taken so need to focus on the rear one and hopefully the forward one can be taken after.  So will come up the road with the tanks and two forces of infantry (a platoon each) will leap frog the buildings on either side.   The force for the rear objective building can also use the woods.  The force on the other side can provide support.   The British will need to be aggressive to get both building in 8 turns.

Game

The British move on 4 infantry sections on either side of the road.  The question for the Germans is do they fire now or wait until they get closer or wait to see where the other unit’s come on?  Rolled for it and they do not fire.

British first units enter.

The British continue to enter more forces and advance.  The Churchill enters on the road and spots the PanzerIV.  Needs a 6 to hit.  Rolls a 6.  A 5-6 will cause damage.  Rolls a 6.  PanzerIV suppressed and damaged.

The state of play. All but the British Achilles in on the table.

The German’s fail to unsuppress the PanzerIV.  The MG42 fires on the infantry in the building at the t-intersection and suppress 2 figures.  The British get a section as reinforcements (event) but this also limits their activations to 2.  The British section in the woods moves to the edge and spot the German Gruppe in the building and suppresses one.  The Germans fire back and suppress two.  Another British section then moves into the adjacent building, fires and the rest of the Gruppe is suppressed.  The Germans fall back as they are all suppressed and in close range of unsuppressed British units.

Infantry first contact!

The Germans unsuppress two of the three figures in the retreating Gruppe.  The MG42 fires on the section on the woods and suppresses another figure.

The British continue to push forwards rather than unsuppress units.  All the British are Green so will be harder to unsuppress as well.    The British move into the building recently vacated by the Germans and fire on the MG42 team.  Two suppressions and the MG retreats into the objective building.  The Germans behind the wall are within 3 so fire and KO one figure, suppress another.  Move movement for rear sections and try to rally the section in the woods but only one figure is good again, leaving two still suppressed.

The British push forward

The German behind the wall fire on the British in the building, cause another suppression and the British are forced to retreat.
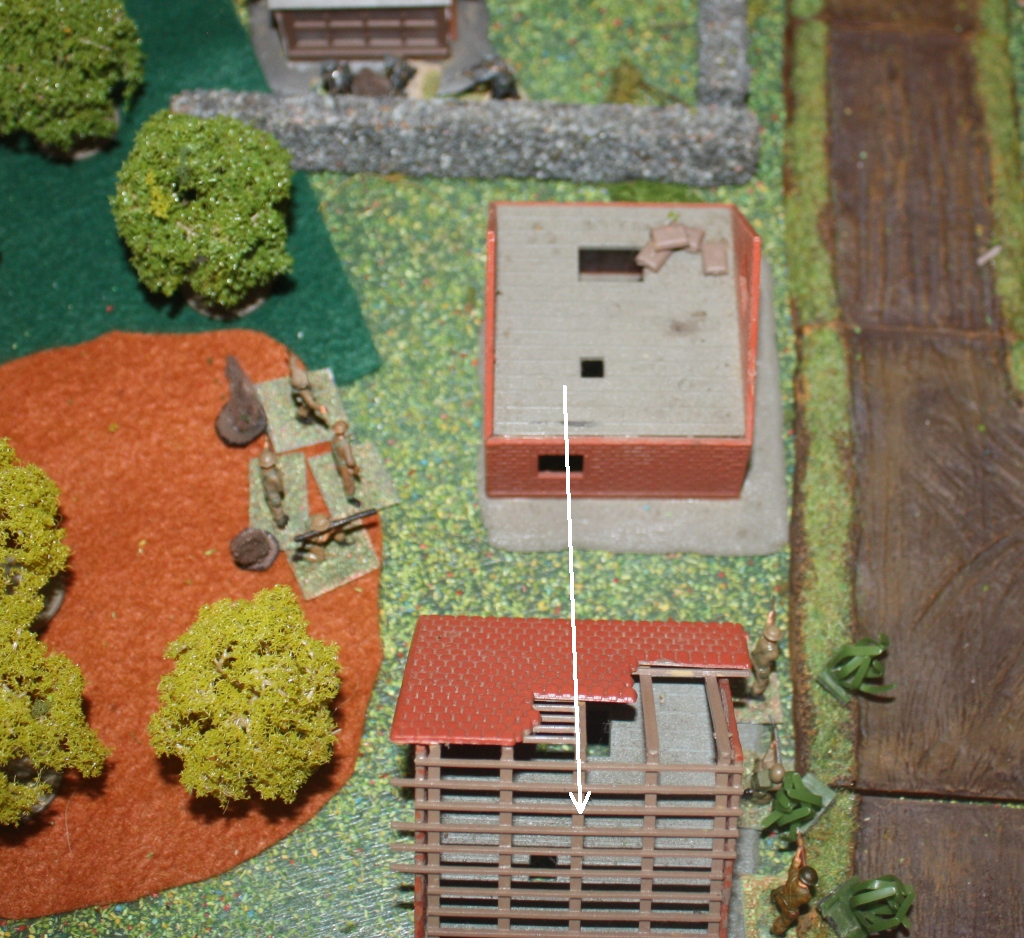

The British are forced to retreat from one of the main buildings.

The MG42 team unsuppress.  The British are halfway through the time limit and forces everywhere are suppressed!  One section moves into the objective ruins.  So half the objectives taken.  Time to bring on the Achilles and so the tanks can support the infantry.  First need to remove the PanzerIV threat but the Achilles fails to hit.  The British attempt to unsuppress and do manage to unsuppress two but rout another.  Still lots of suppression for the British.

The British are consolidating.  The Achilles is on at last.

The Germans focus on rallying and all on their side are unsuppressed now.  The British Achilles fires at the PanzerIV and misses.  The Churchill fires and manages to damage it again.  The PanzerIV is destroyed.  This will free up the tanks to provide infantry support for the last two turns.   The British company HQ move into a building and fire on the Germans behind the wall.  One suppression.  Return fire sees one British figure suppressed.  The British section in the other objective building move to the wall, fire on the Gruppe in the building and suppress them all (excellent dice rolling)!    They have to retreat as they are within 3 of unsuppressed British.  There is nowhere to retreat but into the woods.  So close to retreating off the table.  Wow.  The British were very lucky to cause that. The MG42 in the building can return fire as within 3”. They suppress 3 figures.  However, as the section contains a leader, there are 4 figures in the group and so they do not need to retreat.

The tide turns towards the British.

The German MG fires on the section behind the wall and forces them to retreat.  The Germans behind the wall fire at the building and cause another suppression.  The suppressed unit tries to rally but is unsuccessful.

The German manage to keep the British at bay.

The British are desperate, two more turns to go.    The Building section fires on the Germans behind the wall and suppress none, the British in the woods fire at them as well and suppress one.  The Germans retaliate against the building and cause another suppression and the British are forced to retreat.  The British move up the Churchill and manage to suppress the MG42 in the building.  All units in the second objective are rallied (great rolls!) – ready to charge next turn.

The British attempt to cause some damage but are still not in a great position.

The Germans get three activations.  Move a figure back into the objective building to defend it, try and unsuppress the MG and fail.  Unsuppress the unit in the woods – all unsuppressed.  May be useful for a counterattack.

Last turn for the British.  Two figures from the woods move up to the wall and attack the German figure there.  KO!  The Churchill fires at the objective building and supresses the figure there.  The MG42 and the figure need to retreat as they are within range of the unsuppressed British at the wall.  They retreat into the woods.  I will allow the section in the second objective to charge into the main objective building.

The British take the second objective

Ok, the final turn for the Germans.  The four figure unit in the woods charge into the objective building to try and retake it.  The British also have four figures, the Germans get to fire first but the British have the advantage of not moving.  The Germans roll terribly and score one suppression.  The British respond and score three suppressions.  Not enough to cause the Germans to retreat.

The Germans counter-attack

The main objective building is in dispute with both sides occupying it.  The British lose at they do not solely occupy both building.  So close!

End

Verdict

That was such a nail-biter of a game. Amazing how much fun you can have on a small table.  The British got whittled away and just did not have time to rally enough units.  The Germans however could not get enough hits to stop the British entirely.  The amount of British attackers show though as they managed to keep coming back.  And at the end they were so close to winning. 

Monday, 19 August 2024

Operation Jupiter 22 - Jabos. 20mm WW2 battle report.

Introduction

This is game 22 in replaying the scenarios from the Briton Publishers Operation Jupiter skirmish scenario book.   Links to previous games are on this blog page.

Rules used

I am using a variant of my 4x3 grid rules without grids and sections are 3 person units rather than 1 base. I have changed them a little and now if within 3” count as fighting in melee but all have cover modifiers. Also activation is now (mainly) 2 section/vehicle per side per player turn.

Scenario

The Germans have 6 turns to capture the objective building.

Troops

British


1 Platoon

    1 platoon HQ (1 figure)

    1 PIAT team

    1 Section (3 figures)

1 6pdr ATG

2 fire missions 25pdr

1 Hawker Typhoon with 4x20mm cannon and 8 rockets (arrives turn 4)

British are all regular.

Germans


1 Zug

    1 Zug HQ (1 figure)

    2 Gruppe (3 figures each)

2 251/1 halftracks (transport)

2 Pzkfw IV

Germans are all regular

Deployment

Deployment

British just need to hang on, using the 25pdrs early and then hoping the Typhoon disrupts the attack.  The Germans will move the infantry on first into the buildings to each side of the intersection and then the tanks.  The Germans know the British are setup on the other side of the intersection so will only be able to move the halftracks to unload in building before the intersection.

Game

Germans move the infantry (via halftracks) into building on either side of the road

German infantry on the board

The British call the 25pdr into one of the buildings (the one the British Lieutenant can see) and suppresses two figures. The Germans move the Panzers on.  The Germans cannot spot anything yet.

Panzer IVs enter to support the infantry.

The 6pdr shoots at one of the Panzer IVs.  They hit.  The Panzer Iv is suppressed (-1 to hit, can’t move for a turn) and damaged.  The PIAT is too far from the tanks to hit.  The 25pdr is successfully called again and forces one suppress figure to retreat out of the building.

6pdr damages one of the PanzerIVs.

The Germans are pressed to time.  They move the Gruppe with the commander to the building next to the objective.  And spot the British hiding there!  They shoot and cause two suppressions.  The British get to return fire.  And what a great return fire – 1 figure routed and the other 3 are all suppressed.   The three suppressed have to retreat as they are within 3 of unsuppressed infantry.  On the other side of the road, the suppressed Germans are unsuppressed.

Action near the objective building.  Did not go well for the Germans.

The British get an event – a sniper.  It suppressed the Germans in the building that were just unsuppressed.  Due to the event, the British only get one activation which they use to destroy the PanzerIV.

Destroyed PanzerIV.

The Germans try and rally the Gruppe in the ruined building but do not succeed.  The PanzerIV attempts to direct HE the objective building but does not succeed either.

It is turn 4.  The British Typhoon appears.  I have no aeroplane models so will just have to imagine it.  It has 8 rockets and 4 20mm cannon. But it has to see something to hit it.  The aircraft attack the ruins. 

The 20mm cannot largely does nothing but the rockets cause the Gruppe to retreat from the building.  A few rockets go astray and to hit the PanverIV and it is destroyed!  I used the aircraft rules from my earlier homegrown rules as I don’t really have any yet suitable for the modified ww4x3 rules.

The rocket wreaks havoc among the Germans.

The German unsuppress 2 figures with the commander and all the figures in the other building.

The British are mostly unsuppressed. 

It is turn 6 and the Germans have no chance on getting to the objective building in time.  The British have won!

End game.

Verdict

It was all going to depend on how good the Typhoon was.  As per the actual battle, it was quite good.  The Germans could not recover in time to get to the objective.  It was interesting to play.  I did forget about the PIAT team – they should have been spotted by the Germans and likely would have been suppressed and retreated.

Friday, 19 July 2024

Operation Jupiter 21 - Counterattack at Maltot; 20mm WW2 battle report

Introduction

This is game 21 in replaying the scenarios from the Briton Publishers Operation Jupiter skirmish scenario book.  Links to previous games are on this blog page.

Rules used

I am using a variant of my 4x3 grid rules without grids and sections are 3 person units rather than 1 base. I have changed them a little and now if within 3” are fighting in melee but all have cover modifiers. Also activation is now (mainly) 2 section/vehicle per side per player turn. 

Scenario

The Germans have six turns to capture the British Battalion HQ. The British must avoid this.

Troops

British

1 Platoon

    1 platoon HQ (1 figure)

    1 PIAT team

    1 Section (3 figures)

1 Vickers MMG

1 17 pdr ATG

1 105mm battery mission (poor availability)

British are all regular except the PIAT team and 17pdr crew that is veteran

Germans

1 Zug

    1 Zug HQ (2 figures)

    2 Gruppe (3 figures each)

3 Fire missions of 80mm mortar (average availability)

2 Tigers

Germans are all regular

Deployment

Deployment

This game is at very short range. The deployment zone constrains a lot on where the British can setup.  The Tigers cannot really make it thorugh the buildings so will enter as support, hopefully out of the range of the 17pdr and PIAT. The British Artillery has little chance of turning up but will be very useful if it does.  The short timeframe for the German’s to reach the objective will mean they cannot dally with suppress and movement and may need to take risky moves.  All up it is likely to be short and random. Random due to small units, artillery chances etc.

The Germans enter the board on turn 1 from the southeast corner in the woods.

Game

The Germans enter the Tigers first to provide fire cover for the infantry.  This may or may not be a good idea.  The Tigers will move just far enough to be able to fire on the objective building.  They can’t take the building so in this scenario they are effectively very expensive expendable units.

The Tigers both fire at the objective building but only cause one suppression.

Tigers on the table!

The British retaliate by firing the PIAT (only chance they may have!) and te 17pdr can just see the far Tiger but will call it as being in hard cover.  Likely the only time the British will be able to take out the tanks.

PIAT: Missed.

17 pdr: Hit (rolled a 6, the only score that would hit) and then subsequently penetrated and destroyed the Tiger.

Tiger destroyed (top right)

The remaining Tiger fires but misses the objective, a Gruppe moves on but fire is mostly ineffective.

The British retaliate with the PIAT at the Tiger and the MMG at the newly brought on Gruppe.

Intense fire across the road

The Tiger tries again and the HE hits and suppresses everyone in the objective.  The other Gruppe enters at manages to supress the Vickers MG.

More firing across the road

In the British turn they roll amazingly well and unsuppresses everyone that was suppressed!  The Germans were hoping to rush in and take advantage of the suppression but seems not to be the case.  Next turn the Tiger suppresses them again and the Gruppe charges the MG (range is less than 6 (about 50m)) so the MG only gets 1 dice compared to the Gruppe’s 3.  The Vickers is destroyed at a cost of 1 figure from the Gruppe.  They occupy the building.  

Germans charge the MG in the building at close range

The British 17pdr crew charge the building.   They lose one figure but the Germans are both suppressed and retreat to their former building across the road.  The Germans in the other building try to rally but 2 figures rout!

What is left of the Germans

The turn limit is up, the Germans are at half strength and I do not see them getting the objective building in the next turn or two, even if I did keep playing.  They were so close!  

And just realised I forgot about the artillery and I did not bring on the German HQ of 2 figures!  Let’s play two more turns.

The Zug leader arrives, unsuppresses a Gruppe.

Zug leader arrives

The British unsuppress but then the German artillery is successfully called onto the objective building and the British are all suppressed.  The Germans charge across the road into close combat.

Germans charge into close combat with the objective building’s occupants

The Germans lose one figure, as does the British.  The British are all suppressed so need to retreat.  The Germans now have the objective and win!

The Germans own the objective

Verdict

If I had remembered the artillery earlier the Germans would have had a much easier time of it.  It was still touch and go and easily could have gone against them.

Monday, 8 July 2024

Operation Jupiter 20 - Secure the Village. 20mm WW2.

Introduction

This is game 20 in replaying the scenarios from the Briton Publishers Operation Jupiter skirmish scenario book.   Links to previous games are on this blog page.

Rules used

I am using a variant of my 4x3 grid rules without grids and sections are 3 person units rather than 1 base. I have changed them a little and now if within 3” are fighting in melee but all have cover modifiers. Also activation is now (mainly) 2 section/vehicle per side per player turn.

Scenario

The British have 8 turns to capture the objective building. The British player enters from the northwest road on turn 1. Although the Germans have a small force, they can concentrate their firepower in a narrow lane. The British must not become channelled by the road.

Troops

British


1 Platoon HQ

    1 figure

    1 2" mortar

    1 PIAT team

3 Sections

    3 figures

1 MMG

British are all regular

Germans


1 Zug HQ

    1 figure

2 Gruppe

   3 figures (with panzerfausts)

1 MG42 team

Germans are all regular


Deployment

The German’s deploy one Gruppe in the objective building, one Gruppe in a building opposite and the MMG in the building that has a good view up the road and the building along the British entry road.

German deployment

The British have no choice in coming on the road but will quickly pivot off the road to the right and get to the objective.  Time is tight.

Game

British enter 2 sections.  The first section comes under MG fire and 2 figures are out of the fight.  Already.

Germans MG lining up the British

The British run as fast as they can out of the line of fire, using the buildings to block LOS to the MG.

British run to cover

The remaining British enter – the Vickers MG to a building that has LOS to the objective but not in LOS for the German MG.  The third section enters with the Major and support (PIAT and 2” mortar), the German MG fires at the third section and two are suppressed (unlucky).

The remaining British enter

The first (and single figure) section and second section move into the woods and spot the Germans in the building opposite.  They fire, suppressing one.  The Germans fire back and suppress the first section that retreats.

Germans and Brits clash

The Germans in the building fire at second section in the woods, KO’s one and the other two are suppressed and forced to retreat.  The MG fires at the far building but inflicts nothing.

Germans force the British to retreat further into the woods

The British third section in the building rally one figure and one other is now OK. The rest of the unit (including the major and the 2” mortar) move towards the woods.  The Vickers MMG can see (just) into the German Gruppe in the building and cause two suppressions.

British fire and movement

The Germans attempt to rally their Gruppe in the building. Alas, even with the commander present, one routs and the other two figures remain suppressed.

The British concentrate on the building on their side of the road

A bit of fire and rallying with the result that the second platoon (2 figures) in the woods is unsuppressed, as is the German Gruppe in the building.  Two more turns of trading fire saw one German figure in the building rout, and the British infantry in the woods advance but then retreat again suppressed.

The British just cannot make headway

The turn count is up and the British have not managed to take the objective.  A win for the Germans!

Verdict

That was good fun!  Two things from the game:

1. I seem to have rediscovered my art of being able to play a turn or two (5-10 minutes to play and write some notes) and then come back some other tie, even days later.  I lost this several years ago, glad it is back.

2.  I have overused the word vignette but I find these games are like vignettes of a larger battle and are very tactically challenging with a small number of units and a small battlefield.

It was never going to be easy for the British.  They only had one more section than the Germans and the German MMG was going to be tough to avoid. 

Saturday, 15 June 2024

Operation Jupiter 18 - Maltot Under Siege. 20mm ww2 game

Introduction

This is game 18 in replaying the scenarios from the Briton Publishers Operation Jupiter skirmish scenario book.   Links to previous games are on this blog page.

Rules used

I am using a variant of my 4x3 grid rules without grids and sections are 3 person units rather than 1 base.  But mostly the same.  I did play this scenario out with the rules but they were too brutal (no cover bonus in a building if moved into it).  So I have changed them a little and now if within 3” are fighting in melee but have all cover modifiers. And also activation is now (mainly) 2 section/vehicle per side per player turn.

Scenario

Each side has 8 turns to control the objective building. Control means no unsuppressed units occupy the interior structure.

The scenario calls for an urban layout so rather than use a large table I am opting to set the game up on a 2’x2’ table.

Troops

 British

1 Platoon HQ

    1 figure

    1 2" mortar

    1 PIAT team

2 Sections

    3 figures

3 Universal Carriers (enough to carry the infantry assuming 3 figs per carrier)

1 x Achilles (M10)

1 X Churchill VII

British are all regular

Germans


1 Zug HQ

    1 figure

2 Gruppe

   3 figures (with panzerfausts)

2 Halftracks for transport (to carry the infantry)

2 x Tiger I

Germans are all regular, except the Tigers that are Veteran.

Deployment

The objective building and table edges of entry

Game

British get to move first and move on a Churchill and a section of infantry (via the Brens). They have taken the objective building.

British have taken the objective

The Germans move on two Gruppe.  The Gruppe is the buildings are with 3” of the objective occupied by the British.

Germans move on two Gruppe

The Germans fire and suppress one of the figures.  The British return fire and 1 figure is KO.

 The British move on the second section into the edge of the woods and the Company HQ into another building at the T-intersection to provide support for the objective.  The British fire at the Germans again in the building and suppress one.

The remaining British infantry enter the battlefield

The german turn is an event.  A random 81mm attack on the objective building but no effect.  The Tiger enters the battle and fires at the Churchill but misses.  The Gruppe and Brits continue to exchange fire that sees another British figure suppressed.

Tiger enters.


Overview

The British in the objective building unsuppress.  The Churchill hits the Tiger but for no effect. The British and Germans exchange fire and the Germans are all suppressed and so retreat.  The Germans in the forest move into the building just vacated by the other German Gruppe.  The second Tiger enters.  Lots of firing for no effect.

View from the German entry point

The British section in the forest move up to also be able to attack the building.  They are successful and the British manage to suppress all the Germans in the building forcing them to retreat.  The British advance and take that building.  The tanks are surprising ineffective with lots of shots missing.

British take control of another building

The British section manage to rout some Germans behind the wall.  Even though the Germans in the building manage to unsuppress (with one routing) it is not enough.  Time has passed and the Germans are unable to occupy the building so retire.

British successful in defending the building


End   

Verdict

The rules are working well. I have had this table setup in the map drawers for 2 years – have been dithering over rules to use. Finally I have played a game!  It was good to use the 20mm forces again – I have great fondness for them and likely my favourite scale and period to play.  The rules are the ww3x4 with some minor changes for no grids and also using the activation system from another older ruleset of mine (ww2 on a 12x12 grid) rules that seemed to be better than activating by squares.  Basically roll a die and usually 2 units can activate.  Needs more testing but is fine so far for only a few units and a 2’x2’ table.  There are another 6 or 7 scenarios to play out on the same layout so hoping to keep using these rules for them.