Saturday, 17 May 2014

WW2 20mm West Front Goodwood mini-Campaign Game 5

Introduction
I have re-setup a1/2 a table tennis to continue playing a 7 game mini-campaign set over 2 days at the opening of Operation Goodwood. This is game 5.  Game 1 and some more background, see this blog post.  I set up and played Game 4 just after Christmas 2013 and then had to take it down so a friend had a place to sleep.  The friend has found a place to live so the campaign is back on!

Scenario 5 - Capturing Le Poirer
The Guards armoured reconnaissance battalion is tasked to clear a large farm of German defenders.

The campaign so far - British (orange) have won two, Germans (blue) have won two.
Troops
Germans
1 Panzer Grenadier HQ
3 Panzer Grenadier squads
1 Dispatch rider (allows for one automatic successful radio call for artillery)
3 Marder IIH (Actually H-39s but the scenario suggests they are treated as Marders so I will use Marders. I have no H-39s.)
1 FAO in Kubelwagon
Dedicated Artillery - 1 x 105mm (scenario has 2 but that would equivalent to 1 in my rules)
Reinforced building (I will treat as bunker that in my rules reduces flame and HE effects)

British
2 Squadrons
    1 Cromwell CS
    2 Cromwells
(scenario calls for 3 Cromwells but I do not have 6 of them, but do have 4 and 2 CS tanks)
1 Infantry command
3 Infantry squads
1 PIAT team in Bren carrier
1 Wasp
2 counter battery missions (I ignored this as my rules have no counter battery rules)

Scenario changes
Game is supposed to be on a 6'x6' but I am playing on a 4.5'x5'.  No changes to accommodate this, it will just be a little cramped!

The objective is the Chateau that starts in German hands.  Germans are in a defensive position.

Deployment
Germans deploy with Infantry unit and MMG in the Chateau. The Marders are setup around the centre with good LOS over the entire board.  The other two infantry units are placed on the flanks.  All German units are not spotted at the start of the game.

The British are hugging the centre and their left flank as a focus, rather than attack across the entire front.  The British are in the open will be spotted the moment they move.

British to the left, Germans the the right.
Painting sidenote
So I set the game up and then realised that I did not have any painted Cromwells.  The last time I had used Cromwells was in the early 90s and I used the time-honoured practice of simple substitution: a Airfix Churchill turret on a Matchbox Comet hull.  But in the intervening years I had obtained 4 unpainted Cromwells, 1 badly painted Cromwell and 2 unpainted metal Cromwell CS (with the 95mm howitzer).  Woo-hoo, if I paint them up I can make two squadrons of 2 Cromwells and a Cromwell CS. But the last time I painted a tank was...maybe 1988..could be 1994.  And all I used to do was spray them a colour. I know a lot more, even if I have never practiced it.  So, using paints I already had (I actually had British WW2 green in a spray can that still worked), I undercoated, top coated, dry brushed in a lighter green, washed in black and added some mud.  I also had to paint tracks and three tanks had infantry torsos I had to paint them too.  I think they came out OK for my first tank paint job in 20 years.

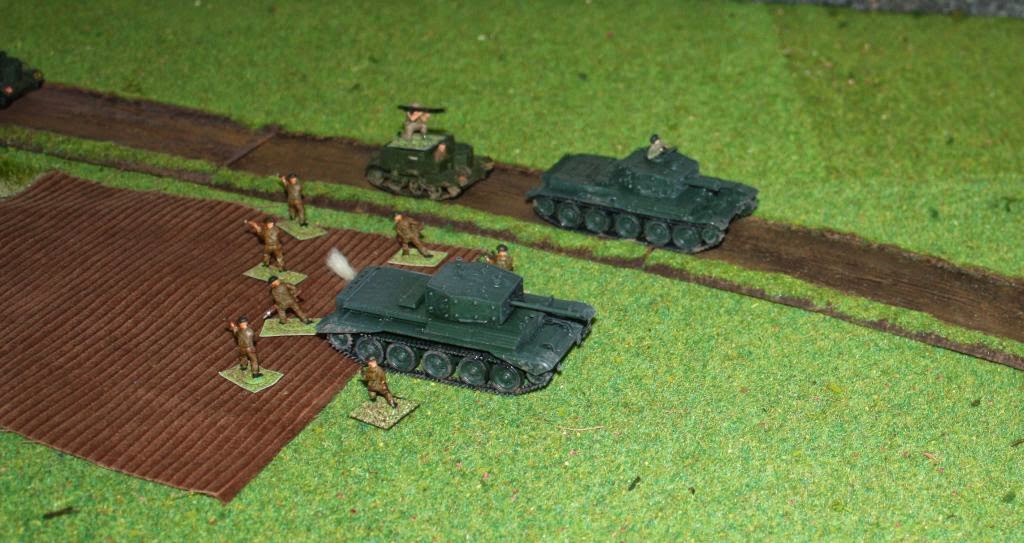
Some of the the painted tanks.  The red spot on the near tank is the previously badly painted tank colour that I missed covering up.
Game
British advance slowly as the infantry only move 6".

A shot of all the infantry, with some of the supporting tanks, just before moving out.
One Cromwell squadron does not move and keeps pumping HE shells into the Chateau, causing a few casualties. To the dismay of the Marders, this squadron is just out of range of the their guns.

The chateau from the British side.  A Marder to the right, the Kubelwagen FAO to the left.
The German 105mm offboard artillery cuts one infantry unit by 50% over a few turns. The unit valiantly carries on (passed all required morale checks).

Along the British right flank, they spot the MMG on the far side of the stone wall and the Cromwell tanks moving down that flank mow it down with their machine gun.

The rest of the early game was the Germans waiting until the British got within a decent range and the British madly trying to get into a decent range to spot the enemy.

End of the early game with the British advancing down the open fiends. The infantry unit in the centre is the one cut down to 50% by artillery.
A Marder III opens fire on a Cronwell in range but is destroyed by return fire.

The  (wrong camo) Marder in the woods on the German right.  Unluckily it was spotted with its first fire and the Cromwell target returned fire and destroyed it.
Mid game the German artillery and fire from the Chateau managed to rout the depleted advancing British unit, then they caused another unit to retreat and then subsequently rout.

The retreating infantry unit that routing with its next morale check.
Only one British infantry unit left of the British left flank.  At least it is well protected by the stone wall and being far away from the action.

The German Chateau infantry forces were eventually routed by Cromwell MG fire.  But no British infantry to take advantage of that fact.  The German infantry unit on the right and in the woods crosses to road into the centre woods to assist with a possible counterattack.  It lost a few units crossing the road from long range MG fire from Cromwells but otherwise OK.

Crossing the road from the German point of view.  Another Marder on the right.
The Cromwells at the rear finally advanced and one is destroyed by a Marder III.  There was a lot of long range fire between the 2 remaining Marders and the Cromwells with lots of ricochets but no pinning or destruction (a run of poor die rolls on both sides).

One of my favourite tanks that I get out at every opportunity.   This tank I acquired back in 1981 and was in use by that person for a few years before then.  Still going strong after nearly 35 years.  Esci (now Italeri) is my guess.

And the last of the British  infantry slooowly advance down the left side of the board, protected by the stone wall.  They have a long way to go.

Cromwells guarding the Chateau.  Favourite Marder bottom right.  Last of the British infantry can just be seen at the top of the picture.
The PIAT carrier advances next to the woods adjacent to the chateau and the PIAT team gets out to scout the wood.  German HQ fires at it from across the road for no effect.  The Wasp then advances and flames the Battalion HQ causing it to routs.  The FAO in the woods enters into melee with the PIAT crew and kills them.

The Germans have passed there force morale check twice but fail it now and retreat off the board.  A win for the British.

End game.  The British infantry have not made it to the chateau yet the the Germans are withdrawing so a win for the Brits.
Verdict
The game dragged a little bit when there was only one infantry unit left that hiked it on foot from one end of the board to the other.  Other than that is was a very close game and I had no idea who would win it until the Germans failed their morale.  This is the second game where poor die rolling has seen long range tank battles not inflict much damage.  It happens.  The rules (latest version from the my WW2 rules page) are working how I want them to and there are two more games to go to test them out.

Saturday, 10 May 2014

20mm East Front 1942 Battle of Butsk (second go)

Introduction
I played a second game with my friend's 9 year old son at Easter.  After playing that game, I then played the same scenario against my friend.  I did as well as I did in the game against his son i.e. not well.

Rules
We used the same rules as the earlier game.  We did not us any spotting rules. The rules are here (opens a pdf document).

Scenario
I used the same scenario - Battle for Butsk, east front August 1942 - that I have had electronically for a long time but never used. I was laying the Russians and to balance the game a little added an extra mortar and some extra infantry compared to the morning game.  It made no difference and was not enough to balance out the German advantage of occupying the town first.  For another replay, I would move the town a little further towards the centre OR increase the Russian forces by an extra unit of infantry OR add 2 more T34s and another AT gun.
 
Troops
German (W---)
3 Panzer IVJ
2 Panzer IIIJ
2 Sdkfz 250/9 (as I do not have any Sdkfz 222)
1 HQ
    1 halftrack
    4 rifles
1 Armoured Panzer Grenadier unit:
    9 rifles
    1 MMG
    4 halftracks
1 Motorised Panzer Grenadier unit:
    12 rifles
    1 MMG
    4 trucks

Russian (me)
3 T34/76
3 T-70
1 Tank riders
    9 SMGs
1 HQ
    3 rifles
    1 truck
2 infantry units each:
    12 rifles
    1 MMG
    4 Trucks
1 Support Unit
    1 45mm AT gun
    2 82mm mortar
    1 truck

Table setup
As per last game but to repeat: River running roughly down the centre and crossable by 3 fords only.  A village in the central area, but closer to the German edge. The objective is to hold more buildings of the town than the other side.  There are scattered woods and wheatfields.  The Germans have a good advantage as they can get to the village and occupy the building first.  This is what happened in this game.

The board, same as last game!
The Game
W--- split the forces in two - one to go directly for the village, the other to skirt around it to the left and come at the village that way, and also protect the left flank.  I, as the Russians, opted for something similar.

Germans in from the left, Russians from the right.  An overview of movement during the game.
W--- (Germans) very quickly realised that he could get his trucks down the road and into the building before I could. So he did that, taking over most of the buildings by turn 3.  The buildings are the objective, so it was a good focus.  By the end of turn three, I was still a move away form the buildings that W--- had already occupied.

The Russians coming in down the road with T70s leading.  Another unit of infantry in trucks makes its way over to the right.
The Germans have occupied all the building on their side of the road (to the left in this picture), backed up by the PanzerIVs.  Note we tend to remove transports once used as they just occupy space otherwise.
The Russians unloaded most of the SMG infantry off the back of the T70s into the woods just before the crossroads.  This was an excellent position for the German to machine gun them, which they did.  A single rifle figure fires with 1d6 while an MG uses 4d6 (and also fires out to 36" while a rifle is only 18").
The T70s unloading infantry into the adjacent woods. View is from the German held buildings.
It was I noticed the range from the SMGers to the closest building was more than 6" (the normal move for infantry) but less than 9".  In my rules, infantry get a 9" move if charging into close combat.  So I said to W--- "I know I haven't mentioned it, but infantry get a +3" move if charging into combat.  No, really, I am not making it up - it is in the rules".   I charged in and defeated the 2 Germans defending the building.  This was the only building I actually got to see the inside of, but I did kick him of of a few more (see later).

The building on the left bottom that was charged by the Russians and successfully occupied by them. Note all the other building have Germans in them.
The game turn is driven by a card deck - it had about 11 black cards, 8 red cards and a joker.  Cards are shuffled at the start of a turn and flipped over one at a time.  Black = any one German unit may activate (move and fire), Red = any one Russian unit may activate, Joker signifies the end of the turn. While there is about the same number of units on each side, the extra black cards represent the better German command and control (compared to the Russians).

So, the next turn starts.  Red card.  I charge another building and win.  Red card again.  I fire on another building, causing them to be pinned.  Red card again.  Fire on the pinned units and they are forced to retreat.  Red card again.  Fire on another building an cause a pin result.  Red card again.  Fire on another building and cause a pin.  Two more red cards but no further damage.  7 red cards in a row.  W--- was getting a little flustered with my run and was seeing all his hard work disappear.  But then the string of black cards came out (I think about 7).  Rallied the retreating unit, pinned and eliminated the units from the buildings I occupied.  Re-occupied the building with other troops.  KO's a couple of T70s. All the Russians gained lost and more. My hold was fairly tenuous so it was not going to take much to push me out again (and it didn't).
 
View from the Russian side - 1 T70 and all the infantry left on that side (about 30% of what I sent down the road)
Meanwhile, the German left flank was going well also. The Russians had sent one infantry unit down there but was facing the two Sdkfz 250/9, the PanzerIIIs and also an already occupied village.  I managed to get the infantry close enough to be protected by a stone wall and with a good shot at one of the buildings.

The Russians get a unit ready to assault the building to their front.

If we actually see what is around the building, we can spot Panzer IIIs to the right, the Sdkfz250/9 rumbling to the rear of the building, and infantry is in the building.
I believe my infantry survived one turn behind the stone wall - they were pinned, lost most of the figures in the unit and then quietly routed. A unit check morale when it loses figures and may become pinned.  If already pinned, it will retreat.  If it has lost at least 50% of the figures, there is a chance it will rout. 

The same happened in the central area.  My remaining two infantry units, already down to less than 50% each, routed under withering fire from the Germans.  It was at that point the Russians withdrew.  Without any infantry to control the building and half the armour gone, it was time to retreat. There is an overall force morale check when more than 40% of the units on the board are pinned or routed.  The Russians did not pass.

Panning back a bit further we see that there are no Russians behind the stone wall to the right.  The remaining T70 is pinned (white smoke) and you will not be able to spot a single Russian infantry figure - they have all gone. 
The T34's stayed to the rear but did not do much.  One was lost to PanzerIV fire.
The PanzerIVs also stayed in the rear but were in a good position to machinegun the Russian infantry approaching the village, or fire at the T34s.
Verdict
Another excellent outing for the rules.  They are working well.  And I finally got to play a WW2 game with W--- after about 10 years of it first being mentioned.  A good time and the whole game was over in 2 hours.

Friday, 25 April 2014

Second 20mm WW2 game with 9 year old - East Front 1942

Introduction
I played a 20mm game at Christmas with L---, my friends 9 year old.  I have not really seen L--- since but the other week both our families went out for dinner.  L--- was sitting opposite and says “Hello Shaun - when can we play again? ” Easter was happening in a few days so we arranged for him to come over Friday for a game.

Slight rules revision (ignore if you do not care!)
I revised my rules slightly as indicated in my last writeup. In summary, I love rolling a single d6 for everything.  But in our Christmas game, while we do roll 1d6 per infantry figure to hit, he wanted to also roll lots of dice for close combat and tank penetration (instead of 1d6 and add and subtract modifiers).  So I changed close combat to 1d6 per figure and add and subtract dice depending on the modifiers; a 4+ on a die is a hit - compare hits to determine winner of close combat.   I just changed one line in the rules as the modifiers to the die roll simply became adding or subtracting dice!  Penetration was roll 1d6 and add the penetration value of the attacking gun and subtract armour value.  4+ = pinned; 6+ = KO.  I borrowed an idea based from IABSM that I have used before. I changed this to roll a number of dice equal to penetration value with 4,5,6 are ‘hits’;  Defender rolls dice equal to armour values with 4,5 or 6 ‘saves’. If hits are less than or equal to saves then no effect; if 1 greater then pinned, 2 or more then KO.  Also required only one line change in the rules as just used existing penetration and armour values.
These changes to rolling multiple dice made for a smoother game.

The updated rules are here (opens a pdf document).

Scenario
I  used a scenario Battle for Butsk, east front August 1942 that I have had electronically for a long time but never used.  It is an encounter battle with a town in the centre.

Troops
German (L--- the 9 year old)
3 Panzer IVJ
2 Panzer IIIJ
2 Sdkfz 250/9 (as I do not have any Sdkfz 222)
1 HQ
    1 halftrack
    4 rifles
1 Armoured Panzer Grenadier unit:
    9 rifles
    1 MMG
    4 halftracks
1 Motorised Panzer Grenadier unit:
    12 rifles
    1 MMG
    4 trucks

Russian (me)
3 T34/76
3 T-70
1 Tank riders
    9 SMGs
1 HQ
    3 rifles
    1 truck
2 infantry units each:
    9 rifles
    1 MMG
    4 Trucks
1 Support Unit
    1 45mm AT gun
    1 82mm mortar
    1 truck

The forces are about balanced - The Germans have an edge in tank quality, but less infantry.  Most of the vehicles are plastic kits (Esci, Arfix, Hasegawa, maybe some Revell) as is most infantry. 

Table setup
River running roughly down the centre and crossable by 3 fords only.  A village in the central area, but closer to the German edge. The objective is to hold more buildings of the town than the other side.  There are scattered woods and wheatfields.  The Germans have a good advantage as they can get to the village and occupy the building first.  This is what happened in this game.  I was happy for this to happen so I could play without pulling any punches but I still lost….
 
The table - Germans will enter from the left, Russians from the right.  River only crossable at the 3 fords.
 The Game
L--- split his forces up – PanzerIVs and halftracks up the German right and PanzerIIIs and trucks to the right flank.
I put the T70s down the centre road with the SMG tank riders and 1 unit of infantry following. T-34s on the left flank; one unit of infantry and the 45mm on the right flank.

An overview of the forces movements.

 L--- aggressively entered all his units onto the table all at the same time.


A shot of the German right flank with PanzerIVs and halftracks advancing on the village.


The PanzerIVs just about stopped where they were after two turns and managed to hold my T34s as soon as they entered the table.  It was a good place to be - the PanzerIVs were close enough to the village to attack infantry, and far enough away that the superior range of their gun counted against the T34s guns.  While the PanzerIvs only actually KO'd one T34, they stopped them from being as useful as they could be. 

The Russians entering down the road to the village - T70s in the lead, followed by one unit of trucked infantry.  At the very centre rear can be seen another unit of trucks making it way to the other flank. At the back rear can be seen the T34s.


L--- quickly managed to control the village.  He occupied most of the houses, using both troops from the half tracks for one side of the village, and troops from the his trucks for the other side.  I did managed to charge in and take over a few of the houses mid-game.

The village after about turn 4.  The T70 in the centre actually survived a long time.
The 9 figure SMG unit had dismounted from the T70s very early on and lead the charge into the village.  I used some of the 50-odd Russian metal figures (Britannia maybe?) I have to represent them. 

What is left of a 9 man SMG unit.  They were machine gunned down and routed shortly after.

The German left flank was sparse, except for the 2 PanzerIIIs and a Sdkfz250/9.  Facing it was the Russian 45mm antitank gun and some infantry.  The infantry was taken out by MMG and 20mm cannon fire and the AT gun held on for a while until destroyed by a PanzerIII.


A picture of the German left flank.
I reminded L---, as I had a few times before, that the infantry were the key to the game.  Only infantry can hold houses, and they are in cover and so hard to get out of a house once in.  And the objective is to hold the houses in the town.  And then L---'s dad turns up and says the same thing!  L--- then focussed only a little more on my infantry than he had previously, and wiped out the last couple of figures I had in the buildings.  I did manage to pin some of the German infantry in the village but it was not enough.


A shot of the village from the Russian side. Do not look for any Russian infantry - there are none. Pinned German infantry has a small ball of smoke on the house
The Russians had no more to give and pulled back their vehicles, leaving the village in German hands.  With the Germans occupying the village first I gave it a good go at dislodging them, but ran out of units to continue pushing them out of the village.
 

One part of the village from the German viewpoint.  Lots of Germans, not many Russians.


Verdict
The rules still worked really well.  And L--- really had a great time.  As per the first game, I still had to tell him a lot on what to roll but near the end he was getting some of the modifiers correct.  He wants to play again.  I may have a convert to figure gaming.

AND, as a bonus, we started abut 10:30ish and finished around 1.  My friend, RPG'er and part time figure gamer, and L---‘s dad, turned up halfway through the game. After finishing the game with L--- he asked why not play the same game again but with me?  Why not indeed and Game 2 of that day is the subject of a blog post coming soon.

Tuesday, 1 April 2014

Programmed opponent with Ancient Battlelines Clash, test 1

Introduction
I have lots of things in the pipeline…so I decide to do something else!  I  have been mulling over  creating a programmable opponent for my Ancient Battlelines Clash rules to help with replaying historical scenarios.  This stemmed from some discussion from Dale's Solo Battles blog from early 2013.  An excellent place for quality discussion on creating decent opponents for solo play.  The last few posts discussed finite state machines and their applicability to gaming, Dale use Meso-American Saga as an example.  Discussion turned to using FSM for THW’s Rally Round the King but did not get far. I kept this in the back of my mind and thought about it at odd moments over the last year.  I finally decided to write it down early March.

Warning
This post gives an overview of the Ancient Battlelines Clash programmable opponent and an overview of the 5 playtests.  While I have tried to make it as exciting as I can, I think it is still dry reading and likely a bit self indulgent (so it fits the criteria for a blog post!) unless you really really care about playtesting ancient gaming programmable opponents.

Where the programmable opponent is at
I have done five playtests, brief overviews are the rest of the post. The programmable opponent is closer now than it was a few weeks ago.  Playtesting has shown I need more testing with different armies. From the five games I did below, I did not use the zone order unit tactics (to decide a units move) very much past the first few moves.  This is mainly because there was not much decision making to be made after the few moves and combat commenced!  It did come in handy to help with some individual moves and I have expanded the zone orders table to accommodate this.  However, the last game had the units further away and the zone orders and action selection got a good working out.  I am *very* tempted to ignore my other projects and play some more games using the programmable opponent.


The zone order unit tactics table at the start of playtesting. Zone orders are the columns (each of 4 zones - flanks, centre, reserve) - each zone has a zone order.  Rows are broad unit types.  Each cell in the table determines the action that a unit may or must undertake. 

The zone orders table at the end of game 5 of playtesting.
I will play some more games and then post the whole thing.


ABC programmable opponent summary
 
Pre-battle
The opponent assists with the following:
  • Random unit selection: this is done as per the ABC army lists, based on the Milgamex tactical armies army lists.
  • Random selection of attacker: a die roll
  • Random selection of terrain: as per normal ABC rules using 12 cards to place terrain into 9 zones based on the terrain location of the defender.
  • Selecting of defenders deployment edge: This is new and loosely based on the DBAS edge selection rules – roll a die for each edge, add to each die from a list of 7 modifiers and select the edge with the highest result.
Battle
The opponent assists with the following:
  •  Deployment: I revamped the ABC deployment options but think Rally raound the King where the army type (Mounted, Infantry etc.) determines the broad strategy for the army (e.g. Centre attack, skirmish line, flank attack).  The broad army tactic determines unit placement e.g. 50% of units in centre.
  • Zone orders: This I borrowed the WRG 7th/Warrior concepts of command orders – Rash, Attack, Probe, Wait, Hold, Delay.  Each zone (left flank, centre, right flank, reserve) is given one of the 6 orders.  So an army with Left Flank attack strategy will have the left flank with Attack orders, centre and right flank with Probe or Hold and any reserve with Wait. As a bonus, each zone rolls for a cautious, normal or bold general. There is a small chance that zone orders will change each turn.  This is also very loosely based on the WRG 7th generals and orders.
  • Tactical engine aka unit tactics: The zone orders determine what each unit does. I have split unit into 4 broad types – impetuous, non-missile, missile-armed and skirmishers.  Each unit type acts a particular way based on the zones orders.  E.g. an impetuous unit in a zone with attack orders will charge at the enemy or full advance if cannot charge.  But with hold orders they will attempt to not move past the centre line.  Missile units in a zone with attack orders will charge into a combat if they have a good chance of winning, else will stand and fire.  Missile units in zone with hold orders will only advance until in range on and enemy, and will not advance over the centre line.
  • Unit reactions: unit reactions are unchanged from ABC and operate “sort-of” like in Rally Round the King.
So, armed with all of this I thought, let’s play a few battles to see how it goes.  I thought it went well. I tweaked a lot of the tactical engine as I went but the concepts held up well.  Amazing what 12 months of working with an idea gives.   The practicability of it was really useful for game setup and the first few turns until there was general combat along the line, after that is was not so useful as most movement was based on reaction.  However, it did help decide what to do with those lone units that won a combat and wanted to know what to do next.

Potential room for improvement
I do not have a system whereby a zones forces will change their order based on circumstances e.g. the left flank has ATTACK orders but is facing overwhelming forces in front of it – maybe the orders should be HOLD.  But again, the zones orders are selected based on what the entire army is doing, so maybe it is not required.  Maybe it would be better to have the army change orders based on circumstance, so in the previous example, if the army was doing an Oblique attack with a focus on left flank and centre but the left flank is facing overwhelming odds, the army changes to Centre attack, and places the left flank into hold.
 
Troops
For these game, I dug out my first two ever 15mm armies – Late Imperial Roman (that I used as mid-imperial as I have not yet done an ABC Later Imperial Roman army list) and Sassanid Persians.
After generating about 30 different battles I gave up selecting what looked like interesting ones and just generated 5 in a row and used them.  I should be testing out the random army selection after all!  I did notice after this that the army size seems just slightly too small.  I have decreased the costs for generals which effectively increases the points available for the rest of the army by about 3 points (from 32 points to 35 points for an average general’s army).  This will make armies nearly 10% larger.  3 points is one average Heavy Infantry unit.
 
I also went with naming the overall commander and each of the zone’s generals.  I did this to inject a little of a campaign feel to follow the generals’ performance through the five games.  This bit was not as onerous as I thought, added to the fun and will do more of it where I can.  I can thank internet friend Jack from BlackHawkHet blog link for this who has been badgering me to do something like this for ages. I grabbed the names by looking through a Persian myths book and "The Roman Eastern frontier and the Persian Wars AD 226-363" compiled by Dodgeon and Lieu.

Game 1

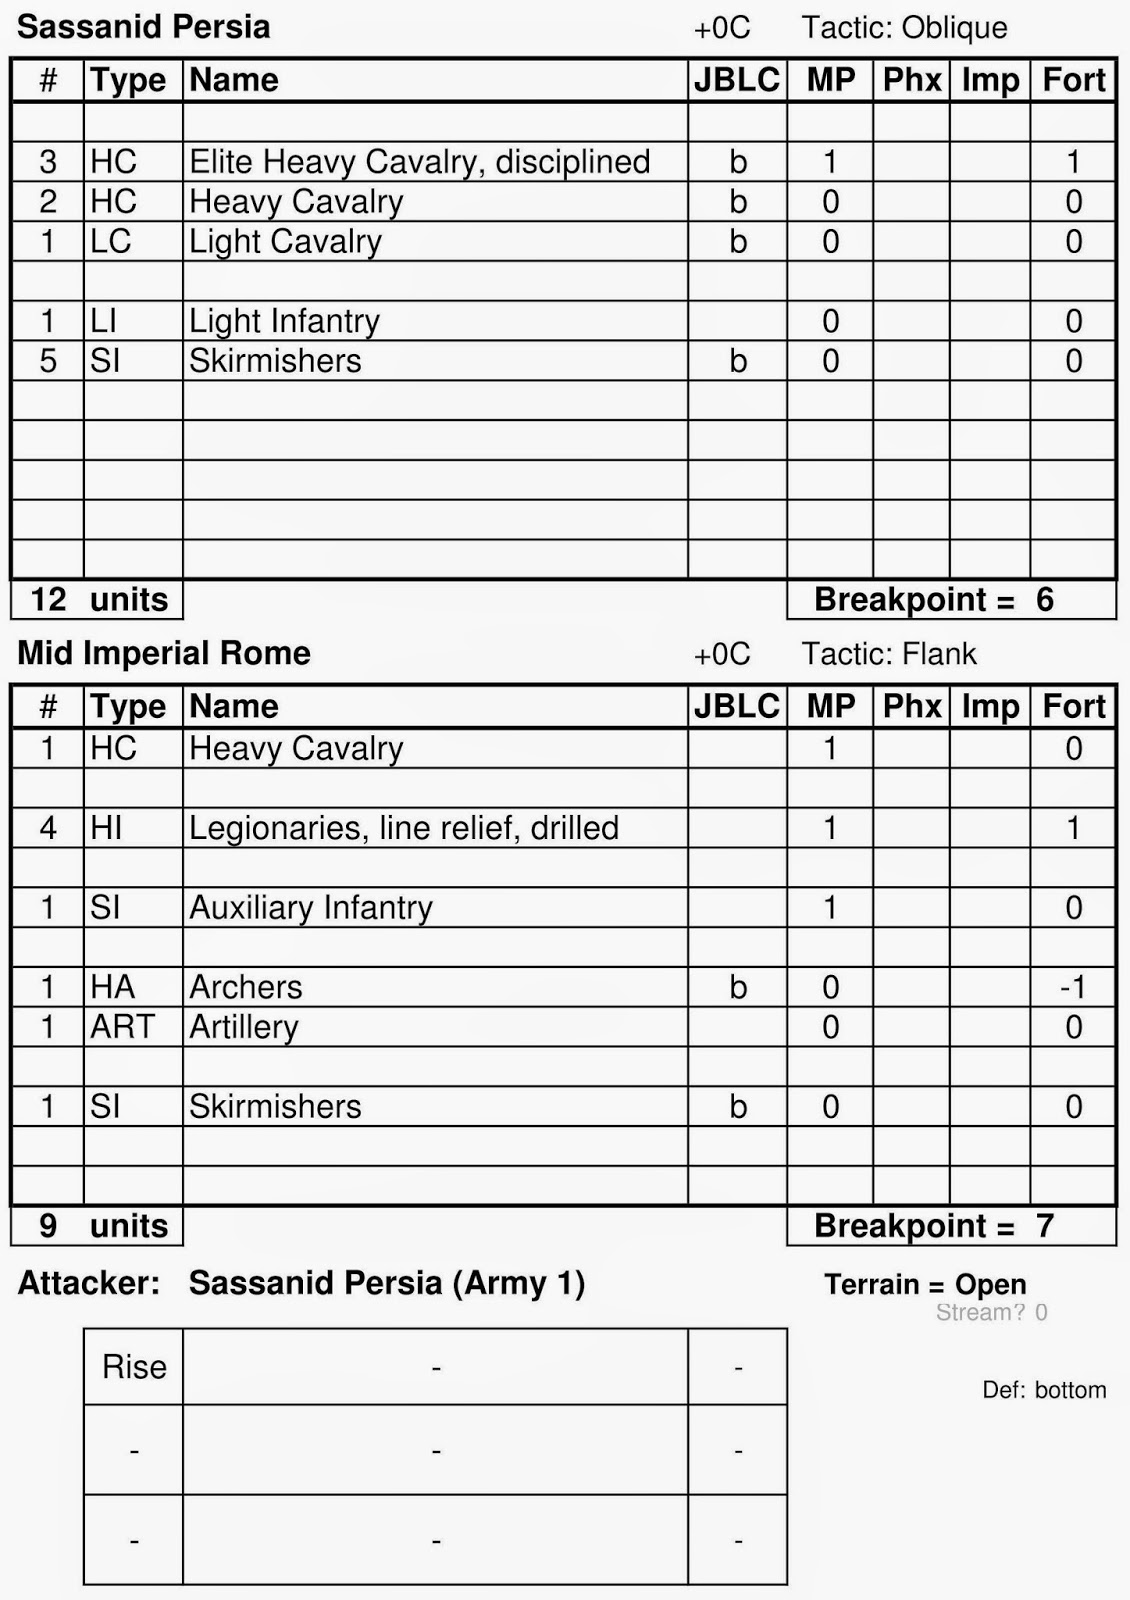
Battle creation page (all randomly generated)

The battle creation page explained
Creating a battle is very easy - select two opposing armies from a drop down list in Excel.  Everything you see on the page is randomly derived - the forces for each side (based on defined army lists) including breakpoints and army tactics, the attacker, the battlefield (and lower right the Def: xxx shows the side the Defender will choose).  It is simply a matter of grabbing the appropriate miniatures and then following the programmable opponent from there. When I am more confident of the programmable opponent, I can add zone orders and generals to the random army generation.

Sassanid (attacker)
Army General Siyavush
Army tactic: Envelop Flanks
Left flank: Attack.  General Karus (cautious)
Centre: Wait (using optional dice to see if Probe changes to Wait). General Garsivaz (rash)
Right flank: Attack, General Khusrow

Roman
Army General Aurelius
Army tactic: Envelop Flanks
Left flank: Attack. General Macrianus ( a +1 marker)
Centre: Probe. General Quintus
Right flank: Attack. General, Timesicles (rash)

Note: Not one random zone order change in the entire game.  There were 4 turns and about a 1 in 12 chance per zone per turn per side of a change.  So in 24 tests (12 per side) tests there was not one zone change.  Ah well.
 
Overview

Game 1

The Sassanids advance and early and things are going fairly well.  The skirmish infantry screen is cleared early on with only a couple of disorders inflicted. The Roman allied warband is routed on the Sassanid left flank.  However, the Roman cavalry unit on that flank proves to be very stubborn and the melee continues to the end game, even with a rear attack!

On the right flank the Roman Cataphract (with Commander Aurelius) routs an opposing cavalry unit.  But immediately after the other Sassanid heavy cavalry unit charges an disordered roman cavalry unit and rout them.  The legionaries in the centre attack the Sassanid Cataphract and elephant; disorders are handed out to most combatants.  Aurelius leads the Roman Cataphracts into side of the elephant that then routs though a legionary (oops)!  Aurelius pursues into the side of the Sassanid cataphracts who rout.  Game over.

Game 1 end

Awards
No awards given out – Aurelius and the cataphracts could do no wrong.
A special mention to Timesicles (Roman right flank) that lost his warband early on but held off superior cavalry for three turns, even surviving a rear attack  The Sassanids could only fail on a roll of a 1 and so rolled that!
 
Lessons
Tweaked table so that non-missile will not always charge, and impetuous will charge closest unit.  Otherwise I did not change much at all.  The units were only 20cm apart and so there was not much looking up of orders.


Game 2


Sassanid attacker
Army General Siyavush
Army tactic: Oblique (right and centre)
Left flank: Probe. General Khusrow (again)
Centre: Attack. General Shaqad (new)
Right flank: Attack. General Sohrab (new)

Roman
Army General Aurelius
Army tactic: Flank (left)
Left flank: Attack. General Timesicles (rash) (again)
Centre: Probe. General Felix (cautious)
Right flank: Wait. General Macrianus (again)

I had to add some new generals as I did not want a general to be rash in game 1, and then become normal in game 2.  I will attempt to use the fewest generals.
For game 2 I changed the chance of a random zone order change to a 1 in 9.  With 4 turns there still was no order change.

Different forces to Game 1 - no Sassanid elephant and artillery on the Roman side.  I do not have a roman artillery piece but do have one for a Byzantine army, so used that.

Overview
Game 2

Things did not go well for the Sassanids overall.  With General Sohrab on their right flank, the regular heavy cavalry was wiped out by the Roman legionaries and heavy cavalry with Aurelius and zone general Macrianus.  All the Romans lost on this flank was the skirmish infantry.
 
In the centre, the Sassanids did much better - one legionary and heavy archer for one Sassanid elite heavy cavalry.
 
But the left flank! I classed the Roman artillery as light artillery - acts basically like a light infantry unit with bows.  It managed to disorder and then rout the light infantry and the skirmish cavalry just kept evading under fire!  Eventually the artillery was routed by a charge from a Sassanid Heavy cavalry unit from the centre.  But it was all too late, the Sassanids had reached their breakpoint, and lost again.

Game 2 end

Awards
No outstanding actions warranted an award, but we say goodbye to the Sassanid general Sohrab who lost his entire right flank force.

Lessons
None but I added a priority list on targets for charging that was useful in this game.

Game 3


Sassanid
Army General Siyavush
Army tactic: Envelop flanks
Left flank: Attack. General Karus (cautious) from game 1
Centre: Wait. General Khusrow (game 1 and 2)
Right flank: Attack. General Garsivaz (rash) from game 1

Roman attacker
Army General Aurelius
Army tactic: Centre attack
Left flank: Probe.General Quintus from game 1
Centre: Attack. General Felix (cautious)  from game 2)
Right flank: Probe. General Macrianus (game 1 and 2)

Overview
Game 3

On the Sassanid right flank the Cataphracts and elite heavy cavalry overruns and routs the lone Roman heavy cavalry and also capture Commander Aurelius. 
In the centre, the legionaries never managed to engage with the Sassanid Light Infantry - the skirmishers exchanging fire took two turns and so no main combat occurred before the battle was decided on the flanks.
On the Sassanid left flank, the impetuous warband did not last long.  The elephant was delayed a lot by the artillery but in the end the elephant managed to rout the artillery and end the game.

Game 3 end

Awards
General Karus on the Sassanid left flank lost no units and managed to clear the entire flank.  The Elephant managed, despite disorder, to rout the artillery.
Commander Siyavush who managed to capture the opposing Roman Commander (Aurelius).

Lessons
A very one sided game - The Sassanids had lost only two skirmishers compared to half the Romans.  It was really that the flanks decided the game and the Romans really did not have enough in defense on the flanks having concentrated in the centre.  Even one extra unit on one of the flanks would have made a difference.   I do not think I need to change the programmable opponent - it was just one of those things; the deployment rules would have allowed an extra unit from the centre to be on the flank.
Oh, and I finally got an zone order change - the Sassanid centre went from Wait to Hold - slightly worse off but did not impact the game.
I spent a bit of time clarifying the non-missile unit tactics - minor changes - but I needed to add in the bits and pieces I had built up over the 3 games and make them easier to follow.


Game 4


Sassanid
Army General Siyavush
Army tactic: Oblique (right and centre as Left has terrain)
Left flank: No left flank as too few units to populate this flank
Centre: Attack. General Khusrow (game 1, 2 and 3)
Right flank: Attack. General Garsivaz (rash) from game 1 and 3

Roman attacker
Army General Macrianus (promoted from zone general in games 1, 2 and 3)
Army tactic: Centre attack
Left flank: Probe.General Priscus (new)
Centre: Attack. General Quintus from game 1 and 3
Right flank: Probe. General Cassianus (new)

Overview
Game 4

The Roman right flank sees the Roman Heavy cavalry advance and eventually rout the opposing Sassanid Heavy Cavalry (lucky 6).
The left flank has the Roman Cataphract manage to rout two opposing heavy cavalry for no damage to itself.
The centre did not end well.  One legionnaire is routes but so is an opposing Heavy Cavalry.  But then the generals - both in a continuing combat - see the roman legionnaire rout, the general is captured and the game is over.

Game 4 end

Awards
Roman General Priscus, new general on the Roman left flank, manages to rout two opposing elite heavy cavalry and is not disordered themselves.

Lessons
I realised Probe was too similar to Attack orders for non-missile units and so the Roman cavalry on the flanks were two aggressive.  And if they were infantry, there would have been no difference.  So I reduced the aggressiveness of infantry a bit and mounted slightly.  And then looking at HOLD and DELAY they were the same too.  So I reworked those too.  The whole table is now about twice as complex (still easy to follow) but it now captures a lot better the differences between the zone orders that did not exist before.
I also think I am started the armies too close together - 20cm is 2.5 times heavy infantry moves and a Heavy cavalry moves 16cm.  I think I will make the defender's side setup no more than 10cm in - this will give a separation of 30cm.  The games are all over too fast with not much tactics happening after deployment.
And this game did show that my proposed change to increase the points by 3 is good - there was not really enough units in this game.

Game 5


Sassanid
Army General Siyavush
Army tactic: Flank (right)
Left flank: Wait. General Garsivaz (rash) from game 1, 3 and 4
Centre: Probe. General Khusrow (games 1-4)
Right flank: Attack. General Shaqad from game 2
 
Roman attacker
Army General Quintus (promoted from zone general in games 1, 3 and 4)
Army tactic: Defensive
Left flank: Hold.General Priscus (game 4) +1 marker
Centre: Hold. General Cassianus (game 4)
Right flank: Hold. General Vincentius (new)

Overview
Game 5

With the Romans setting up 10cm in and the Persians also this means the distance between them is 40cm, rather than the 20cm of previous games.  This led to quite a exciting game.

The Sassanid right flank charges down that flank and manages to rout the guarding heavy cavalry.  The Roman Legion in reserve advances to that flank and holds the cavalry for a while unit the legion is routed.  The Cataphract eventually manages to charge uphill and rout a legion, causing the end of the game.
Sassanid centre changed is zone order from Probe to Wait first turn and wait and then to Hold in the second turn. On the fourth turn they zone order was sucessfully changed back to Probe and the Elephant advanced, charged uphill but was repelled.  Another heavy cavalry unit from the centre also charged uphill and was routed.
The Sassanid left flank is simply the skirmisher that advanced to the centre and went no further.

Game 5 end

Lessons
The Sassanid Centre changing from Probe to Wait to Hold over two turns showed me that the Commander in Chief would want to change the orders back to what they were at the start of the game.  So I added in a table to allow for orders to potentially revert back to the original orders.  But having the zone general interpret the orders his own way can shake up the game a little.  A good thing when playing solo.

The Sassanid Persian cavalry is not impetuous as they all have bows.  I realised I needed to make sure that heavy mounted units (that get a charge bonus) are treated appropriately and that heavy mounted units with bows also work the way I think they may have. I created a non-archer Shock section in the non-missile units. I also had to add in special rules for heavy mounted archers in a couple of the zone order columns.  I think after the last 2 games, the zone orders table is a lot closer to being workable.

The Generals report card
It was interesting to track the generals as they went from game to game and hand out awards.  On the Sassanid side, General Khusrow was in every game, and the rash General Garsivaz was only missing from game 2.  On the Roman side, things were grimmer - the Army General Aurelius was captured in game 3 and his replacement, General Macrianus, was also captured in Game 4.  These generals were the only ones to participate in more than two games.

The Romans won games 1 and 2, while Sassanids won games 3, 4 and 5.


Verdict
Playtesting is fun and frustrating (as I have learning with playtesting my rules).  The first three games did not test much as the troops were too close together and I was just tweaking the tactical engine.  But the last 2 games! There was where all the action was.  I spent a while focusing on the zone orders table, matching to what the units would have done (or at least what I would potentially have done - it is a solo effort so far).  There was a lot of situations that came up in the last two games that the zone orders table did not handle, or handled not very well.  All better now and, as I mentioned at the beginning, I am tempted to run a bunch more games from different periods to firm up the tactics table.