Tuesday, 30 July 2013

Battle of Delium 424BC using Ancient Battlelines Clash

Introduction
This is game 11 in playtesting my ancient rules. Previous games used my rules called Ancient Warrior  Battles.  The latest version is on its own blog page. I am playtesting the rules by replaying all the Peter Sides scenarios from his Historical Battles books.  ABC is designed to finish in under an hour on 2'x2' tables.

The Battle of Delium is not one of the Peter Sides scenarios, or in my other replay list, Bill Banks Ancients.  I came across Delium as a replayable scenario while researching Leuctra.  Hence I am playing it out of chronological order compared to the previous battles.

Battle of Delium
Athens invades Boeotia and fortifies the temple at Delium.The Theban commander, Pagondas, convinces the Boeotian forces to attack the Athenian force, led by Hippocrates.

Here are links of interest and that I used to create the scenario:

Wikipedia article
fanaticus.org DBA scenario
Warhammer Ancient Battles scenario
Thucydides Book IV 89 onwards

I also used Lost Battles (Sabin).

Troops
Boeotia

1 Elite/formed-deep Hoplites, HI, protection 0, phalanx, fortitude +1
6 Hoplites, HI, protection 0, phalanx
2 Heavy Cavalry, HC
4 Skirmisher, SI, javelin
1 General (Pagondas)

Breakpoint: 10

Athens


7 Hoplites, HI, protection 0, phalanx
2 Heavy Cavalry, HC, fortitude -1
1 -1 General (Hippocrates)

Breakpoint: 9

Deployment
Deployment:
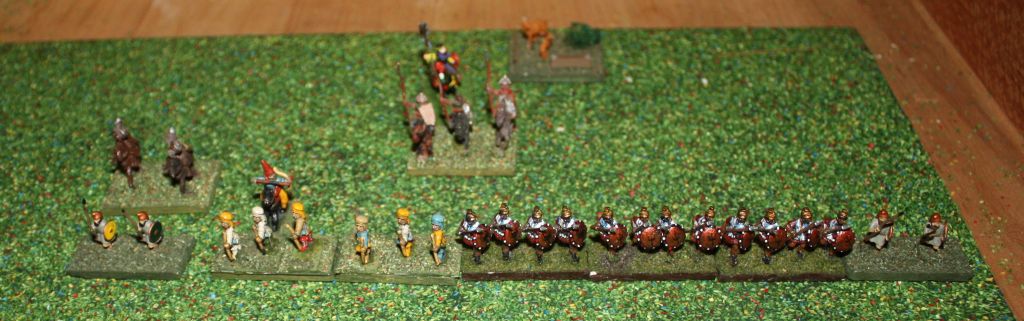
Athens on the left, Boeotians to the right on the hill.  Note the rivers that inhibit flanking.

Note that both wings are constrained in movement by the rivers.

The Game
An unfair fight if I ever saw one.  But the river restricting the cavalry movements may even it out a bit (in the actual battle, Pagondas moves cavalry from one flank to another to assist the failing left flank).

Thebans move the entire line forwards.  Athens responds by moving three hoplites on their right flank up.

Athenians (top) advance 3 hoplites to face the Boeotian left flank (bottom)
The plan is the Skirmish infantry will throw their javelins, and then hoplites charge forwards and as the general is attached to one of them, there is a chance to break the Theban left flank.  It sort of works - one retreat each.  This is the best chance for the Athenians to win.

One retreat to each side (Athenians at the top)


The Boeotian right flank move up to tempt out the Athenians.  While on left flank the Athenian Hoplites with an attached Hippocrates routs opposing disordered phalanx; they pursue into another disordered hoplite that rolls a 1 and routs too!  Hippocrates is doing well.

Hippocrates (centre) and hoplite unit that has no units in front - they have routed.

Athenian left flank forced to advance to protect the right flank. Pagondas and the Boeotian Heavy Cavalry move from the Boeotian right flank moves to shore up the left flank.  

Pagondas (centre) and Boeotian heavy cavalry (centre rear) moving to shore up Boeotian left
 An Athenian hoplite, shored up with an attached Hippocrates, routs the opposing cavalry (the one that was already on the Boeotian left flank).

Hippocrates and victorious hoplites

Not to be outdone,  Pagondas assists a disordered hoplite to rout an opposing hoplite too.

Pagondas and victorious hoplites.

The centre 2 Athenian hoplites advance and mange to rout a disordered hoplite with Pagondas; they advance and capture him too!

Pagondas (on the left) just before having the hoplites he is with rout, and then being captured by the hoplites he is facing
Boeotians reach breakpoint.  I play to the end of the Athens turn but nothing more.

End of game position (Athens at the top and the left as well).

The Thebans may have had a chance with the heavy cavalry flanking disordered hoplites, and with the elite hoplites (on the right) with the +1 fortitude advantage on the opposing hoplites.  But they just did not get the chance.

Verdict
Game took one hour, including taking photos and writing the progress of the game.  Fast and furious and great fun.  I did not expect the outcome but the whole game was a tight balance and could have gone either way every time I rolled the dice.  I love ancient wargaming.

Sunday, 28 July 2013

Spaceship miniature game - Starfire with Firestorm Armada models

Introduction
So, spaceships.  Where did this come from?  I have never done spaceships miniatures before and so I bought some earlier this year.  Why does a wargamer ever need a reason to start a new project?
Back in the early 80's, and before I got together with my partner (and now wife), I used to do a fair bit of science fiction boardgaming (ones I played a few times that spring to mind are WarpWar, Starforce, Titan Strike, Ogre, Dune, Sword and the Stars) and also spaceship boardgames.  I did play Starfire a bit (the original ziplock bags and then the second edition), SFB a lot, Yaquinto's Shooting Stars  and FASA's Leviathan a little bit, and some space fighter miniature rules called Starhound (but playing with someone else's homemade spaceships).  I stopped doing this around 1985.
 
When the spaceships turned up my wife asked "Since when are you into spaceship gaming?"
And I replied (with the truth!) "Oh, in the early 80's I used to do a lot of space gaming."
"Oh, before my time then..." and lost interest in further conversation. No "What are you doing?!" or "How much did you spend?" or rolling of the eyes.  A keeper.
 
The acquired ships
The ships are a bunch of painted Firestorm Armada ships - a few starter kits and models.  Large models, but I am expecting I can also use them to play some games with my children.  And I like using larger spaceships.
The Firestrom armada ships - mostly Dindrenzi and Terran.
Rules
I have acquired a few spaceship rules (and science fiction boardgames, but that is another story) since over the years, assuming I would maybe get back into it - Full Thrust, Silent Death, Starfire 3rd edition (and Ultra edition!), Attack Vector: Tactical, Squadron Strike. Also some more recent that are available as a PDF; THW 5150: Fighter Command being the most recent.

But what rules to use? I am looking for quick games with maybe up to 1/2 dozen ships a side.  Not fleet battles, and not detailed ships as per SFB.  Full Thrust looks ideal and I may try them later, but to get me in the mood for spaceship gaming, I am going to use Starfire.  I loved Starfire more than SFB but I never liked the large battles and large ships that were in Starfire and also played smaller scenarios.  So I will go with that for now, but I do have Full Thrust, Starmada Nova, Warcosm and 5150:FC on the top of the pile to try out. I am using Starfire as I know the rules, not because I think it is the best system out there for me.

 
Starfire 2nd Edition box
Starfire very quick overview
A ship in Starfire is a represented by a list of ship systems, from left to right with shields and armour to the left and weapons and engines further in (see below for an example).  Damage is crossed off from left to right, although some weapons can skip armor and/or shields.  Ships move up to 6 hexes and need to move a number of hexes before they can turn 60 degrees (no vector movement here).  Range of beams etc is normally around 10, and missiles are 20.   Players moves ships one at a time alternatively and fire one at a time alternatively.  Who moves or fires the first ship is via initiative that is rolled for at the start of each turn.  Movement is broken down into 6 phases - in phase 1 all players move ships up to one hex, second pahse all players move ships another hext, then thirs phase.  Can only move in phases up to your movement rate, so faster ships will get a movement advantage.  when fighters turn up, they move further than 6 and there are more phases to compensate.  that's about it.,  no specific weapons firing arcs but no ship can fire 60 degrees to the rear.
 
Starfire Mods
Life would not be complete without tinkering with the rules.  So this is what I have done so far:
I use the rules from the second edition except for:
  • I use the ships systems from the 3rd edition (with magazines, engine rooms etc) so I can use the ship designs from "The Stars at War". I did not want to design ships for Starfire.  Although interesting, I did not want to invest in learning design when I am unlikely to play many games of Starfire.
  • I converted the to hit table from 2d6 to 1d6 (I like rolling single dice - always bugged me the 2d6 per weapon)
  • If you roll 2 1's when firing with all the ships weapons, you inflict a critical hit and inflict another hit 1d6 systems further in (or the last one if you roll higher than the number of systems left)
Scenario
I was looking for something simple with only a few ships (a lot of battles are large with lots of capital ships) and a few different ship types to try out my first foray in 28 years (wow, it sounds like a lot when I write it down!).  So I used scenario 2 from "The Stars at War" with the Khanate of Orion defending a Space Station with a Light Cruiser and 3 escorts.  Attacking is the Terran Confederation with 2 destroyers and 2 frigates.
 
Forces
Khanate of Orion


Spacestation BS1 (0) SSSAAAALhQRGRGMg (0)
CL Karhae (flag) (3) SSSSSAAAA(Bbs)G(II)LR(I)RMgQsH(CIC)(II)(I)Qs(II)(I) (6)
ES  Malkon  (2) AH(I)GRMgQS(I) (4)
ES  Talron (2) AH(I)GRMgQS(I) (4)
 
Forces start 20 hexes of the planet (Mazdranar)
 
Terran Confederation


DD Napoleon (flag) (2) SSSSSAAAAHW(I)LM1(I)(I)(I)WMgLhQ(I)(I) (6)
DD Discovery (refit) (2) SSSAAZHL(I)(I)WMgQs(I)(I)(I) (5)
FG Outreach (2) SSAHX(I)(I)(I)GRMgX(I)(I)Qs(I) (6)

For those not familar with Starfire the main things to know are:
S = Shield
A = Armour
(I) = Engines
G = Gun
R = missile launchers
W = Gun /missile launcher combo
L = Laser
 
The Game
 Starfire is hex based and  so I dragged out the hexsheets from Leviathan and put them on the floor.  I have a dark wood 3x5 fold out table that I would have used if it was non-hex.  Not that fond of hex based miniature games, and I could have done with larger hexes.  But you play with what you've got! 
 
Deployment

Terrans come on the board and advance over 2 turns into missile range.  They focus on one of the Escorts (Malkon) and do 3 damage, reducing its speed to 2 and taking out the Gun.

Exchanging missiles

The Khanate missed 2 out of four shots available (a 6 is a miss!) focusing on the Discovery.


Terrans have one more laser (range of 8) in total than the Khanate, and so move closer.  The Khanate have more Guns, so need to get closer too (guns are range 9 with a 1 in 6 chanve of a hit; range 6 is when there is a 50% chance to hit. Beams will only miss on a d6=6 out to range 8.

Malkon loses second weapon and effectively out f thefight, napoleon has M1 so splits between Karhae and Malkon.

Closing in....


Kahae focuses on the Discovery and takes out shields and armor, and the Talron does first blood on an internal system (a hold) of Discovery.
 
I just like the look of the ship so here is a pic (Dindrenzi Cruiser standiung in for the Khanate Karhae)

The Terrans are now in range of the Space Station. It has two missile launchers that it targets on the Discovery. Yep.  Laser and Engine gone.  Talron then takes out remaining weapons on the Discovery.  Karhae hits with all weapons on  Outreach,  but all Outreach weapons are still OK - they are well back in the ship list of systems.


Something I have forgotten after 20 years is that missiles don't hit well at range 0-2.  Oops for the Khanate who I have moved quite close to the Terrans.  The Terrans have dual missile/gun launchers so are fine at short range.

Karhae gets 4 hits on the Outreach - not looking good - Talron hits on its shots and Outreach has no weapons left. Napoleon proceeds to rip the guts out of Talron.

The ships in action
Only Napoleon and Karhae and the pace station left. The Napoleon can take more damage than the Karhae at this stage, but the Space Station will keep sniping.   It will be a close run thing.

Karhae is too close!  Only it and the Terran destroyer Napoleon is left in the fight.  Karhae begins to turn and run for the Space Station.


A couple of turns are spent exchanging shots as Karhae runs closer to the space station.  Napoleon gets the initiative for the first time in ages, fires first and takes out Karhae laser and missile launcher.  So Karhae only has one weapons left; but Karhae fires back and takes out a weapon on Napoleon too.  Space Station still sniping.

Karhae is back near the Space station.  Eventually Napoleon becomes devoid of weapons.

I played a few more turns with pot shots being taken but Napoleon lost its last weapons before being able to drop the shields and armour on the Space Station.  So a win the the Khanate, but with much damage to both sides.


Verdict

Even for a simple combat sequence, there what a lot I forgot about tactics - Beams Vs Missiles, close range stuff, rear arcs etc.  And to really focus on the order that the ship systems are!  But I had a blast.  It may be awhile before I drag them out again but I hope to do so later this year.  Not sure if I am up to the complexity of some of the rules after playing Starfire - firing arcs, written orders etc may end up being too much for what I want from spaceship gaming!

Wednesday, 10 July 2013

Battle of Leuctra 371BC using Ancient Battlelines Clash

Introduction
This is game 10 in playtesting my ancient rules. Previous games used my rules called Ancient Warrior  Battles.  The latest version is on its own blog page. I am playtesting the rules by replaying all the Peter Sides scenarios from his Historical Battles books.  ABC is designed to finish in under an hour on 2'x2' tables.

Battle of Leuctra
Thebans and Boeotians, led by Epaminondas, defeat the Spartans and their allies.  This victory broke the Spartan domination of Greece.

Here is a link of interest:

Wikipedia article

Changes to the Bill Banks Scenario
The scenario is designed to play on a 24"x16" board, so no changes required there. The depth ratio will be fine being longer as ABC has longer move distances than DBA.  The scenario also had all the Spatans and ally hoplites as Spear (O), except 1, and all the Theban and ally hoplites as Spear (S). I changed this by improving some Spartans, and downgrading the Theban allies.  Lastly, I reduced slightly the number of bases on each side so they would fit onto a 24 frontage - DBA allows for Spear rear support, and my rules don't.  In the original scenario there are too many units to deploy in a single line on a 24" frontage.

Troops
Thebans and allies
 
Thebans, from left to right, skirmishers, hoplites, cavalry (and elite hoplites behind).

2 Elite Hoplites/Sacred band, HI, protection 0, phalanx, fortitude +1
5 Hoplites, HI, protection 0, phalanx
3 Heavy Cavalry, HC
4 Skirmisher, SI, javelin
1 General (Epaminondas)

Breakpoint:10

Sparta and allies

Spartans, left to right, skirmishers, cavalry, hoplites, skirmshers.

2 Spartan Hoplites, HI, protection 0, phalanx, fortitude +1
8 Hoplites, HI, protection 0, phalanx
2 Heavy Cavalry, HC, fortitude -1
4 Skirmisher, SI, javelin
1 Camp (on a hill)
1 -1 General (Cleombrotus I)

Breakpoint:12

Deployment
Deployment:

Spartans to the left.  Their battleline is definitely a lot longer than the Thebans!

The Plan
Theban: The Theban cavalry need to charge the opposing Allied Cavalry and hopefully force them back (rout or retreat) through the hoplites, disordering them.  Followup really fast while disordered to gain an advantage.  Refuse the weak right flank.
Spartan: The Theban Cavalry are going to come on, and are better than us.  Hold on as long as possible while attacking with the left flank where we have the superiority of numbers.

The Game
Theban cavalry charge the Spartans counterparts.

The Theban cavalry (right) charges into the Spartans.  The generals are the single cavalry figures.

Three average heavy cavalry Vs two poor ones;  one Spartan cavalry routs back through their own hoplites and disordered them.  This is something I have borrowed from Justified Ancients - every unit will involuntarily interpenetrate others when routing or retreating.  Heavy infantry will be disordered when interpenetrated.  It also allows for the historical event in this battle where the retreating spartan cavalry disrupts the Spartan hoplites behind them.   One Theban cavalry is also forced to retreat.

The elite Thebans hoplites move up to be closer to the cavalry battle.

While cavalry battle is a swirling, the rest of the battleline on both sides moves.  The Thebans needed to advance to protect there cavalry flanks.

The Spartan cavalry is depleted and routs backwards, disordering another Spartan hoplite.  A Theban Cavalry pursues into a skirmisher unit - routs it and then pursues even further into a Spartan hoplite and is locked in melee.

After the cavalry met - the Thebans are on the left.  One Theban cavalry (at the rear of the picture) pursued a routing Spartan cavalry unit into a hoplite unit.  Green bushes are disorder markers.  There is a lot of disorder!
More toing and froing with the Theban cavalry and Spartan hoplites.  A Theban cavalry unit retreats through the elite Theban hoplites and disorders them (ha! just like they did to the Spartans).  Spartan unit with  Cleombrotus I commands the centre. Epaminondas had the Theban cavalry unit he was attached to destroyed, but he survived.

Another turn and on the Theban left flank sees all the Spartan cavalry gone.  One Theban cavalry lost. Theban elite hoplites are in the centre (both disordered by the retreating Theban cavalry seen on the right). 
Epaminondas can be seen alone between two enemy hoplites.

The Spartan left flank advances and manages to rout some skirmishers (skirmish infantry will usually evade from heavy infantry but are disordered.  Two evades will destroy a skirmish infantry).  They also engage some Theban hoplites  but they are both disordered and locked in melee (which is what normally happens when two similar units meet).

On the Theban right flank the Spartans (on the left) are doing better on this flank. 

This ends turn 3!

A Theban hoplite charges into a Spartan hoplite already in melee and already disordered.  This fresh hoplites manages to deplete the Spartan hoplite which is a rout (a deplete result when disordered is a rout).


..well, maybe not so good.  The Spartans are down a hoplite (the gap in the middle of the line at the rear).
Epaminondas moves over to assist cavalry in combat with disordered Spartans and with a good roll depletes them and the Spartan breakpoint is reached.

Theban cavalry that routed an opposing disordered hoplite and caused the Spartans to reach their breakpoint.
 Game over.

End game. Most of the Spartans are in the centre line and the darker bases - the Thebans are to the left and lighter.


Verdict
 The Thebans had only lost one cavalry and all their skirmishers, but they did have a few lucky rolls as well.  More of the cavalry would have gone with average rolls and it would have been a much closer game.  Rules are still fun and no changes required, a good thing.  I will be out of the hoplite clashes in a few more games and so will have to wait and see if more changes are required with different troop types.

The shorter format definitely is helping me focus on getting more games - I have the next one already half played and the four after that in varying stages of scenario development.


Sunday, 30 June 2013

Battle of Cunaxa 401BC using Ancient Battlelines Clash

Introduction
This is game 9 in playtesting my ancient rules. Previous games used my rules called Ancient Warrior  Battles. The renamed latest version is Ancient Battlelines Clash (ABC) on its own blog page. I am playtesting the rules by replaying all the Peter Sides scenarios from his Historical Battles books.  ABC is designed to finish in under an hour on 2'x2' tables.


Battle of Cunaxa
Cyrus the Younger rebels against his brother Artaxerxes II, the latter being the king of the Persian empire. Famous as the historian Xenophon, who was on the losing side, wrote about the long march of the Greek soldiers back to Greece.


Here are links of interest:

Wikipedia article
Caliban's Cunaxa scenario (scroll down the page)

Changes to the Bill Banks Scenario
The scenario is designed to play on a 77"x22" board.  The width and size of Cyrus's army is about 1/2 that of Artaxerxes II.   I reduced the forces by about two-thirds (reducing Cyrus slightly less) to play on a 24"x24" board.  The game also has the two sides starting 6" (or 3 heavy infantry moves apart) hence the short 22" depth. I will start them about 20cm, or about 2.5 heavy infantry moves so the short depth translates OK. 


Troops
Cyrus

The rebel persians

3 Hoplites, HI, missile protection 0, phalanx
2 Skirmisher, SI, javelin
2 Light Infantry, LI
1 Heavy Cavalry, HC
1 Light Cavalry, LC, javelin
1 +1 General 
1 Camp

Breakpoint:6

Artaxerxes II

The loyal army - a lot longer and larger than the rebels!
3 Median Infantry, HA, bow
5 Subject Infantry, LI, bow
4 Skirmishers, SI, bow
2  Heavy Cavalry, HC, bow
2 Light Cavalry, LC, bow
1 Scythed Chariot, SCH
1 -1 General

Breakpoint: 9

Deployment
Deployment:


Cyrus below, Artaxerxes above.

The Game
Cyrus advances his left flank, the Persians do the same.

Cyrus advances on his left, Artaxerxes advances his left.


Persians fire at the rebels. The rules are reaction based so a Median infantry firing on a hoplite usually sees the hoplite advancing and then the medians have an opportunity to fire again, the hoplites then advancing into melee with the Median infantry.  There is always a small chance that the hoplite will be disordered by the firing and not advance.


A hoplite makes it through the line

The clash did not go so well for the rebels - no real breakthrough and only a loss of a skirmisher to the loyal Persians.

Lots of holes in the loyal line where the hoplites went through, , but on the right of the picture it is still intact. Green markers are disorder markers.

Persians continue to advance their left flank, leaving opportunity for Artaxerxes to push through the gap.

The loyal Persian lest advances towards the camp.  In the foregorund are the two rebel camp defenders.

Cyrus moves up to proximity range (4cm) of some Median infantry threatening the flank of the rebel battleline.

Cyrus and his cavalry charge some median infantry....

Cyrus then charges in forcing the Medians to retreat,  and then routs them next turn.


...who are no more next turn.
Across the battleline clash, the rebels push through.  The  Hoplites win all the melees and the rebel light infantry with the subgeneral (a +1 general gives your side a subgeneral) manages to cause a Median light infantry to rout.  A Median infantry melees a rebel light infantry and routs it - the only loss so far to the rebels.
Loyal Persians are 5 into a breakpoint of 9. The rebels are 1 into a breakpoint of 6.

A happy median infantry that actually won a melee.

The rebel left is mostly clear, but at the expense of disordering the hoplites.
Artaxerxes turns to face Cyrus:

 
Cyrus forced to pursue a previous melee and landed near Artaxerxes, who pivots.

While the loyal Persian right flank makes a lot of progress towards the camp.  There are only two rebel defenders - skirmish javelineers and horse archers.


While the rebels are getting closer to the camp, hampered by poor order dice.
Cyrus charges Artaxerxes and both are disordered. Next turn, a Heavy cavalry in the same group as Artaxerxes gets onto the flank of the Cyrus Heavy Cavalry and, with a good roll, Cyrus is captured. Now the rebels are on 5 breakpoints (6 and they lose).

Cyrus is hit on two sides and is subsequently captured.


The loyal Persians continue close in on the rebels camp:

The loyalists still slowly advancing on the enemy camp.

..and eventually destroy it and rebels reach their breakpoint and game over - a win to the Persians.

Surrounded the camp with light infantry and eventually is was looted.

Nothing much more happened with the hoplites of the Rebel left flank.  With no general around, it was difficult to get them moving.  And they were all disordered and no possible way to rally (no support and no general). Note that I forgot that a +1 general (Cyrus) should be replaced by a +0 general - after capture I did not do this replacement as I am used to playing with +0 generals that are not replaced).  This may have helped the hoplites move a bit further, but would not have changed the outcome of the game.

Final table:

Game end - hoplites to the lower left, camp captured to the lower right, Artaxerxes in the middle.


Verdict
Game was fast to start with but bogged down halfway.  This was because Artaxerxes is a poor general, and all units are at -1 to order rolls with a poor general.  So it too forever to get the Persians to the camp. Of course, all was not great for the Rebels.  They cleared their left flank fairly fast heavy infantry is not that manoeuvrable and were slow to redeploy.  This slowed down even more when Cyrus was captured and their order roll was at -1 too.  A good game but took awhile overall (it was played over about 6 weeks), maybe 45 minutes for the games without note taking.  This was mostly due to a lot of failed order rolls that does not occur so much in most games.  Oh, and the game went roughly along historical lines which is always good when testing rules.

Lastly...
It takes a while to write up reports this long and it has taken me 12 months to play 9 games out of at least 100. It takes longer to write them up than play!  So I think I will be shortening the battle reports using the rules from now on and just post game highlights.  And it takes me away from testing out new rules so getting back to that is a good thing as well.


Friday, 28 June 2013

Battlegroup Kursk - Intro scenario (again and again) No 2 for the day

This is the second time we played the BGK Introduction Scenario in the same day down at the club. We swapped sides and the whole game took less than two hours.  I was the Germans and Andy the Russians.  First game in the morning is here.  The Russians lost for the third time with us playing this scenario.  Admittedly all three times the Russians were coming from the same table edge, so maybe there is a pattern there (maybe not!).
  
Andy and I have had a couple of conversations since this day.  Especially after Andy re-read the rules.   There are a few rules we are not playing quite right (limbering/unlimbering being one of them), and rules we are not taking advantage of as much as we could (reserve actions for one).  I think we were both suffering the "advance until fired on then stop and fire back" syndrome.  With playing the rules just a bit better, we both believe there is a better game in there.  We shall have to wait until our next game to see.

The Game
Just to recap forces, he introductory scenario is quite small (Squad level) on a 6'x4' table with a platoon each and a few infantry support units on each side.  The game starts with 2 armoured cars on board for the Germans, and a sniper team, T-70 and BA-10 for the Russians.  The rest of the units dribble on over the next few turns (1d6 per turn) and on turn 4 reinforcements turn up - a T-34/76  for the Russians, a Panzer IVG for the Germans.


Ther German Sdkfz 250/9 standing in as a Sdkfz 222

The Sdkfz 250//8 guarding the crossroads but moves across to the wheatfields on the left in the next turn.


The Russians come over the hill using the Ura rule to allow them all to move at once.


Another bunch of Russians coming through the woods


The BA-10 takes on the Sdkfz 250/9 and wins.  The clash of the armoured cars!


More Russians hiding in the woods.  OK, they were advancing a fair way up the centre of the board and into a good position.


T34 comes on in turn 4 and advances straight up the road and past the armoured car (see in the background).  The Germans in the house (roof does not lift off so the Germans at the back of the house are indicating that they are really in the house.

The PAK Anti-tank gun.  No pictures of it in any of the games and in both games it has been at the back of table quietly plugging away and doing the odd bit of damage here and there.

The BA-10 is taken out too.  The Russians have got no further in the woods but further than any Russians ever got in any of the games.

All that is left of the Russians on the hill is the Command unit (the other two squads routed).   They continued to busily call in 81mm mortar fire accurately for many turns.  But for very little effect.  Better that when I was the Russians and never got a decent communications roll.

The 4th Russian squad braves the open terrain on their left flank.  The sniper team in the distance is  pinned (and was for most of the game).


What the game looked like, from the German side after the Russians had lost :-)  But the Germans had taken a share of losses too. 
 
 
A good game and the rules get better each time.  Next time hopefully even better as we continue to grasp the subtitles in the rules.