Sunday, 30 June 2013

Battle of Cunaxa 401BC using Ancient Battlelines Clash

Introduction
This is game 9 in playtesting my ancient rules. Previous games used my rules called Ancient Warrior  Battles. The renamed latest version is Ancient Battlelines Clash (ABC) on its own blog page. I am playtesting the rules by replaying all the Peter Sides scenarios from his Historical Battles books.  ABC is designed to finish in under an hour on 2'x2' tables.


Battle of Cunaxa
Cyrus the Younger rebels against his brother Artaxerxes II, the latter being the king of the Persian empire. Famous as the historian Xenophon, who was on the losing side, wrote about the long march of the Greek soldiers back to Greece.


Here are links of interest:

Wikipedia article
Caliban's Cunaxa scenario (scroll down the page)

Changes to the Bill Banks Scenario
The scenario is designed to play on a 77"x22" board.  The width and size of Cyrus's army is about 1/2 that of Artaxerxes II.   I reduced the forces by about two-thirds (reducing Cyrus slightly less) to play on a 24"x24" board.  The game also has the two sides starting 6" (or 3 heavy infantry moves apart) hence the short 22" depth. I will start them about 20cm, or about 2.5 heavy infantry moves so the short depth translates OK. 


Troops
Cyrus
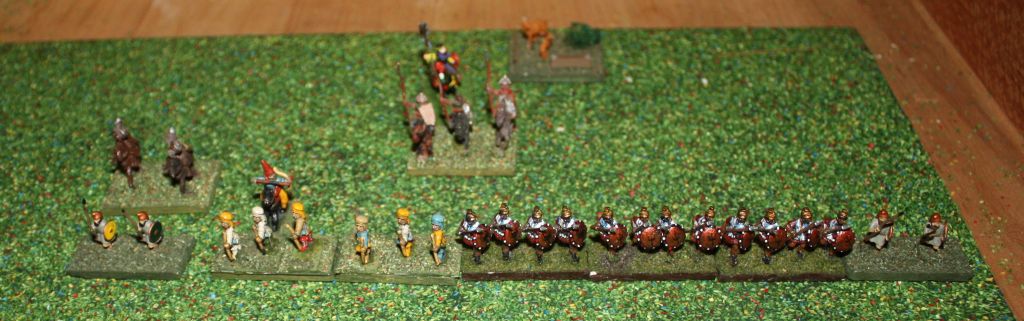
The rebel persians

3 Hoplites, HI, missile protection 0, phalanx
2 Skirmisher, SI, javelin
2 Light Infantry, LI
1 Heavy Cavalry, HC
1 Light Cavalry, LC, javelin
1 +1 General 
1 Camp

Breakpoint:6

Artaxerxes II

The loyal army - a lot longer and larger than the rebels!
3 Median Infantry, HA, bow
5 Subject Infantry, LI, bow
4 Skirmishers, SI, bow
2  Heavy Cavalry, HC, bow
2 Light Cavalry, LC, bow
1 Scythed Chariot, SCH
1 -1 General

Breakpoint: 9

Deployment
Deployment:


Cyrus below, Artaxerxes above.

The Game
Cyrus advances his left flank, the Persians do the same.

Cyrus advances on his left, Artaxerxes advances his left.


Persians fire at the rebels. The rules are reaction based so a Median infantry firing on a hoplite usually sees the hoplite advancing and then the medians have an opportunity to fire again, the hoplites then advancing into melee with the Median infantry.  There is always a small chance that the hoplite will be disordered by the firing and not advance.


A hoplite makes it through the line

The clash did not go so well for the rebels - no real breakthrough and only a loss of a skirmisher to the loyal Persians.

Lots of holes in the loyal line where the hoplites went through, , but on the right of the picture it is still intact. Green markers are disorder markers.

Persians continue to advance their left flank, leaving opportunity for Artaxerxes to push through the gap.

The loyal Persian lest advances towards the camp.  In the foregorund are the two rebel camp defenders.

Cyrus moves up to proximity range (4cm) of some Median infantry threatening the flank of the rebel battleline.

Cyrus and his cavalry charge some median infantry....

Cyrus then charges in forcing the Medians to retreat,  and then routs them next turn.


...who are no more next turn.
Across the battleline clash, the rebels push through.  The  Hoplites win all the melees and the rebel light infantry with the subgeneral (a +1 general gives your side a subgeneral) manages to cause a Median light infantry to rout.  A Median infantry melees a rebel light infantry and routs it - the only loss so far to the rebels.
Loyal Persians are 5 into a breakpoint of 9. The rebels are 1 into a breakpoint of 6.

A happy median infantry that actually won a melee.

The rebel left is mostly clear, but at the expense of disordering the hoplites.
Artaxerxes turns to face Cyrus:

 
Cyrus forced to pursue a previous melee and landed near Artaxerxes, who pivots.

While the loyal Persian right flank makes a lot of progress towards the camp.  There are only two rebel defenders - skirmish javelineers and horse archers.


While the rebels are getting closer to the camp, hampered by poor order dice.
Cyrus charges Artaxerxes and both are disordered. Next turn, a Heavy cavalry in the same group as Artaxerxes gets onto the flank of the Cyrus Heavy Cavalry and, with a good roll, Cyrus is captured. Now the rebels are on 5 breakpoints (6 and they lose).

Cyrus is hit on two sides and is subsequently captured.


The loyal Persians continue close in on the rebels camp:

The loyalists still slowly advancing on the enemy camp.

..and eventually destroy it and rebels reach their breakpoint and game over - a win to the Persians.

Surrounded the camp with light infantry and eventually is was looted.

Nothing much more happened with the hoplites of the Rebel left flank.  With no general around, it was difficult to get them moving.  And they were all disordered and no possible way to rally (no support and no general). Note that I forgot that a +1 general (Cyrus) should be replaced by a +0 general - after capture I did not do this replacement as I am used to playing with +0 generals that are not replaced).  This may have helped the hoplites move a bit further, but would not have changed the outcome of the game.

Final table:

Game end - hoplites to the lower left, camp captured to the lower right, Artaxerxes in the middle.


Verdict
Game was fast to start with but bogged down halfway.  This was because Artaxerxes is a poor general, and all units are at -1 to order rolls with a poor general.  So it too forever to get the Persians to the camp. Of course, all was not great for the Rebels.  They cleared their left flank fairly fast heavy infantry is not that manoeuvrable and were slow to redeploy.  This slowed down even more when Cyrus was captured and their order roll was at -1 too.  A good game but took awhile overall (it was played over about 6 weeks), maybe 45 minutes for the games without note taking.  This was mostly due to a lot of failed order rolls that does not occur so much in most games.  Oh, and the game went roughly along historical lines which is always good when testing rules.

Lastly...
It takes a while to write up reports this long and it has taken me 12 months to play 9 games out of at least 100. It takes longer to write them up than play!  So I think I will be shortening the battle reports using the rules from now on and just post game highlights.  And it takes me away from testing out new rules so getting back to that is a good thing as well.


Friday, 28 June 2013

Battlegroup Kursk - Intro scenario (again and again) No 2 for the day

This is the second time we played the BGK Introduction Scenario in the same day down at the club. We swapped sides and the whole game took less than two hours.  I was the Germans and Andy the Russians.  First game in the morning is here.  The Russians lost for the third time with us playing this scenario.  Admittedly all three times the Russians were coming from the same table edge, so maybe there is a pattern there (maybe not!).
  
Andy and I have had a couple of conversations since this day.  Especially after Andy re-read the rules.   There are a few rules we are not playing quite right (limbering/unlimbering being one of them), and rules we are not taking advantage of as much as we could (reserve actions for one).  I think we were both suffering the "advance until fired on then stop and fire back" syndrome.  With playing the rules just a bit better, we both believe there is a better game in there.  We shall have to wait until our next game to see.

The Game
Just to recap forces, he introductory scenario is quite small (Squad level) on a 6'x4' table with a platoon each and a few infantry support units on each side.  The game starts with 2 armoured cars on board for the Germans, and a sniper team, T-70 and BA-10 for the Russians.  The rest of the units dribble on over the next few turns (1d6 per turn) and on turn 4 reinforcements turn up - a T-34/76  for the Russians, a Panzer IVG for the Germans.


Ther German Sdkfz 250/9 standing in as a Sdkfz 222

The Sdkfz 250//8 guarding the crossroads but moves across to the wheatfields on the left in the next turn.


The Russians come over the hill using the Ura rule to allow them all to move at once.


Another bunch of Russians coming through the woods


The BA-10 takes on the Sdkfz 250/9 and wins.  The clash of the armoured cars!


More Russians hiding in the woods.  OK, they were advancing a fair way up the centre of the board and into a good position.


T34 comes on in turn 4 and advances straight up the road and past the armoured car (see in the background).  The Germans in the house (roof does not lift off so the Germans at the back of the house are indicating that they are really in the house.

The PAK Anti-tank gun.  No pictures of it in any of the games and in both games it has been at the back of table quietly plugging away and doing the odd bit of damage here and there.

The BA-10 is taken out too.  The Russians have got no further in the woods but further than any Russians ever got in any of the games.

All that is left of the Russians on the hill is the Command unit (the other two squads routed).   They continued to busily call in 81mm mortar fire accurately for many turns.  But for very little effect.  Better that when I was the Russians and never got a decent communications roll.

The 4th Russian squad braves the open terrain on their left flank.  The sniper team in the distance is  pinned (and was for most of the game).


What the game looked like, from the German side after the Russians had lost :-)  But the Germans had taken a share of losses too. 
 
 
A good game and the rules get better each time.  Next time hopefully even better as we continue to grasp the subtitles in the rules.


Thursday, 13 June 2013

Battlegroup Kursk - Intro scenario (again)

Andy and I played the BGK Introduction Scenario twice down at the club the other day.  It is amazing how much you can forget after playing the game once 2 months ago.  But playing them again - and swapping forces - has really helped with understanding the rules and some of the strategies for the nationalities.   The first game took awhile, mostly because we spent half the time chatting to others that passed by for a look.  Note that The second game took less that two hours as there were no interruptions.

I do not love BGK but like it a lot.  It is a fun game and does capture the feel of WW2.  And it gives me a chance to use those models I have not seen for a long time.  A lot dates to the early 80s and this year is the second time my 20mm WW2 figures and models are having an outing since 2004!

The introductory scenario is quite small (Squad level) on a 6'x4' table with a platoon each and a few infantry support units on each side.  The game starts with 2 armoured cars on board for the Germans, and a sniper team, T-70 and BA-10 for the Russians.  The rest of the units dribble on over the next few turns (1d6 per turn) and on turn 4 reinforcements turn up - a T-34/76  for the Russians, a Panzer IVG for the Germans.

I will cover the first game here and the second sometime later in another post.

I am the Russians coming in from the edge further from the road.

The view looking from the Russian side
 There is a large open area on the left of the table.  No much happened over there.

An action shot of the T-70 that managed to destroy most things it fired at.
The fantastic T-70 as seen above.  It has a total of 7 shots.  I took them all as AP as the MG is as good as an HE shell from the gun.  It pinned lots of infantry, caused the Panzer IV to be abandoned and destroyed an armoured car.  It ruled the centre of the table almost the whole game.

The Sdkfz 250/9 (scenario calls for a Sdkfz 232 but I do not have a painted one and the 250/9 is similar)
German unit in the wheatfield. Another MG turned up later as well. I managed to pin all of these, only for Andy to draw a battle rating chit and unpin them all.
 
Two units of Russians advancing. It was only after I brought them on I remembered about the Ura! rule where the officer (who came on next turn) can order all units in 5" range to move top speed with only one order.  The Ura! order is very handy for the Russians.


The T-34 reinforcement arrives on the Russian side. 

...and the PanzerIV for the Germans.

German squad now occupies the ruined farmhouse at the crossroads.  This was a real pain for the Russians and the MG was pinning the Russians everywhere.   The PanzerIV was abandoned early on by the T-70 (out of shot further down the road) due to a lucky shot and unlucky morale check (a 1). 


The BA-10 tops the hill in the centre, ready to lay waste to the German infantry.  But I forgot that the PanzerIV was coming on, and when it did, it fired and destroyed it.  Ah well.


Before  the PanzerIV was abandoned, it did manage to take out the T-34 as well.  The T-34 had used the special rule Stal! Stal! Stal! to advance at double speed and attempt (unsuccessfully) to pin the German MG (seen the the right).
 
An overview of the crossroads where most of the action is happening.  T-34 destroyed, T-70 Ok.  All the Germans are still on the table.  A lot of the Russian infantry have been subject to routing, which is why you cannot see any in this picture.  This made up for some earlier firing by Andy where every aimed fire roll he did for an entire turn was a 1 or a 2 for observation or for AP shots and so inflicted nothing. As the Russians, I had lost the momentum by this stage and Andy definitely had the upper hand.

 Another shot of the crossroads from the German side.


The battle rating chits for the Russians. Initial Battle Rating was 18.  I seem to remember I did draw one special chit as well.
The Russians, when the game finished, I think may have had one or two units left on the table, and they were pinned.  This was out of a starting force of about 12 or 13.  The Germans had lost no units other than the Panzer IV being abandoned (so the crew ran away rather than being killed.  I did pin quite a few but  none took casualties.  As Andy pointed out, the Germans took no casualties at all while most of the Russians had gone!

A good fun game.


Friday, 17 May 2013

Battle of Acragas 406BC using Ancient Battlelines Clash

Introduction
This is game 8 in playtesting my ancient rules. Previous games used my rules called Ancient Warrior  Battles.  After game 6 I streamlined them and simplified the combat mechanism so renamed them Ancient Battlelines Clash (ABC).  The latest version is on its own blog page. I am playtesting the rules by replaying all the Peter Sides scenarios from his Historical Battles books.  ABC is designed to finish in under an hour on 2'x2' tables.

Battle of Acragas

During the Peleponnesian War in 410, Carthage came to the aid of some Sicilian cities. In 407BC, Syracuse and Acragas aggravated the Carthaginians who laid siege to Acragas in 406.  A Syracusan lead relief party failed to dislodge the besiegers possibly, some say, because Acragas failed to sally out to help. This battle represents the relief party trying to dislodge the Carthaginians (which they did on the eastern side as portrayed here, but there was more of the army on the other side of the city).

Here are links of interest:

Wikipedia article
Diodorus account in Book 13 (see 86-87)

Changes to the Bill Banks Scenario
The scenario is designed to play on a 35"x28" board.  I reduced the forces by about a third to play on a 24"x24" board. I did halve the hoplites for both sides - the deployment map infers a second rank of spears for each side.  This infers a bonus in DBA but not in my rules so I left them out.


Troops
Early Carthaginian


3 Libyan Spearmen, HI, missile protection 0, phalanx
2 Chariot, HCH
2 Heavy Cavalry, HC
4 Light Infantry, LI
2 Skirmisher, SI, javelin
1 +1 General

Breakpoint: 9

Syracusan


3 Hoplites, HI, missile protection 0, phalanx
2 Hoplites, HI, missile protection 0, phalanx, low fortitude
2 Heavy Cavalry, HC
6 Light Infantry, LI
3 Skirmisher, SI, javelin
3 Skirmisher, SI, bow
1 General

Breakpoint:10

Deployment
Deployment:

Deployment, Carthaginians at the top between the two ramparts.  Hill represents the city.
 Note that the city walls are impassable, and the ditch is classed in DBA terms as difficult going.  Difficult going has quite an impact on combat effectiveness in DBA. In my rules, difficult going (rough) is really really bad e.g. cavalry cannot cross, so I will make it a hill (like a steep hill in Armati). This will halve movement for heavy and mounted units and also reduces the combat value of most cavalry and heavy infantry.

The Game
Syracusans move first. The lights of the flanks move to a position on the rampart, the hoplites move up in the centre and the left flank heavy cavalry fails to move (failed the order roll).  The Syracusan plan is to harass the flanks with the light stuff (backed up by the cavalry), and hopefully win on one or two of the flanks and use that flank to assist in the centre. The Carthaginians responded by attacking the flanks with the light infantry - otherwise they are going to sit there and take missile fire.

On the left flank, the Carthaginian LI managed to raise the ire of an opposing LI that repeatedly followed up combat.  The retreating Carthaginian LI finally routed when interpenetrating the cavalry (disordering them).  The Syracusan LI stopped just in front.

LI breaks thorugh on left.  Green markers are disorders.  The Carthaginian subgeneral is the two hoplites behind some LI.
The Syracusan right flank fares no better - the Syracusan skirmishers are swept away, but the remaining light infantry becomes a bit chaotic and mostly disrodered, Carthaginians coming off worst.

The Syracusan right flank (Syracuse on the left)

Continuing on the same flank, Syracusan LI against a Carthaginian chariot -anything but a 6 will cause the LI to retreat.  Rolled a 6 and both disordered and remain in melee.  This means the Heavy Chariot will not get a +2 charge bonus next turn.

Syracusan LI in combat with a Carthaginian Heavy chariot.  Lucky rolls see both disordered.

Syracusan hoplites cross the rampart.


The Syracusan hoplite line crosses the rampart but are not quite in contact.  The low fortitude hoplites are on the Syracusan flanks.
One of the LI turns 90 degrees to flank a poor Syracusan hoplite.  Movement in the rules is restrictive for HI but LI can wheel 90 and move.  But the LI rolled badly for melee and were routed as they were already disordered.  Worth a shot.

LI wheels onto the flank of a Syracusan hoplite but ends badly for the LI( it routs).

Syracusan Hoplites move into melee with Carthaginian hoplites. All hoplites in contact disordered. Bit of a bet to make a difference - while the Carthaginian flanks are being held by the LI, one the LI are gone, there Carthaginian's have the advantage of number son both flanks (2 heavy mounted Vs 1 on each flank).  But only so long the LI will hold.

Syracusan Cavalry charges opposing cavalry (it is disordered from previous brush with  a LI), but all that results is a disorder.

Syracusan Heavy Cavalry (bottom right) charges the opposing Carthaginian Heavy Cavalry (top right) while the chariot is engaged with a LI.
But the Heavy Chariot next to it routs the LI, pursues into the Cavalry but no effect.  Chariots will almost always pursue.

...but the LI routs, chariots advances into the heavy cavalry but the results sees them locked in melee.

Just about  every unit on the board is disordered!

Note about difficult going - makes the LI pretty tough as the Cavalry don't get a +2 shock bonus, and are also are at -2, so the LI have a very large advantage.  And no heavy units lost yet either.

Moved the sub-general over the the Heavy chariot and Heavy Cavalry and finally managed to destroy a heavy unit - the Syracusan Heavy cavalry.  The Syracusan left flank has gone.


The Syracusan left flank has collapsed - there is only one LI left on the rampart but the Carthaginians have two heavy mounted units that can just go around it.
Hoplite clash in the centre sees two Syracusans gone and one Carthaginian.  Low and high rolls!

What is left in the centre after a round of hoplite combat.  Both generals involved, but both survived leader death checks.

..and on a lucky roll of a 6, the Heavy Chariot destroys the Syracusan LI.  Syracusan has reached breakpoint of 10 and so the Carthaginians win.  A bloody victory.

The Syracusan LI to the lower right, just before it is routed in combat with the Chariot.

End game:

At the end, Syracusan forces to the bottom. 

Verdict
An interesting battle.  While this one was finally decided in the centre, the flanks were vey important.  The Syracusans should win the centre with more hoplites but the flanks see them with more lights troops than the Carthaginians, but outnumbered in heavy troops.  This is what saw the Syracusans off in the end - the heavier flank units of the Carthaginians.

This game took a long time to play.  It did not help that I stopped playing it for about 8 weeks after the second turn.   Even then with the action on the flanks before the centre decided the battle, it was likely a hour to play - longer than I would have liked.  There was a lot of points of troops of the table - about 50% more than what would be a 'normal' game of ABC.   But it was interesting.  I thought the Syracusans would get slaughtered but they put up a really good fight and the game could have swung their way at any time.