Friday, 24 February 2012

WW2 battle report - East Front 1941 Belyi (Take Cover) 6mm

Introduction
This is game two in the Vzyama or Bust mini-campaign I am attempting to play to the end. I started just playing the first scenario to test out the Take Cover rules (review here) in 6mm on a 2'x2' table (converting inches to centimetres).  I enjoyed it a lot, so thought I would move on through the campaign.  The Germans lost the first game so the second game take place near Belyi.

Troops
 

German

Battalion HQ
1 x Battalion HQ Squad
4 x Rifle Squad
1 x AT Rifle team
1 x MMG
2 x Truck

1st Company
8 x Rifle Squads

2nd Company
8 x Rifle Squads

Armour Group 1
1 x Panzerjager I
1 x SdKfz 222

Armour Group 2
1 x Panzer II F
2 x Panzer IV D

Artillery Group
1 x Captured Jeep (was supposed to be Horsch Staff Car but I don't have this model in 6mm)
2 x Trucks (One is supposed to be a radio van, but don't have this in 6mm either)

Air Support
One bombing mission

All Germans are Regular

Germans - HQ, Co 1, Co 2, Panzers and Artillery group


Russian

Battalion HQ
1 x Battalion HQ Squad (includes a Commissar)
1 x AT Rifle team

Scout Company
6 x Scout Squads

1st Company
8 x Rifle Squad

2nd Company
8 x Rifle Squad

Support Company
2 x MMG
2 x 50mm Mortar
2 x Truck

Supporting Armour
5 x T-26

Air Support
One strafing mission
All Russians are Regular

Russians - Scout Co, Co 1, Co 2, support and T26s, HQ at the front

Terrain
As per scenario briefing:
  • Wheeled vehicles have a chance to be bogged down
  • Stream is crossable by all but wheeled vehicle
  • Hills are too steep for wheeled vehicles
  • Hedges are low - do provide concealment but barely hinder movement.

Objective
German
Minor victory if all 3 artillery group vehicles exit to the south.
Major victory if at least half the men do as well.

Russian
Minor victory if prevent German victory.
Major victory if also get commissar to farmhouses.

Deployment
Germans at the farm to the north.
Russian Infantry from the south - infantry on the right road, armour on the left.

View of the board with Russians entering from the bottom.  The farms the Germans start from is just off the top of the picture.


Orders
This is an encounter, but neither side knows it yet. Easily represented in Take Cover by use of orders.  German orders are to exit the artillery group off the southern edge.  Russian orders are to get the Commissar to the farm.
 
Turn sequence change
This is solo, the time between moves for time-poor me is long and may stop mid-move, I am going to move away from the Take Cover turn sequence of one side moves, other side moves, one side fires, other side fires, morale.  Instead, it will be unit card driven - a bit like I Ain't Been Shot Mum (IABSM), amongst others.  I have always like the card driven sequence of IABSM for WW2 but could not convince my friends of it.  It will help keep track of where I am up to in a turn. So each unit will be on a card.  As the Germans have slightly better command and control for this scenario, I will put in an extra card and the Germans can choose a unit to activate.  A unit will still only get one activation a turn.  When activated, a unit does the following in sequence: checks morale, moves, spots, fires, lift suppression.  I will use the concept of the "end turn"/"tea break" card to end the turn.  Then all units not activated can fire at short range or charge an enemy within an infantry standard move distance (6cm).  Note that suppression, in the Take Cover sense, if not lifted at the end of the turn but at the end of an activated units turn.   Defensive fire as per Take Cover no longer occurs - an activated unit if not firing, goes on "overwatch" until the end of the turn.  There is a "all unspotted move" card for each side. Hopefully a bit more chaotic and surprising, always good for solo play.
 
The Game
First few turns were the respective sides moving out.

T26s advance through the village


German company and support advance into the wood on their right.

 
An aside:  I started this game in August 2011.  It is now January 2012.  I stalled as I was unhappy with how many bases are on the board and how close they are together.  I was also unhappy that the troops were starting too far away from one another.  i was unhappy with the amount of streamlining ("changes") to the rules I had done after the first game.  I spent five months looking at alternative rules and thinking of going down 1 base = 1 platoon rules (rather than 1 base = 1 squad).  I was also looking at possibly going to grid based rules to ease the fact troops started further way from one another.  After lots of soul searching, I am actually not changing much to Take Cover!! except what I wrote earlier about card driven sequence of play.  I will start the troops closer to each other in the next game.  I will also reduce the number of squads in each company in the next game.  So the only real change after all the soul searching is to modify the infantry fire combat so you roll a die per squad, rather than combining squads to fire.  So, back to the game...

2 T26s move onto the bridge and attempt to fire at the Sdkfz 222s. Miss.  Needed a 6 anyway as the T26s moved.

T26s on the "bridge" (I am still building up my 6mm terrain collection)


Otherwise, the  Russians deploy off the road to cover the flanks.  The Germans do the same.

Germans deploy off the road on their left.


The scouts are on the left side of the bridge and spot the Germans after the Scouts move to the edge of the woods.  They trade shots over the next turn or two, and a couple of squads each are destroyed.

So, after two more turns, I have realised that for all my tweaking, I much prefer the Take Cover combat mechanisms as is. It could be that it is simply I know the original rules very well, or maybe that I have simplified the game so much they have become too generic for me.  Knowing the Taker Cover rules well and how they work on the table from lots of playings, why change what I know when I see no improvement?  If I had lots more time free I would possibly start trying other ww2 rules but I think I will leave that for a few years when maybe I have more time..So from now on I've back to the Take cover combat mechanisms.  Still doing card activation though.

The Panzers manages to disable and then destroy the two leading T26s.

Panzers command the road


The Russian scout company loses two (of 5) squads but hangs in there (rolls a 6 for morale test).

A couple of Scouts squads engage with some Germans in the woods over the river


Each of the other 2 Russian companies end up facing an opposite German company on the riverbanks to the left and right of the bridge.  The board is a more crowded than I like, particularly the village, partly as the Russians are based on longer bases than the Germans. Also, I have the Russian squads behind the building they are in, so it looks like a parade ground!

Why I want less unit density - a view of the village.  I like my WW2 games to be a little more dispersed.

I do like the card activation, but then I have been fond of it for WW2 ever since I first played IABSM in 2005.
  
Facing off the the right of the bridge - Russians in the river
 
The Germans call in the aircraft bombing run on the crossroads.  I have rarely used aircraft in Take Cover and was again surprised at how easy it worked - everything aircraft is effectively done in one phase.  There were two bombs that landed in different parts of the artillery grid -  one bomb killed two squads and disabled a T26 (a 6 was needed to do this).  The other bomb simply suppressed a few squads and a truck.

A viee in the centre - two T26s down

 
The T26 squadron activates and takes a morale test as it is now lost two tanks.  They roll a 1.  Higher is better :-(  They are under air attack, have a damaged tank but luckily the Battalion HQ is within 12cm.  But the end result is they are pinned - they cannot move or fire until rallied (a 3+ for regulars).

Germans advacne on the village - the centre German squad is eliminated after this picture is taken (the green bush like things next to the squads in the river are suppression markers).


So far in the game I've had four suppressions - two from bombs and two from small arms.  In my last game, I had none. Small arms suppression is only possible with double the firepower (in figures) than the target (cumulative for a turn).  Suppression is a good thing to inflict - the target unit cannot fire, and perform up to a 1/2 move.

3 and 5 year old helping me roll the dice.


On the Russian right flank, they have been chipping away at the opposing Germans, and charged a lone suppressed squad and successfully routed it in close quarters combat. Close combat is the abstract dealing of squads in close range of one another - each side rolls 1d6+number of figures.  Add a few modifiers.  Highest loses one squad, lower loses 3 squads.  Easy.  The Russians are swarming through the woods.

Russians swarm through the woods to the right of the bridge


The German battalion HQ of 4 squads and a MMG was operating as a reserve and is brought up into place opposite the village and opens fire, continuing to keep suppression on the Russian (and fast depleting) company in the village.

Everything in place for the Germans to assault the village - all Russians have been cleared from the opposing bank and houses

The Panzer MMG destroys two of the last three remaining scout squads on the edge of the woods. An MMG in the game has the equivalent firepower of 4 squads, and has twice the range of the rifle squads.

Another T26 in the village is destroyed and all but one squad is left guarding the village.  The Germans being suppressed has delayed taking it over but finally the cards fall right and they charge in.

Germans (at the top) storm the village


The Sdkfz222s on the German left flank decimate the Russians in the woods that had been so successful.  The remaining 3 squads of the German company form a line at the edge of the woods and assist in holding them back.

Germans regroup on their left - two A/Cs an 3 squads on the hedgeline

There used to be a lot more Russians in these woods! So much for the swarm.

 The Russian support company finally gets it card (I think it has been 5 turns without it coming up) and deploys at the back of the village.  It is needed - it is two MMGs and two 50mm mortars.

The T26s are forced to pull back due to bad morale.  The Scout company also fails morale and pulls back.  The battalion HQ card comes up, also the first time in 5 or so turns, and a battalion test (higher morale in game terms) needs to be taken due to the number of losses the battalion has suffered.  Failure of this is usually game over as the result is pulling back (a nice way of saying withdrawing) from the battlefield.  A 2 is rolled, and with the negative modifiers for companies with casualties or pulling back, the Russians get the worst result possible and will pull back off the table edge.  I call it a major victory to the Germans - they just have half the units left in the game.

Verdict
Besides the 5 months crisis of faith and lots of tinkering, I really like using the vanilla mechanisms of Take Cover (as I know them very well) with the chaos factor of card activation.  As I mentioned earlier, on a 2'x2' board, I really have too many troops and will reduce the squads per company in the next game.  I will start the armies closer to each other.  The game was fun to play but ended up being a fairly straight forward company Vs company with tanks firing at each other in the centre (my fault, not the scenario's - I had too many bases on a small board).  There was some tactics - moving reserves and when the advance against a retreating enemy.  I think with less unit density, I will see harder tactical decisions needing to be made - onwards to set up battle three!

Wednesday, 18 January 2012

Hydaspes replay number 4 - Ancient Warrior Battles

Introduction
This is the last game of four replaying the Battle of Hydaspes with different rulesets.  Go to this post for background, troop descriptions, deployment and comparison to the other 3 rules.
 

Ancient Warrior Battles is a homegrown set.  Think of Ancient Warrior Battles as Justified Ancients with some RRtK reaction tests to determine enemy reaction to events and you will get the general idea of the rules. Sort of.  As per Justified Ancients replay, Alexander has a rating of +2, Porus of +0.
 
Game
Horse archer advance, Chariot and cavalry attempt to charge horse archers but fail.  Horse archers fire. Cavalry pushed back; chariots forced to charge, one horse archer fires at the chariot - no effect- and evades, chariot automatically pursues but does not catch them.  Results are similar to Justified Ancients, but reactions to events occur a bit like Rally Round the King.

Horse archers pushing back the chariots


Porus moves to an elephant closer to left flank (maybe should have done this in the JA game as well as their is a distance modifier to order roll) and advances the right flank chariot and the archer battleline.  In the Macedonian turn, the horse archers advances to within range of the disordered cavalry and the chariot; missile fire causes the chariot to retreats (retreat is like flee in Justified Ancients so chariot is disordered and depleted).  The skirmishers, battleline and peltasts all advance.

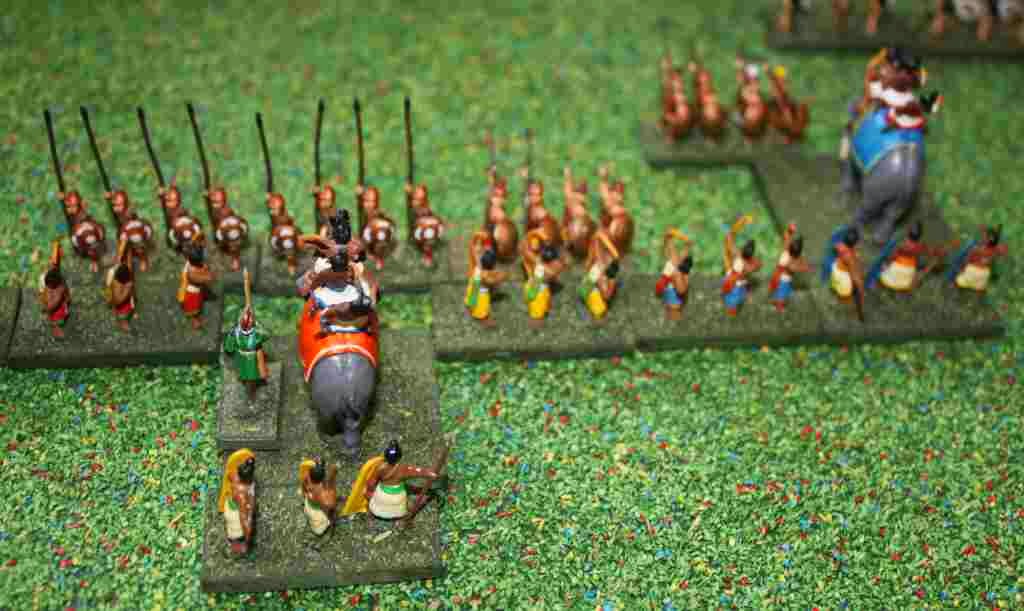
The Indian left flank - note how far the cavalry has retreated.  The chariot is disordered and depleted.


The Indian battleline from the Macedonian side.  Macedonian skirmishers are in position to harass the Indians.


The Indians fire at the advancing battleline. Four skirmishers gone for only one archer pushed back in return fire.

Porus cries out "Release the elephants"...one does not receive the order (rolled a 1 - the only chance for a failure), but the rest go in.

First elephant contacts skirmisher and the latter rout. Elephants pursues into a phalangite unit who stands.  Combat will occur next turn.

The Elephant charges and contacts the phalanx line after routing a covering skirmisher.


Second elephant (with Porus) causes the contacted skirmisher to run away, the elephant continues into the phalanx line that stands. The last elephant in the line charges the Hypaspists who retreat in the ensuing combat.

Hypaspists retreating from an elephant unit.


The Chariot rallies off their disorder and the Indian cavalry fails to charge the horse archers.  The horse archers fire at the Indian cavalry that then retreats to edge of board.

Two pike units are in melee with the Elephant and Porus.  The Elephant loses and is pushed back.

Elephant with Porus retreats from pike line - a pike unit pursues and recontacts.


Another pike unit is in combat with an Elephant.  The elephant also loses and retreats.
 
The Indians advance all the archers within missile range of pikes (12cm).  Elephant on the far right still waiting for a successful order to charge!

Porus moves off the elephant that retreated and moves to an undisordered undepleted elephant - he can see the writing is on the wall for his old mount.
  
Elephant (now without Porus) Vs pike sees the Elephant destroyed, and also depletes the archers in the rout path behind.


Elephant (now with Porus) charges the Hypaspists, the latter that retreats and depleted.  As the Hypaspists were already depleted, they are destroyed.  The Elephant pursues.  The Chariot charges a horse archer that retreats.

Elephant pursuing the destroyed Hypaspist.  Horse archers retreating from the chariot.


The Macedonians move the horse archers to in front of the cavalry and chariots. The Thessalian Heavy Cavalry wheels to face the elephants that is now next to them after pursing the destroyed Hypaspists.

Thessalian heavy cavalry turn to face the Elephants.


The pike line advances and gets fired on by the Indian archers. One pike unit is disordered.  One pike unit charges and elephant - the elephant routs and depletes the archer unit behind it.


The battlelines.  Note the Indians are worse off with some depleted archers.

My three year old helping me out, here rolling dice off the end of a ruler.


The Indian right flank chariots charge a peltast unit that decides to stand and take it.  Both end up disordered.

The right most elephant then charges two peltasts who both rout.

The Elephants and Chariot on the Indian right flank.  There were two peltasts in front of them, but they routed.


Indian archery fire: All the pike units roll high for their fired-on test...except the last one to test that fails and retreats.

The Indian left flank - only one Macedonian pike unit (the leftmost one in the centre of the picture) retreats from the archery.


The elephant with Porus (next to the Thessalian cavalry) tests to turn to face the cavalry. The order will fail on a roll of a 1.  Rolls a 1.

But, on a whim, the heavy chariot charges the horse archer unit in front who retreat, already depleted so dispersed.

The other horse archer that is pushing the Indian cavalry close to the table edge, fires at the cavalry who are pushed back off the board.

The Companions charge the heavy chariot. The Chariots retreats but already depleted so destroyed.  Companions pursue.

Companions and Alexander against the chariots (that are destroyed)


The Thessalians cavalry charge the elephant (with Porus) in the flank. Poor rolling by the Thessalians see them retreat.

The pike battle lines charge the Indian archers. One pike is forced to retreat but four heavy archers are dispersed (two were already depleted that did not help).  Indians have reached their breakpoint (50%) and so I call it for the Macedonians (who were 3 units away from their breakpoint).

At game end from the Indian side - not many archers left in the centre.  Companions are off stage to the left.

  
A great game and a good outing for my rules.

Tuesday, 10 January 2012

Hydaspes replay number 3 - Fast Ancient Battles

Introduction
This is the third game of four replaying the Battle of Hydaspes with different rulesets.  Go to this post for background, troop descriptions, deployment and comparison to the other 3 rules. 

The battle report is a little bit more detailed than I would do normally do just for a report, but I needed some detail as to who did what as it helped to write the rules comparison. 
 
The main differences between FAB and Bill Banks Ancients (BBA) is that not all units can moved - it is limited to a number of groups per turn.  The number of groups of units able to move per turn is 1 + the number of leaders.  The CRT is replaced with a die roll table but has a similar effect.  Lastly, missile fire cannot destroy any units besides skirmishers - another 'DD' on a unit is no effect.
The Macedonians have 3 leaders, Indians only 1.  In hindsight, Macedonians should have only got 2 leader, and in fact that is the number of generals in the Peter Sides scenario.
 
Game
Horse archers and opposing mounted have a bit of movement and retiring resulting in a disordered Indian cavalry unit.  The archers, with good die rolling, manage to disorder and destroy some skirmishers.

Overview, Indians to the bottom.  Indian mounted has advanced on the horse archers to the left.  Some skirmishers in centre disordered (green marker) from Indian bow fire.
 

The Indian cavalry and chariot charge the horse archers in the flank.  They cannot evade and so are destroyed.  The Cavalry and chariot pursue 4cm.  This may have been a bad move as the Macedonian Heavy Cavalry is going to charge next turn.

Companions (Alex attached) facing the Indian cavalry and chariots

  
Alexander move to attach to the Thessalian Heavy cavalry (the Companions already have a good chance against the disordered Indian cavalry) and both cavalry units charge - The Indian cavalry is destroyed and the chariots disordered.
 
Post combat - Indian cavalry gone, chariots disordered.


The rest of the Macedonian battleline move forward, archer fire results in no hits (this balances out their good rolling last turn).

Indian Elephants contact the skirmishers who fire and evade.  Missile fire disorders the elephant with Porus, who rolls a leader check to see if destroyed.  Rolls a 1.  So yes - Porus has left the battlefield.  That is going to hurt.  Macedonian Skirmishers also disorders two archers.

Porus was attached to this elephant.


Two skirmishers move into the gaps between the elephants to protect the pike from the archers. This was a good move as archery destroyed the two skirmishers. The pike battleline charges the elephants.  The Macedonians ran out of group move points as they would have also really liked to move the hoplites into combat as well.  Note a general moved over from hoplites to a pike to help combat.
Thessalians Vs chariots see the Thessalians disordered.  One elephant is destroyed by a pike unit that pursues into an archer.  Some disorders handed out in other melees.

Battlelines - mostly elephants crashing into the pikes


At the end of the Macedonian turn, remove disorder from the Thessalians and a pike unit  with a general.  This is a large advantage that the Macedonians now have - only generals can remove disorder, and the Indians have no generals.
 
Note that ongoing melees are optional to resolve for the active player.  So the Indians do not resolve the disadvantaged chariot Vs Thassalians, but will do combat against disordered phalanxes as they are at -2 compared to ordered phalanxes.
Hypaspists destroy an elephant.  Pikes in melee destroy an archer and disorder another.  A Macedonian general attached to one of the pike units that is disordered fails the general in combat check and leaves the battlefield.

Battleline - only centre elephant left and the phalanx is getting into contact with the archers.


Alexander moves to the Companions which then move behind the battleline to face the Indian cavalry that came from the other flank - in the next turn they charge and destroy the poor Indian cavalry that had moved so far.   Combat sees one elephant down, and a few disorders on both sides.

Battleline - Alex and Companions on the left ready to charge the Indian cavalry from the right flank.

The Macedonian doesn't progress many melees due to the number of disordered pikes.  The Indian right flank sees the elephant and chariot charge in and disorder the peltasts.

Indian right flank - both elephants and chariots disordered, but so are the Macedonian peltasts.


The Companions turn around ready to charge the archers from the rear.  In FAB, this disorders the Companions, but that is OK as Alexander is with them and disorder can be removed at the end of the turn.  The Hypaspists destroy an archer in melee.

Battleline at end of game - not many archers left.


The Indians have lost 50% of their breakpoints and so the game is over with a Macedonian win.  Phalanxes are really strong in this game, and they also got some lucky rolls.  The skirmish screen worked very well and the phalanx units did not get disordered going in.   The Macedonians lost only the horse archers. Having 3 leaders really helped with undisorder and movement flexbility.  Losing Porus early really hurt as could not move extra groups nor undisorder units.  If I played again I would keep Porus out of combat longer as he is too valuable for group points to throw away for +1 combat.  There were also a number of archers that could have been better used by me on the Indian right flank - possibly outflanking the hoplites and helping remove the peltasts.  Overall a fun game - the multiple leaders and the leader disorder/rally concept is central to this game which make is different to play than most other games at this scale.

Monday, 2 January 2012

Hydaspes replay number 2 - Justified Ancients

Introduction
This is the second game of four replaying the Battle of Hydaspes with different rulesets.  Go to this post for background, troop descriptions, deployment and comparison to the other 3 rules.


The battle report is a bit more detailed than I would do normally do just for a report, but I needed the detail as to who did what as it helped to write the rules comparison.  There is a lot less than I originally wrote left...


The Game
Alexander will be rated as a +2 General, Porus a +0.  Generals can move independently but for now, as per RRtK, Alexander is with the Companions, Porus in a lead elephant.
 
Horse archers move up (with a +2 general, they pass the move order automatically) and fire at the opposing Cavalry and Chariot. Goods rolling sees both pushed back.  Firing needs a 6 to deplete the cavalry and will never deplete the chariot (needs a 7).
 
The cavalry and chariot charge horse archers (pass order).  Horse Archers fire and evade and fatigued.  Note that in Justified Ancients, the cavalry and chariot would be fatigued too, but if a charger does not hit home, my house rule is the charger is not fatigued.
 
Archers fire, evade and fatigued (green markers)


The tactic I used in the RRtK replay for the horse archers will not work in JA - the horse archers cannot wear down the left mounted Indian flank. But the effect is similar in that they are screening the Macedonian Heavy cavalry.
   

Indian move battleline forwards and the Macedonians do as well.  It seems to be moving so slow!  They are moving 1/2 the speed compared to RRtK (move distances in RRtK are quite large).  And also cannot do same thing as in RRtK where advance with just elephants - each elephant needs an order roll.

Battlelines getting closer


Only one elephant successfully passes a charge order, contacts 2 skirmishers and they evade.  The left chariot and battleline all successfully pass order check and advance and fire at a few skirmishers.

 
A view of the Indian left and opposing pikes


Horse archers are back in front of the Indian left flank mounted but cause no damage (with firing on a die roll of 6 they can deplete the cavalry).  The Indian cavalry and Heavy Chariot charge (successfully!) the horse archers who evade.  The horse archers evade through the gap between Companions and pikes.
 
Horse archers retreat between Cavalry and Hypaspists

 
There is a bit of elephant charge and retire and some Macedonian skirmisher pushback from archer fire.  A centre elephant charges some skirmishers that fires and evades.  The fire has no effect so the elephant continues into a phalanx.  The phalanx flees and the elephant pursues, recontacts and destroys the phalanx next turn in melee.
  
Phalangite unit fleeing from a pike.

  
After failing charges tests, Porus finally passes charge test, gets to a skirmisher that fires and evades and Porus is pushed back by the fire. Ah well.

Archers firing pushed back more skirmishers and exposes most of the phalangites.  Skirmishers interpenetrating the pikes do not effect the pikes but skirmishers are depleted.  In my house rules skirmisher foot only take one depletion.  So gone.

The Macedonian battle line starts moving up.
 
Elephant Vs hypaspists: Tie.

Elephant in combat with Hypaspists

  
The Elephant that pursued the fleeing pike and destroyed it:

Elephant destroys pike and pursues - like a knife through butter


Skirmisher Vs Elephant with Porus: Elephant pushed back.

Elephant and Porus in melee with recalcitrant skirmishers


Hoplite Vs Elephant: Hoplites pushed back and disordered.

Elephant and Hoplites in melee


A turn of little happening is almost a lull in the battle - a few failed orders, firing has little effect but an elephant did destroy a depleted pike unit.

The left side of the Indian battleline


The right side of the Indian battleline


The Macedonian horse archers fire and deplete the cavalry (a 6 - finally).
The Macedonian battleline move up to contact archers where possible.  The archers all stand and fire but it does not help - four archers flee.

The Macedonian right - Hypaspists in the lower centre.


The Macedonian left - Hoplites are the lone lead unit.


The Indians then failed every move or charge order roll, except Porus that charges in. Even though there were not moves, there were a lot of combats - four archers units dispersed.  Porus was pushed back.

Field of battle - Indian lower, Macedonians at the top - archers and pikes are lost on both sides.  Heavy Cavalry to the top left have not yet entered the battle


Then the Hypaspists vs elephant sees the elephant dispersed.Porus and another elephant both cause there respective phalanx unit flee and in subsequent melee cause them to disperse.

My 3 year old son helping me move the Macedonian cavalry (yes, the game is in a map drawer)

 
The Companion and heavy cavalry charge the opposing Indian mounted.  The Indian cavalry flees and dispersed as already depleted (it was depleted by the horse archers - so they were very useful after all).
 
Combats go back and forth for another turn - then a peltast gets a elephant in the flank, and the elephant is dispersed; and Companions and the heavy cavalry destroy the heavy chariot.  This means the Indians have lost 50% of their forces, and so it is a Macedonian win.  It was close, as the Macedonians were only 2 units away from 50% as well.
 
End  of game - a lot of units went by the wayside in a rush. Indians table edge to the bottom, although most Indian units are scattered about in the centre


A fun and fast game.