Saturday, 29 January 2011

Zama refight with Rally Round the King

Background
So, the DBA refight over and done with, onwards to something I find more exciting.  While Warrior Kings was my favourite fast play ancient set, this has been replaced by its updated successor, Rally Round the King.  Very similar but better.
I gave Rally Round the King a go when it first came out,and produced a battle report.

In the Warrior Kings Callinicum refight, I used centimetres rather than inches for movement.  I have reconsidered, and was tempted to go with maybe 2/3rds of an inch per original inch (as RRtK is designed for a 4'x3' board and I am using 2'x2') but will go with inches for this refight.  Should certainly makes things faster, which is not a bad thing with all the AC4, REP5+ troops.

Forces

Roman
1 Heavy Cavalry: Melee, Mounted, AC 4, REP 5, Figs 3
4 Light Cavalry: Skirmish, Mounted, AC 2, REP 4, Figs 2
4 Velites: Skirmish, Foot, AC 2, REP 4, Figs 2
4 Hastati: Melee, Foot, Elite-trained, Combo-weapons, AC 4, REP 5, Figs 4
4 Principes: Melee, Foot, Elite-trained, Combo-weapons, AC 4, REP 5, Figs 4
2 Triarii (one with general): Melee, Foot, Elite-trained, AC 4, REP 6, Figs 4
4 Light Infantry: Melee, Foot, Undisciplined, AC 2, REP 3, Figs 3

Carthaginians
1 Heavy Cavalry: Melee, Mounted, AC 4, REP 4, Figs 3
2 Light Cavalry: Skirmish, Mounted, AC 2, REP 4, Figs 2
2 Elephants: Melee, Foot, Elephant, Undisciplined, AC 2, REP 4, Figs 1
2 Skirmishers: Skirmish, Foot, AC 2, REP 4, Figs 2
4 Light Infantry: Melee, Foot, AC 2, REP 4, Figs 3
8 Medium infantry: Melee, Foot, AC 4, REP 3, Figs 3
4 Heavy Infantry: Melee, Foot, Elite-trained, AC 4, REP 5, Figs 4
2 Heavy Infantry (one with General): Melee, Foot, Elite-trained, AC 4, REP 6, Figs 4

As with DBA, a bit of a tough call on where to place the generals.  So I put them at the back, same as in the DBA refight.  Note that the general figure on the table is just there to remind me what unit has the general.

War rating will be 2 for each side.  I thought about 1 as each side may not need more than that, but it seemed just a bit harsh.

Deployment
As per my standard deployment, but here is is modified with the extra stands:


Or a view from the top:

Overview

Special rules
Carthaginians will go first.
If it looks like the cavalry battle is going to end really fast, I may just stop them for a couple of turns.
Also, the Numidian Light infantry cannot be activated until a Carthaginian comes within 6".

Tactics
The aim of the Carthaginians will be to prolong the cavalry clashes as long as possible and defeat the centre as fast as possible.  Strangely enough, the Roman plan is to hasten the cavalry clashes, and defeat the Carthaginians lines, one by one.  Fairly straightforward.  We will see how close to history we go.
 
Turn 1
An elephant attempts to charge an opposing Velite, but doesn't pass the wanting to charge test and halts.
The second elephant charges an opposing Velite, who shoots, scores no hits, and retires. The Elephant pursues, re-contacts to Velite and routs it. Elephant does not pursue.
The Roman light cavalry charge the opposing light cavalry, both Carthaginians shoot, scores 1 hit, and both retire.  One light cavalry pursues, recontacts the light cavalry and routs it.   The light cavalry pursues off the board! Luckily in RRtK, a unit can come back next turn is pursuing off the table.  Hmmm, seemingly a slight problem with keeping the movement rates the same for a small board, but I actually like it.

The early Numidian clash

The Roman Hastati move up, and one charges the elephant that broke through the Velite line. The elephant and a Hastati are in melee - Elephant receives two hits, Hastati one.  Post melee test sees the elephant give ground (another hit for the elephant) and the Hastati followup.  What a fun game!  Much more activity than the DBA refight.

The elephant pushes through the Velites into the Hastati.

Turn 2

Attempt to charge with the elephant that failed last time, and succeeds.  Opposing velite fire, scores a hit, and routs. Elephant halts.
Elephant in melee with the Hastati routs while the Hastati gives ground and do not pursue.  Elephant routs directly back and contacts the Carthaginian first line who halt.  Elephant inflicts no hits but the Light Infantry inflict a hit on the Elephant.  Light Infantry give ground and the Elephant routs again and so is removed from the board.  Light Infantry pursue.

Move a Carthaginian skirmisher up to within range.
Romans tidy up the Hastati line and move up a Velite to within range of a Carthaginian Skirmisher.
The Velite fires at the Carthaginian skirmisher that moved up earlier. Skirmisher retires. Note: The retiring Skirmisher passed through friends behind it.  I've dome this for other skirmishers retiring throught the rest of the game.  This is not so. The question on can retiring Skirmisher interpenetrate friends came up on the THW mailing list.  The answer is no, as per the rules.  Reading the rules, this is so: when skirmishers are moving, there are times they can interpenetrate.  When retiring, they are treated just like any other unit, so should stop when meet a friend (and take another hit).
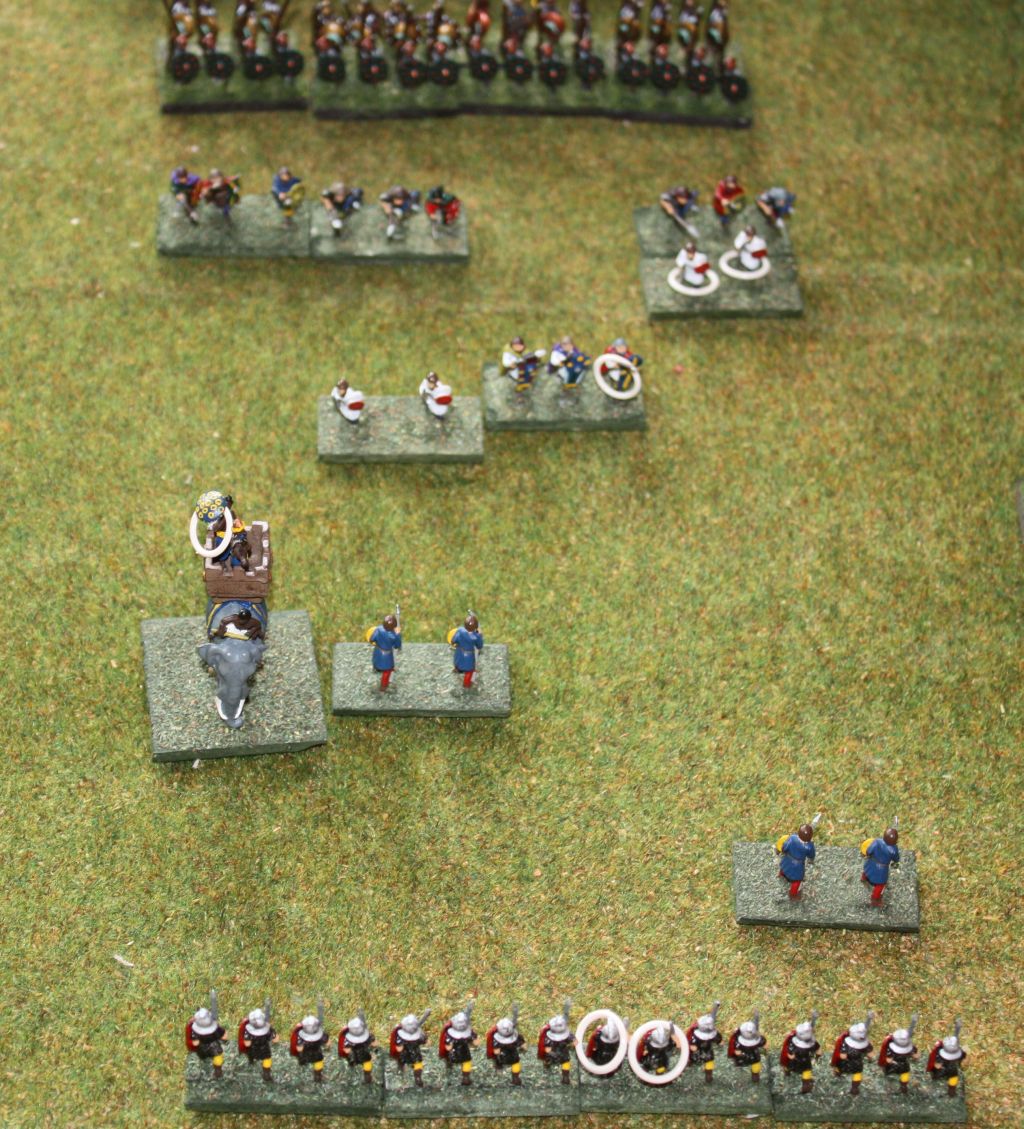
The fragmented skirmishers (and an elephant that just will not charge!)

Turn 3
Carthaginians failed to do anything, but a Roman Velite managed to rout a skirmisher.

Turn 4
Carthaginian light infantry manages to force a Velite to retire, but does not pursue.  At this rate, the Elephant is never going to pass two dice and charge.  3 or less on both dice is a 25% chance, so hopefully soon.  But no matter, as the Hastati line charges it (and an infantry unit).

Hastati line in combat

Light infantry routs, elephant routs and rampages back towards the light infantry line, but all it manages to do is force a skirmisher to retire before it routs again (via a received fire test from the skirmisher).  No hits received to the Hastati.  Tough bastards, and dish it out too  - +1 for elite trained, +1 for combo-weapons is at least a die roll of 3, and an average of 5.5!  And they outnumber the opposition currently too - an average of 6.5 damage per Hastati element.  With the new line up on contact rules, it means an adjacent friendly unit is normally in corner-to-corner contact with the enemy unit  So in the case above, while the elephant was directly in contact with one Hastati, the adjacent Hastati rolled a die in melee as well. 

Turn 5
Carthaginians try to charge with the light infantry but halt.  They move up the second line to behind the light infantry.
Hastati line charges the light infantry (it is in two battles - 2 on one and then 2 on 2).  The lone light infantry routs and the Hastati pursues but fails the attempting to charge (it would meet the Carthaginian second line). The other ( two on two) actually sees a Hastati hit.  In the ensuing post-melee, a light infantry routs the opposing Hastati gives ground (another hit), but pursues into a Carthaginian Skirmisher that fires (another hit!) and retires.  The Hastati pursues, but does not charge into the second line (passed only one dice on the wanting to charge). The other light infantry gives ground.

For the Romans, I am tempted to also move up the Principes to give the Hastati a bit of a REP boost, but I used up the 2 War Rating points charging the Hastati.  I will do it next turn.  I haven't forgotten about the Numidians, and will focus on them soon.  Not doing anything with them helps me not having to introduce a "do nothing with the cavalry for a few turns" rule.

Oops, the Principes (bottom) are a fair distance from the Hastati that is coming into contact with the Carthaginian second line.

Turn 6
Carthaginian second line charges the Hastati. This could highlight a mistake where I should have brought up the Principes earlier to be directly behind the Hastati  for support.  Second Line receive 4 hits from the Hastati. Note about hit allocation - one of the units in melee is a light infantry and so receives a hit first. The die roll for damage was 18 so first hit to the Light infantry (AC2) leaves 15 more to allocate - one each to the other 2 second line; this leaves 5 to allocate which goes to the light infantry.  The last 2 points are not enough to inflict a hit on the AC4 second line and so is ignored.  
The Hastati receive only 1 hit in return.The Carthaginians roll a double 6 for being involved in melee - oops.  with REP 3 and three friends in contact, this would normally be great, but any hit and they are stuffed on boxcars.  One unit is a light infantry with 3 hits, and the other 2 are second lines with hits.  They are stuffed.  All 3 units rout.  Being outnumbered doesn't help either.The Hastati give ground (extra hit each) and the only ones that pursues is the middle one with 4 hits! Luckily, it halts on its wanting to charge test.

Hastati clashing with the Second line

The first combat line melee results in Romans destroying 3; Carthaginians 0.  But the Hastati are not in great shape.  And hits cannot be removed (another thing I like about RRtK).  Note the total losses so far are Romans have lost 3 units to Carthaginian 9.

The Romans moved up the Principes and the Triarii.

Turn 7
Carthaginians second line charges the Hastati line again.The Hastati pass 0 dice for the receiving a charge (a 6,5 and the best unit has a modified REP of 4 - original REP 5 +1 friend -1 hit).  The 3 Hastati in the line rout (one to the right is off by itself and was not charged - seemed like to much to tempt fate to do so).  Fascinating how nature balances itself out. No Carthaginian pursues.

The Hastati, except one, evaporates.  Principes at the bottom of the picture are advancing to assist.

Romans move up some Velites - can't waste them!

Turn 8
Carthaginian moves the lone skirmisher from behind the second line to in front of it, conveniently in front of the Velite.

Right Velite shoots, inflicts a hit.  The Carthaginian can only halt than advance as it already has an enemy in front and within the enemy's charge reach.

The Velite scores a hit!

Principes continue to move forwards, and join up with the last Hastati.

The centre Velite shoots and forces the Carthaginian skirmisher to retire.

Turn 9
The Carthaginian line charges, mainly to avoid more hits from Velite missile fire. The Carthaginian unit with the hit only passes one dice so halts.  So the Velite hit was important and a useful thing to do.  I feel better - I wasn't sure.  The Velite between the lines routs and the Carthaginian pursues into the Principes.  So we end up with a front of 4 Principes Vs 3 Second line:

Principes to the rescue and contact the Second line.

Romans inflict 4 hits, Carthaginians 2.  As well as being REP 3, the Carthaginians are outnumbered, so their post-melee test may not be pretty - one routs, rest give ground.  The Romans roll a double 6! but with REP 5 and two friends in contact for the units with 1 hit, all is fine - They follow up.

Principes are cleaning up the Second line.

The right Velite inflicts another hit on the Carthaginian who retires, but cannot due to the unit behind, so takes another hit!  And then the Hastati charges it, melee results in the Carthaginian routing, Hastati pursues into the Carthaginian unit that was behind the first one.  It routs.  Hastati has cleared out two units with no hits to itself.

The Principes continue the melee (move up another Principes into corner to corner contact so it is three units to two). Principes inflict 3 hits, the Carthaginians 2; post-melee test sees the Carthaginians rout - no surprises there with 4 hits and REP 3 and a roll of 6,5.  A Principes pursues (note: to pursue after a continuing melee, a roll of greater  than original REP is required, so a Principes will only pursue on a 6, which it rolled)  into the last remaining second line that was behind one of the routed units.   The second line unit fails both dice for receiving charge (it is a REP 3 so not much chance of it staying).  There is no Carthaginian second line left.

Overview with the Carthaginian Second line routed.

Turn 10
Carthaginian Third line charge into the Principes (and the last Hastati on the Carthaginian left).

This is where the final clash gets interesting - Carthaginians has 6 units - REP 5 and 6 (the two REP 6 units are in the centre).  Romans have 5 units - Hastati and Principes, and 2 Triarii in reserve (bound to move up when the Romans have a turn).  So it is going to be close.  All are elite trained.  Due to the way the Roman line has been staggered, there are actually 3 melees.

The Third, and last line, of the Carthaginians enter the fray of what becomes a very long battle.

First melee: Romans give ground.
Second melee: Continue melee.
Third melee: Continue melee.

Continue melee are fairly rare in most of the games I have played as after a hit or 2, most units cannot pass both dice.  But REP 5 and 6 with a few friends in support - reaction test? don't even bother to roll!

Early days of the battle line clash - hardly any hits each!  It gets much worse.

Romans finally get their act together on the Numidians - I forgot that the Skirmisher cavalvy could fire against the enemy, doing bits of potential damage (like the Velite has done recently).  I think is was playing DBA in the previous game where they had to contact, and RRtK does not allow contact until hits are greater than equal to REP.  Ah well, it may have made a little bit of a difference.  There is one Numidian that comes back onto the board (1 use of the war rating) and moved up the other against the opposing Light cavalry (2nd war rating).  Triaii use their move (they must continue move at least 1/2 their move) to wheel towards the left, where the Principes line is in most danger of collapsing.

Turn 11
Carthaginian Numidians fire and cause opposing Numidians to retire. Take that, traitors!

The battle line clash continues - all the Romans are in contact with one another, and so are the Carthaginians, so I'll call in one melee (in hindsight, last turn should has possibly been only two melees rather than three). three Romans units give ground (which gives them a hit as well).

No routs or retires, just a few more hits.

2 Roman Numidians move to face the Carthaginian one.
Triarii move up to provide some stiffening to the left side of the Roman battle line.

The clash continues as two separate melees:
melee 1 (right two units): Romans give ground, receiving additional hits (as chance would have it, both roll 1,6 for post-melee test - The general helped ensure the Carthaginians passed 2 dice, while the Romans only pass 1)
melee 2 (left two units with general and Triarii in the rear): One Carthaginian gives ground.  The general really helped here too for the Romans.


Still no routs or retires, but the hits are now piling on. The Triarii have joined to the left rear.

Check out those hits!  The Hastati is buried under 6 hits on the far right of the Roman line!

Turn 12
Numidians fire on the Roman Numidians; eventually the Carthaginian retires off the board.  Even though the Roman skirmishers do not need to roll to pursue (as it is not melee), I make them do so to simulate the actual battle.  One Roman pursues off the table (it can come back later as did a previous pursuer).

OK - the battle line clash continues!  It is two different melees (Carthaginian right unit and then the other three line units form the other melee) due to give grounds last turn. Three hits each and every Roman unit on the front line has 4 hits!

The first melee results in both giving ground, which mean neither do and both get an extra hit!
Unsurprisingly, the Hastati with 6 hits routs.  The other give ground.  There is a Principes with 7 hits in there.

A rout! (on the right - a Hastati).  More hits...


Romans move a Principes to fill a gap. Battle line clash again, three melees - two flanks units are each a melee and the centre two is the other.

The centre two Principes rout (they did have 7 hits each so it was not unexpected). The left most melee would have seen both units rout but simultaneous rout means neither do.  Interesting as the Roman unit currently has so many hits it cannot pass no matter what it rolls; the opposing Carthaginian modified REP is a 1 so is hard to pass too.  Unless the general and more friends appear, these two units with continue meleeing until the end of the game!  I do not see a problem with this - quite a few battles in ancient history had troops fighting until the end of the battle (and one side then flees).

The centre Principes finally rout.


Turn 13
Hmmm. For the battleline, the Carthaginians have two unhurt units, and three with 4 or more hits.  Romans have three unhurt units,and one with 7 hits.  They also have some skirmishers that can charge when it gets bad.  There is also the Heavy Cavalry that have been standing off since the start.  Not game to charge with the Romans - the one additional REP does increase the chances of winning the flank, but losing it would be bad.
The Carthaginians could charge a flank, but the Triarii would automatically pass both dice, so what would be the point.

The Carthaginian Veteran does not charge into contact with the opposing Triarii - it would lose the flanking friends, and no longer be adjacent to the general.
The nearly never-ending melee ends - neither scored a hit and the Carthaginians passed one dice.  The Romans routs.

The leftmost Principes routs.

Romans charge in with the Triarii.  No need to roll a check with REP 6.  On the Roman right, both units could have routed so neither do.  It is looking bad for the Carthaginians, who cannot pass a test, but the opposing Roman has a modified REP of 2 - not good either.

On the Roman left, the Carthaginian routs.

Triarii are now in the front line (on the left).

Turn 14
Carthaginian general wheels to attack flank of the Roman general Triarii unit.  The Romans have a modified REP of 8, so would pass any test, and so do not count as flanked.  But now the roman general unit could potentially be outnumbered and so a -1 in a test.
The Carthaginian veteran  facing the Triarii General rout.  Ah well.

The other melee of the Carthaginians and Principes becomes a never-ending melee - both are the same REP and both units cannot pass a test.

Never-ending melee on the far right. There is a gap in the Carthaginian centre. The leftmost Carthaginian unit routs next melee. 

The left most Triarii and the General Triarii charge the opposing veteran unit.  Post melee for the veteran - 2 hits on a REP 5 lone unit and outnumbered...hmm...passed 0 dice.  Rout. Romans pursue. 
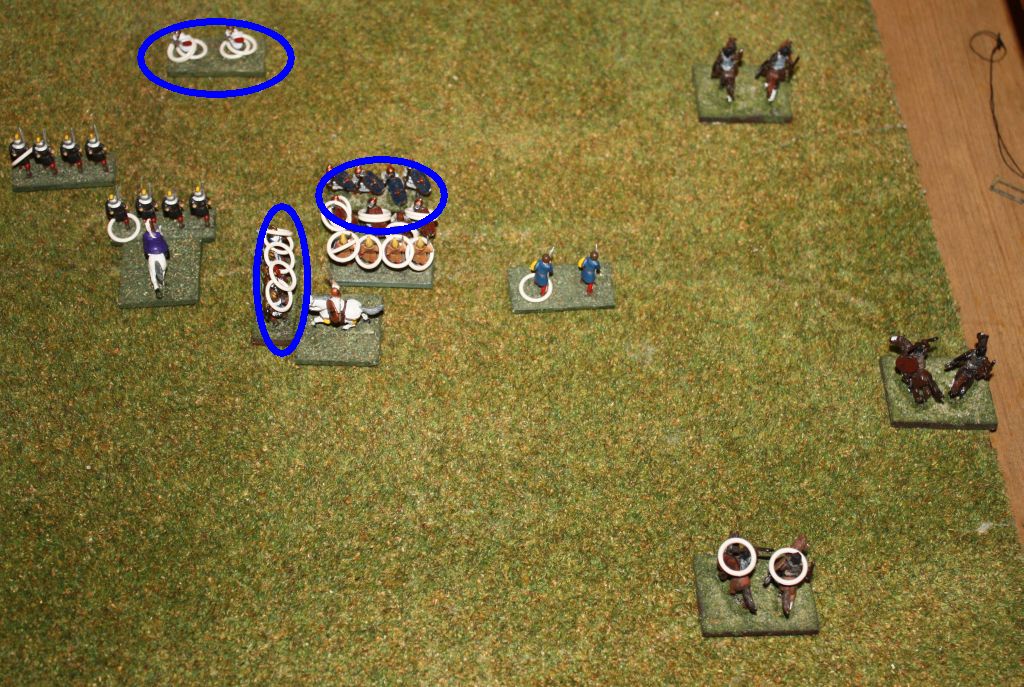
The battleline and surrounding units.  Carthaginian units circled in blue.

The Carthaginians only have one unhurt unit (REP 5) and the Veteran general unit (with 5 hits). Oh, and a foot Skirmisher with 4 hits.  The Romans outnumber this by two, and also have the Numidian cavalry to assist.  The Heavy cavalry is still at a stand-off.  I'm giving this to the Romans.  It was close though.

 
Overview at game end.

Verdict
A long game.  This was due to the high quality troops.  Two Rep 4 lines (AC4) will not last long and will often fail at least one dice.  Two REP5-6 lines will almost automatically pass both dice for at least turn or two.  As a comparison to Armati, two average lines clashing will take just as long to resolve as 2 quality lines.  Ah well.  I enjoyed it, but is wasn't as fast play as normal - probably because there are lots of troops!  The casualty rings on the figures are normally no problem, but when I got to 6 or more, it was getting hard to keep them on. RRtK works fine for an infantry game like Zama.  My enthusiasm for it has not waned.  On a final note, Zama is not really suited to fast play, and I think I will try out only one more ruleset with it.  That one will be the fastest I know, Mighty Armies: Ancients.

Sunday, 2 January 2011

Zama refight with DBA

Background
For the first refight of Zama using different rulesets, I thought this time I will get DBA out of the way first. Although not that fond of it, it is the most popular ruleset for less than 1 hour on a 2'x2' table. So it will offer some comparison for later rules.

Forces

Roman
1 Cv - Heavy Cavalry
4 LH - Light Cavalry
4 Ps - Velites
4 Bd - Hastati
4 Bd - Principes
2 Sp - Triarii (one with general)
4 Hd - Light Infantry

Carthaginians
1 Cv - Heavy Cavalry
2 Lh - Light Cavalry
2 El - Elephants
2 Ps - Skirmishers
4 Ax - Light Infantry
4 Sp - Medium infantry
4 Sp - Heavy Infantry (one with General)

A bit of a tough call on where to place the generals.  So I put them at the back.

Deployment
As per my standard deployment map but rather than link to it, here it is:


Or a view from the top:

Setup - spotted that the Romans had 2 Cv during turn 1, but the extra base appears in this picture. And in DBA, generals are not separate but part of a unit.  Fixed all this after this picture taken. 


Special rules
Carthaginians will go first.
If it looks like the cavalry battle is going to end really fast, I may just stop them for a couple of turns. Note from post-game: I did not have to do this.
Also, the Numidian Light infantry cannot be activated until a Carthaginian comes within 6".
Victory will have to be when I call it as using the normal DBA breakpoint will not see the rear lines ever get into contact.

Tactics
The aim of the Carthaginians will be to prolong the cavalry clashes as long as possible.  In the centre it will be to defeat the Roman lines, one by one.  Strangely enough, the Roman plan is to hasten the cavalry clashes, and defeat the Carthaginians lines, one by one.  Fairly straightforward.  We will see how close to history we go.
 
Turn 1
The Carthaginians shuffle the lines forward; the Romans do also, and move forward the cavalry on both flanks. The Roman LH moves a double move with some spare PIPS. Light Horse use additional PIPs to make additional moves so long as it does not start of finish within a base width of an enemy.  Both leave enough room between the skirmish line and the next line in to allow for recoils, flees etc.

Turn 2
Carthaginian elephant and skirmisher line charge the Velites.  Outcome: all 4 Velites recoiled.  All the Romans could do was charge their Numidian light horse into the Carthaginian Numidian Light Horse.  It is a 4 Vs 2 battle. But the outcome was a Roman Light Horse recoiled.  I am used to thinking in units and see the LH as a unit but the Roman LH is really 4 individual units and so next turn individual bases could wrap around the flanks which will turn recoils into destruction.


Elephant line about to clash with the Velites

Turn 3
Elephants and Skirmishers charge in again and the rest of the lines move further forward.  One Elephant and Carthaginian Skirmisher lost, but a Roman Velite lost and another flees.The Carthaginian Numidians in contact result is the destruction of two Roman Light Horse; one in the Carthaginian turn, one in the Roman turn.  This flank is not going so historical.   

 Light Horse flank - Roman LH on the sides, Carthaginian in the centre.

Turn 4 and 5
Turn 4 had PIP roll of one each - Elephant and skirmisher charge the Hastati, and are bounced.


Elephant charges in again. Roman Velites attack the Carthaginian first line.  No damage, just a few recoils for each side.

Elephants with auxilia close behind (too close!).  Two Velites defending on the right.

Turn 6 and 7
Elephant and Hastati clash again for no effect, except the elephant recoils into an Auxilia, destroying it. Wow! Historical outcome. I did have the first line about 80mm behind but the Roman Hastati moved forward to contact after a recoil, and the elephant recoiled again - into the Carthaginian first line.  Carthaginian first line destroys a Velite.

Then the second (and last) Elephant is gone. Hastati move forwards, only 1 inch from the Auxilia now.  7 turns and only really the skirmisher line has contacted.

Overview at end of turn 7.  Romans at the bottom.

Turns 8 and 9
Some re-arrangements of the front lines.  Romans now have two Velites on each flank of the Hastati line - this will provide the valuable -1 modifier for attacks.  This is one thing it is still hard for me to grasp about DBx, even after 15 years - the longevity of skirmishers.  Especially compared to Armati where they are removed on contact with just about everything!  Hastati destroy another 2 Light Infantry.
An aside on the cavalry flanks: Historically, the Romans won both flanks, pursued the enemy cavalry and returned near the end of the infantry battle to finish them off in the rear.  In this refight, there is a stand-off between the two cavalry units as they are the same combat strength.  And the Numidian light horse is now two units versus two units and so is quite equal - neither side wanting to press the issue and possibly give an advantage to either side.  So, while I thought I may have to wave a hand to prevent the cavalry entering the infantry battle too soon, they may never actually enter...


Turn 10 and 11
The last Auxilia of the Carthaginian first line is destroyed.  Thinking back, the tactic  for the roman, and the Carthaginian, would be to extend the flanks with the psiloi and/or light infantry.  The Romans did so with two of the fleeing Velites, and they have an advantage going up against the second Carthaginian line.  This began to be a theme in later turns as the lines were extended to stop advantages.

The Hastati and the Carthaginian second line about to clash.

The lines meet...and the result is a few recoils on each side. 

Turn 12
Next turn, a Velite turns onto the flank of a second line - it the Romans score a recoil, it will be destroyed.  Which it is.
Carthaginians bring into the line their Cavalry on the flank (so much for my aside earlier) to gain an advantage - and manage to destroy the pesky Velite on the flank - now the Carthaginians have an advantage there.  One of the Carthaginian veterans moves up to combat the Velite on the other flank, and recoils.  Sometimes I have to stretch my imagination to understand DBA results.

Each of the the clashing line flanks fragments (but soon restored).

Turn 13 to 15
Romans split the Principes line to either side to support the flanks of the Hastati.

Carthaginians play the same trick as the Romans did earlier - wheeled a Skirmisher on the flank of a Hastati.  Local advantage- a Spear with two supports Vs a Blade - 4 Vs 3.  Spears win 10 to 9.  Hastati cannot recoil and destroyed.
Romans bring their cavalry into the fray as well.


The line (much extended) meets again.  The Spears recoil. The trick is trying to get a good enough local advantage - the Romans managed it by recoiling a few Spears leaving one lone Spear with two Roman supports beside it - making it a 5 vs 3.  But just a recoil.  Possibly the Romans can afford to close the door with some Blades as they have more of them.  Will have to see.

The battle lines extended, with the advantage to the Romans.

Turn 16 to 18
The lines, which contains almost all the remaining troops with both sides also having a 2 unit reserve, clash.

The lines clash.

The line clash went on for a few more turns.  The Carthaginian cavalry was destroyed first, making the Carthaginian right flank quite open.  This was followed by the rightmost Spear unit next turn which is really leaving that flank open! And then another spear unit from both flanks.  With the Carthaginians down to only 3 Spear unit, and the Romans having lost nothing, I called it a victory for the Romans.

The remainder of the lines.  The three Carthaginians are centred on the general at the top.

Overview of the filed at game end.

Verdict
It was a long game - 18 turns!  There is nearly twice the elements for a normal DBA games, and also the game is staged over three lines of troops. So it is unsurprising it took so long.  I estimate there was at least 2 hours playing time.  I think that DBA, compared to some of the other rules I'll try out, it not well suited to fast play when multiple lines are involved. Once again, as per the Callinicum DBA game, I did enjoy the game but found it not as historically representative as I like.  Some things went quite historical - the Elephants impacting the Carthaginian first line, the Principes did help extend the line of the Hastati which is similar to parts of the original battle.  The to and fro when the heavy troops clash is well represented. But the skirmishers hung around which still gets to me.  I understand the reasoning, it just does sit comfortably with me.  Still, a good game. There are others rules I like more so I think this will be my last solo DBA effort.  If all the Zama refights take this long though, I am only going to replay it a few times before moving on to a different battle.

Friday, 24 December 2010

Wars Ancient rules overview and battle report - Persians Vs Romans

Background
I am ongoing quest for fast play ancient rules that play on a small table.  I am supposed to be refighting Zama with numerous rules, but got sidetracked by doing a battle report when Rally Round the King was released.  I have been sidetracked again.  I saw on a thread on TMP that the Irregular Miniatures are carrying a new ruleset - Wars Ancient.  There is a website for the game and also a boardgamegeek entry.  But that is it.  The rules are not cheap (22GDP), and shipping from the UK to Australia does nothing to help keep the cost down.  But they sounded interesting - and they are interesting.  Shiny new rules are a distraction.   So following is an overview of the rules and a battle report between Sassanid Persians and Eastern Romans (yes, I know I did that for Rally Round the King too - it was easier for me as I had the armies still out).  Battle report won't be as detailed as I normally do (might do when I use them for Zama) but enough to try and convey a feel for the rules.

Overview of the rules
This is not really a full review - more an overview of the rule mechanisms and some comments based on a playing.
 
Forces
Unit bases are mostly 6cm frontage by 3cm depth.
A unit is one base and called a DET (Detachment).
An army is initially 15 units split across 3 commands - a leader-general with 5 units and 2 generals each with 5 units.
 
An army also get six strategy cards - more on these later.  Strategy cards are an important part of the game - they provide terrain, additional unit capabilities and tactics that can be implemented during play.

Movement is in MU which is 40cm or 1.5 inches.
Table size is 40" by 32".
Moves are 2MU for infantry, 4MU for mounted.
 
Units can move straight ahead, wheel, about face and a few special moves such as swap places.
The terminology for units are similar to that in DBA - Psiloi, Auxilia, Blades, Light Horse etc but besides combat values being similar the only resemblance to DBA is the unit names.
 
Troop types are differentiated by having a Combat Value (CV), a Morale Value (MV) and some attributes (about 3 is average) from a list of 20 or so.
 
Attribute examples:
Fierce - +1 CV if attacking (warbands have this)
Charge - CV bonus (cavalry have this)
Formation - +1 CV for friendly unit in contact (heavy infantry get this)
Impetuous - units must follow up in rout (cavalry, warbands).
Short Range - short range missile fire.
 
All units have two "Morale Damage" points.  If a second morale damage point is received (i.e. they fail a morale check twice) they are destroyed.  However, a unit can only receive a limited amount of morale damage per turn (see later as this is important but need to describe the other concepts first).
 
Deployment
Strategy cards (see later) are used to alternatively place any terrain.
Then players alternative deploying a camp.
Then players alternative deploying one command (general + 5 units) at a time.
There is an optional scouting rule where the scouting value of a side is determined and this can effect unit deployment.
There are simple weather rules.
  
Turn Sequence
1. missile fire - simultaneous
2. initiative - roll 1d10 and highest determines who goes first
3. players turn:
   a) First player activate a general and move/melee units in command range
   b) Other player activates a general and moves/melee units in command range
  c) Alternate until all generals activated.
4. count Victory Points.
 
Command and Control
A leader/general must spend a command point to activate a unit to move.  Unit must be in range.  Unit can be activated only once per turn.
Leader-generals have a command radius of 6MU and 4 command points.
Generals have a command radius of 4MU and 3 command points.
Leaders/Generals have unlimited movement.
 
Missile fire
Missile fire is simple.
Bow fire is 3MU - d6 roll, hit on a 5-6.
javelin fire is 1MU - d6 roll, hit on a 6.
In cover - only a 6 is a hit.
 
A missile unit that doesn't move may be placed into "opportunity fire", where it can fire during the player turn.  Missile units may fire at enemy units in contact and in firing arc.
See what a hit means under melee. 
 

Melee
Melee is where it gets interesting. Bases line up edge on edge (like DBA) for combat.  There is a shuffle when units engage to ensure this happens.
Combat values of opposing units are compared.  The unit that is active rolls 1 to 3 d6 depending on the comparison ratio - The higher the CV ratio, the more dice rolled.
 
Each pip of a d6 has a specific result ranging from attacker takes a hit (a '1') to defender takes a hit and retreats (a '6').   For multiple dice rolls, the attacker chooses the best result. So, the more rolls, the more chance of choosing a bad thing for the defender. Nice.
 
The base combat values for a unit can get modified by attributes and attached generals.

A hit is not really a hit - A hit is a morale check.  Every time a unit is hit, roll a 1d10 and compare against the morale value: if less, pass; nothing.  If more, take one morale damage.  Two morale damages and the unit is destroyed.  On a natural 10, the unit routs which is a an about face and a full rout move back towards your table edge.  Routing units can be rallied using a command point.  I like this.

Morale values also can get modified by attributes, and +1 for each unit in contact.

A unit cannot take more than one morale damage point in the melee phase or the missile phase.  Units hang around for a while.
 
Strategy Cards
Things come into their own with Strategy cards.  There are 32 of them.  Players get 6 each. Historical lists get about 4 defined and 2 random.  Strategy cards range from terrain, deployment options to tactics during the game.

Terrain is placed if a player plays the appropriate terrain strategy card.  It is placed anywhere.

Deployment options (and some of these can be played during the game) are such things like:
  • replace up to 2 Auxilia with Bowmen
  • the enemy leader is ill - reduce his command value by 1
  • Replace an Auxilia with a blade or spear unit.
  • Increase the morale value of a unit by 1. 
  • After all deployment, redeploy 2 units.
Strategies that can be played during the game are:
  • Fanatics - select a unit and morale is now 9.
  • Select an Auxilia - it is now a heavy infantry unit;
  • Select a unit to now have javelins.
  • Treason - and enemy unit is now on your side.
  • My favourite is select up to 2 Auxilia and change them to Bowmen.  I am not sure of the reasoning behind that one!
The strategies cards are not balanced but getting 6 of them each would reduce imbalances in their effects.  I don't think I would play with some of the cards - they just seem a bit weird.  But the cards add some uncertainty to the game and should make it quite interesting.
 
Army Lists
There are 10 army lists given but the game is designed for more build you own armies.
There are no points values for units.
Building armies consists of an Auxilia plus 4 random units and 10 selected units.  Note there are minimum and maximums for unit types.
 
That being said, I think the game will play quite well with historical armies.  My first replay was using a historical army list generated from other sources.
 
Determining the Winner
Victory points are awarded for inflicting morale damage, destroying enemy units, sacking an enemy camp and destroying enemy generals.  First side to reach 15 points wins.
 
Presentation
The rules are clear and the layout is fine. The rules total 24 pages including army lists, optional rules and pictures of games in progress.  There are diagrams littered throughout the book to assist in describing some mechanisms.   The Strategy Cards and Army cards are in the book and need to be cut out.  I used a paper guillotine.

The only issue I really came across is that attributes and their effects are in one table on the back of the book.  The effects are very important and listed no where else.  Such things like Skirmishers reduce attacking infantry CV by 1 and Mounted destroying routing Psiloi and Bowmen. These effects are not referred to anywhere else in the rule book (not even an indication that unit attributes are varied and have a large effect on unit interactions) so when you get to the back page, the richness of the attributes for the units takes you by surprise.

I had only a couple of questions and clarifications I sent to the author which I will post once tidied up. 

My verdict on the rules after a battle are at the end of the post.  But in summary: not for everyone,  I liked them a lot, will play again and lends itself to tweaking (using the existing rule mechanisms) to get your version of history.

Back to the battle report....
 
Troops
There is no list for the Sassanid Persians and Later Eastern Romans.  Armies are 15 DETs each so I just used the first edition Armati lists as a basis (they are about 15 units each).  As I mentioned earlier, the rules lend themselves to historical tweaking - you could adjust combat and morale values to better differentiate troop types. But I will resist for this replay and stick to the standard troop types.

Sassanid Persian
2 Cataphracts
4 Cavalry (one has +1 CV +1 MV due to Weapon Maker Strategy Card)
2 Light Horse
2 Auxilia
4 Psiloi
1 Elephant
+1 additional Cavalry from playing a Strategy card.

Later Eastern Roman
1 Cataphract
3 Cavalry
2 Light Horse
3 Blades (+1 MV and Wall of Shields due to Legionaries strategy card)
3 Auxilia
3 Skirmishers

Strategy Cards

Cataphracts is a Strategy card.  There is only one, but I could not help but give the armies the cataphracts I think they deserved.  So I will reduce the number of Strategy cards by 2 for the Persians, and by 1 for the Romans.  Further, I will give 2 Missile Weapons to the Persians. And 2 Thrown Weapons and 1 Legionaries (I chose to only apply this to the Blades) to the Romans.
This leaves 2 random cards for the Persians:
  • Weapon Maker (used in deployment - one DET gains +1 to CV and MV)
  • Mercenaries  (deployment - add one Spear, Bowman or Cavalry last). 

And 2 random cards for the Romans:
  • Treason - play at start of a melee and enemy DET becomes yours.
  • Strategist  - either redeploy army at end of deployment or redeploy 3 DETs during play.
Deployment
If you use 4cm width bases, that is 2/3rds of the recommended size, and then a MU needs to be reduced by 1/3rd which equal 1" and table size goes down to 22"x28" which is close to 24"x24".  Eminently playable.   And I only have units based on 4cm wide bases.  I don't have a 2x2 board except a (slightly bright) green 26"x26"mat I picked up from a hardware store.  I'll use that as my real 2'x2' board is being used for Zama refight.  I'll deploy 2" further in to account for the slightly wider board.

Normally alternate deployment, but will skip this as solo and can't outthink myself this late at night.

Deployment view from the Roman side

Romans setup cavalry on the left flank, legionaries in the centre with skirmishers and auxilia on the right with a light cavalry.  Leader is in the centre. 
Roman plan - break the left flank, maybe using some blades from the centre.  Hold or break the centre. Panic at the large force on the right flank so refuse it.

Persians setup General with cataphracts and heavy cavalry on their right flank, levies with some skirmishers in the centre and more heavy cavalry and the elephant on the left flank.
Persian plan - use the cavalry on the wings to beat the Romans.  Hold the Romans on their left flank with equivalent forces and hopefully break their right flank.  the centre is weak, but only has to hold - may not even need to engage.

Turn 1
A general advance by both sides.  Shuffled some Psiloi when I reread their atrribute of providing +1 to a DET on their flank.  Cavalry get +2 to their CV if they charge so initiative is important - The Persians only moved up the Cavalry within charge distance of the Roman left flank - the Cataphracts advanced but not to within charge reach.


Roman left flank

Turn 2
Romans win initiative and charge into 2 of the opposing cavalry and cause a rout.  The Persians retaliate and cause a damage point as well.  The cavalry on this flank is becoming a bit of a swirling mess.

Roman left flank and centre area

I'm using blood red glass beads for damage markers.  Seemed like a good idea at the time but blood red on bright green does clash.  I will go back to casualty rings next game.


Elsewhere, the Roman centre advanced and the Persian left flank continued its advance.

Roman right flank

Victory Points: Persian 1 Roman 1

Turn 3
Romans charge in on their left flank and cause 2 damage points. The Persians retaliate and cause a cataphract rout and some damage elsewhere.  The rest of the board is taken up with an advance on the Persian left flank to within 1MU of the Romans.  In hindsight, maybe the Romans should have really used the treason card on the Cataphract melee, but I have been saving it for the Roman right flank, where they could get overwhelmed.  The Romans also have the Strategist card, which I was going to use to redeploy some centre legionaries to the left flank, but a pursuit by a Persian cavalry has quashed that idea - The Strategist card only allows redeployment is no enemy are within 4MU and the pursurer is now within 4MU.

Roman side at the bottom of the picture, Persians at the top.


Victory Points: Persian 2 Roman 3

Turn 4
Missile fire - the Persians play the 2 missile weapons cards to give missile fire to 2 cavalry on their left flank.  Roll to hit - both miss.  
Romans win initiative for the 4th time (!).
The chaos on the flank with the cavalry on cavalry continues.  The centre legionaries split up to start the journey of being assistance to the other flanks.

Legionaries split

The Persians cavalry and elephant charge into the Auxilia.  The Romans play the Treason card and turn the Elephants.


The treasonous elephant

Otherwise, the charge was disappointing - only one damage out of three attacks.  And cavalry get +2 to their combat value when charging.

The Roman right flank after they turned the elephant


Victory Points: Persians 4 Romans 3

Turn 5
Persians finally win initiative.  In the cavalry swirl, a roman cavalry succumbs to the general and cataphract and another flanking cavalry.  The Persians activated quite a few melees and the dice were hot - scoring morale checks in almost all of them and inflicting some damage.  The flanked Light Horse on the far right of the Roman line was destroyed.   The Romans did not have much go there way but the Elephant (now Roman) assisted in causing damage to a neighbouring - former friendly - cavalry.

Overview with Romans at the bottom.

Victory Points: Persian 10 Roman 4

Turn 6
Persians win initiative for the first time.  The Roman camp is three moves away from the cavalry on the right flank.

The Roman camp is only an about face and two moves from the Persian cavalry to the left.

It is probably worth giving it a go as capturing the camp would give enough victory points to win the game.  So the cavalry move towards the camp. There was little movement this turn - more jockeying for position, a bit of flanking and an advance of the Roman centre.  No hits this turn - everyone survived any morale checks.

Turn 7
Still no hits from missile fire anywhere!
Things are slowing down as most units are in melee, or don't want to be so don't move!  The Persians are only one move from the camp.  The Romans finally managed to destroy the Persian cavalry flanked by the elephant.  And also finally destroyed the Persian cataphract facing the Roman cataphract and flanked by a legionary unit.

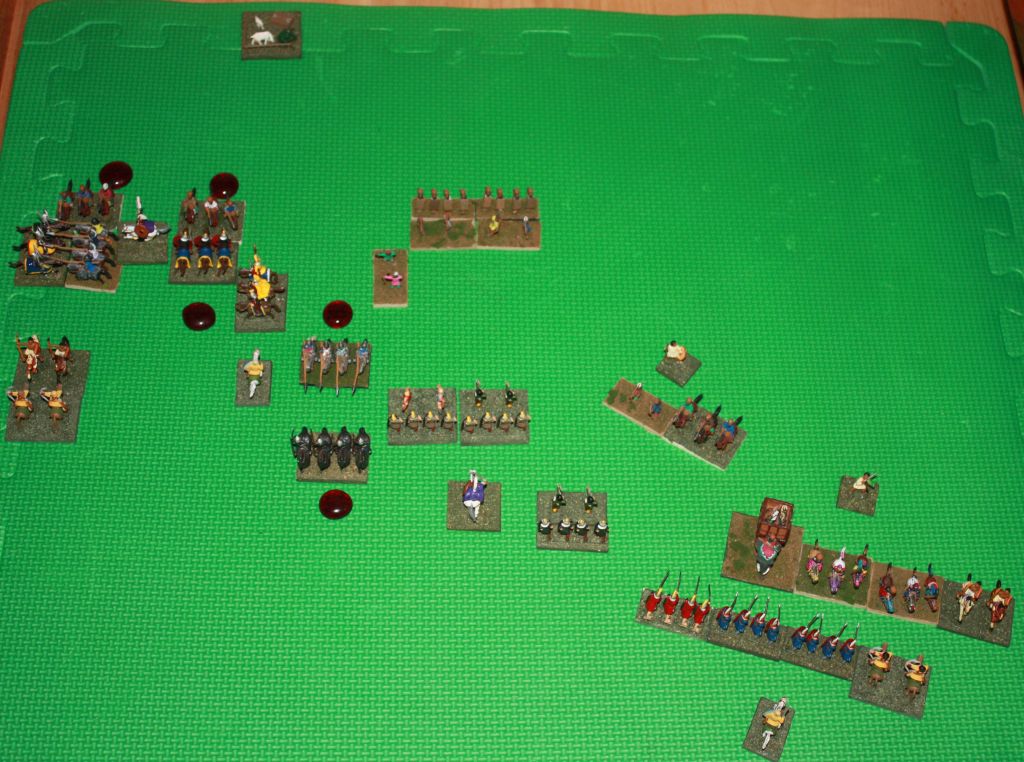
Overview - Romans to the bottom, Nadia the dice roller at the top.  Having the game in a drawer helps protect it for the weeks it takes to play.

Victory Points: Persians 10 Romans 8

Turn 8
The Persians win initiative and attack the camp, successfully scoring a hit which means it is captured.  The Romans lost a melee against some Persians cavalry: they rolled two 1's on the dice roll to hit, which means the attacker needs to do a morale check, which they failed.  They already had a melee damage and were destroyed.  Those snake-eyes rolls are bad - this was the second one for the attack (last time the attacker passed the morale check).
The Romans give up as there is no way they can exceed the Persians victory point score this turn, and most places they could try, there is just as much chance of worsening their victory point score!
Victory to the Persians.
Final victory points: Persians 17 Romans: 8

Final positions

Postscript to game
There were a few rules I did not play correctly.  When I started the game, I sent off a few (ok, about 14 and I do feel bad about asking so many at once) clarification questions.  They were not really omissions, just things that seemed unclear.  There was only about 3 things I think I had assumed incorrectly.  An example of one of these is that units that have missile fire capability can fire at enemy unit in contact with them to the front (it does imply this in the rules so my bad).  I will format the clarifications and post them here later.


Verdict
I like the rules.  I was thinking they could be used for fast play, but they are aimed at the 2-2.5 hour game.  It should be obvious, as it is written in large letters on the front of the rule book: 2-3 hours.  But, again, I was thinking, maybe they could be cut down, as per some of the other rules I have tried.  Probably not - I may do some more thinking on it before using them for a Zama replay.  Anyway, the rules may seen to be simple, but they are not simplistic.  The command and control system is excellent, and the grind of melee is well represented.  Troops have both a combat value and morale value which works well in differentiating the units.  Lastly, a word on the cards - while they could be powerful, they are not within the mechanics of the game.  And they do add uncertainty to the battle.  The game can be used for straight pickup games with selected forces but would work quite well for historical games and historical scenarios.

Saturday, 4 December 2010

Rally Round the King: Persians V Romans

Background
So, Rally Round the King is out.  New and shiny next edition of Warrior Heroes, which means it also contains the original Warrior Kings, but updated.  And Warrior Kings is my favourite ancients ruleset after Armati.  But I've been playing it on a 2'x2' board, rather than the recommended 4'x3', and converting the inches to centimetres (and about 75% of the recommended units).  Units move slower in comparison to their width when using centimetres.  So I thought that I would take the plunge and play some games on the full size board.  I've always had a soft spot for Sassanid Persians versus Late Romans so I'll play 2-3 games with these forces

The board will not look that great - My small children are bound to get into it and so the good stuff won't go out.  And I haven't play ancients on anything bigger than 3'x2' for ten years and I don't have great 15mm scale gullies or rough ground.

What I did do is create an Excel spreadsheet that calculates the forces, war ratings, scouting value and any outscouting, and also the board terrain.  Took about two hours but now the pre-game stuff of selection and deploying it literally one button away (F9 - recalculate).  It doesn't do rivers and doesn't include flyers for scouting, but otherwise it is a winner!  And the only forces it works for currently is Sassanid Persians and Late Romans but it is easy to add new army lists.

Lastly, for the first few turns I do show the reactions tests, die rolls etc, to shows how the game works.  As the turns progress, I tone it down.

Forces

Sassanid Persia army list AA
6 Clibinarii – Dual, Shock; Mounted Melee, REP 5, AC 4
3 Cataphracts – Shock; Mounted Melee, REP 5, AC6
1 Chionite Cavalry; Mounted Skirmish, REP 4, AC 2
2 Elephants – Terror, UD; Foot Melee, REP 4, AC 2
3 Levies – UD; Foot Melee, REP 3, AC 2
3 Skirmishers; Foot Skirmish, REP 4, AC 2

Battle tactics B.  Actual tactic DE - double envelopment - 30% right, 40% centre, 30% left

Later Romans Army list LL

2 Equites – Shock; Mounted Melee, REP 4, AC 4
5 Legionaries – CW, Elite; Foot Melee, REP 3, AC 4
3 Auxiliaries – CW; Foot Melee, REP 3, AC 4
2 Auxiliary Archers; Foot Missile, REP 3, AC 4
3 Archers; Foot Skirmish, REP 4, AC 2
1 Slingers; Foot Skirmish, REP 4, AC 2

Battle tactics A. Actual tactic PC - penetrate centre - 20% right, 60% centre, 20% left.

Battleground

Table generated:       
Clear    Clear    Gully
Clear    Clear    Hill
Impass Clear    Clear
        
Persians are the attacker and choose the right side to attack from.

Deployment

View from the Roman centre.  My four year old getting ready to move the Persians.

Romans, from their left flank
Equites with leader
Centre body with skirmishers, legionaries in the middle and the Auxilia in the rear
Right body of archers at the edge of the gully

Persians from their right flank (left side in the picture)
Skirmish cavalry unit
Body with 2 heavy cavalry and a cataphract
Centre front body of skirmishers and elephants
Body of levies behind the elephant/skirmisher body
Body with 2 heavy cavalry and a cataphract and leader
Body with 3 heavy cavalry behind

Turn 1

In Rally Round the King, each sides alternates turns.  In each player turn, bodies are moved one at a time, always doing so from right to left.  This may help follow the moves in the replay.

Persian
Moved the single light cavalry to the far right flank.
Wheeled the heavy cavalry on left and moved to the left flank.
The heavy cavalry behind them moved up as well.

Roman
Moved the centre body full distance straight ahead.  It is the selected battle tactic after all.

Can't do much about the skirmish cavalry and gullies are more and more interesting when I think about them - no movement inhibitor but basically invisible inside - can only see 1 inch.  Or maybe it is one big gully so it is only the edge that is 1" but inside is clear.  Thinking further I believe it is the latter (and the latter is how gullies are described in Warrior Kings)... hmmm.  Will cross that bridge when I come to it.  Anyway, the archers should be ok where they are.  Might need to split the centre body as the Persian heavy cavalry could wheel to their flank.  However, bodies can only wheel 45; units can wheel 90.  Maybe not as big a threat after all.

 End of turn 1 from the Roman side.  The Persian skirmish cavalry is off to the left of this picture.

Note: I use a small green bush behind a body to indicate it is activated.  Easier to track that way.  Casualties are noted by flesh coloured rings on the figures on the stand.

Turn 2

Persian
Move the light cavalry further down the right flank.
Moved the centre-left heavy cavalry forward 6".
Moved the leftmost heavy cavalry up 1/2 and then wheeled to line up.
No new activations.

Hoping to take the Roman missile body from two directions and also worry the flank of the centre body.
Expecting the Roman Equites with the leader to move next turn (which is why the cavalry on the right has not moved).

Did not move the elephants (tempted) but let the Romans to to them.

Roman
Moved centre body up 3.  In hindsight maybe the Auxilia should have been a reserve body, rather than boosting reputation for the body.  We will see in melee in a few turns whether that was the correct deployment choice.

Moved the Equites 12" straight up to 3" away from the enemy cavalry.
Persian heavy cavalry needs to take enemy threat but only one heavy cavalry will actually react.  Passes both dice: non-charging dual armed fires. 1d6 rolled 1, nothing.
Roman takes a received fire test. Passes both dice: advance, which will be a charge.
Roman wanting to charge. Passes both dice: the one heavy cavalry that reacts is moved 1" away.
Persian takes received charge test.  Passes both dice: return fire. 1 hit.
Roman takes received fire test:  fails both dice: retires (5") with one hit (now has 2 in total).
1 move, 5 reactions, 2 hits and a result.  Oh the uncertainly!

 The centre, from the Persian side, at the end of turn 2.  The right shows the result of the cavalry reactions.
 
Turn 3

Persian
The skirmish cavalry did move somewhere but my 2 year old son has moved him off the table somewhere (hopefully in the same room).  I'll find him at the end of the turn and put him back. Note: It was not in the same room - in the lounge, 3 rooms and about 15 metres away.  At least he understood what I was looking for and remembered enough to show me where it was!

The heavy cavalry on the right can only charge forward (or remain stationary) as an enemy is in charge reach.  So it does - the enemy has 2 hits. Worth a go.
Wanting to charge - pass both dice.
Equites receives charge: passes both dice (lucky - modified rep is only 2) and counter-charges.(and now has the leader unit in contact so a bonus there).
Melee: same for both - 1d6 +1 shock +1 opposing mounted.  Both roll 6 which = 8.  One hit each.
Persians involved in melee test: pass 1 die;  retire + 1 hit.
Romans involved in melee test: pass 1 die; so retire + 1 hit (now have 4 hits).

Persians don't move the elephants -  wait for the Romans to move forwards.

Now, I've charged missile units in the past and it all ended badly.  And now the roman archers will get +1 to missile fire. A change from WK.  3 figure missile units in RRtK get +1 which they did not used to get in WK..  To hell with it - Persians in front of the archers (not the Heavy cavalry wth the leader) charge the archers.
Only the middle stand pass 2d6 and so charges.  The others pass 1d6 and as they are dual armed they halt. Different to WK where pass one die was just continue+1 hit.  I prefer the RRtK here to WK.  Nice change and much more in line with my view of historical battles.
The archers only have a rep of three so maybe what I am doing is not so bad.  Anyway, they pass both dice (modified rep of 4)!  I then noticed that if they had passed only 1 die they would have routed.  So it was definitely a good idea - they have a 5/9th chance of routing if charged.  Maybe not good now that they have passed.
Return fire 2d6 +1 mounted +1 3-figure missile.  Total 8, one hit.
Persian received fire test - passes 0 dice and retires with another hit.

OK, so much for plan A where the heavy cavalry charge and so let the leader heavy cavalry body move to flank the Roman centre body.  Bugger it - wheel the leader body ready for a charge to the archers next turn.

 The view from the roman archers with the retiring cavalry to its front.  Note the only roman archer units I have are 4 to a base (DBM Reg Bow) but I only count them as 3 figures for RRtK.

Romans

Moved the centre body up to very close to the elephants body.  Note: cannot charge as it is skirmisher Vs skirmisher.

Charged the heavy cavalry unit with leader on the left flank into the Persian heavy cavalry that retired. Passed wanting to charge.
Persians being charged: passed 0 dice and rout.
First rout of the game.  Equites roll for pursuit and do so. No longer activated.

 End of Roman turn 4 on from the Persian right flank - Elephants in the centre and the Roman Equites plus leader at the bottom right.

Turn 4

Persian
Moved the skirmisher cavalry behind the Equites (with 3 hits).  The Equites will have to move, or be fired on and probably rout.

I thought the Roman battle tactic was going to be their downfall - move the centre body forwards while the Persians were actually attacking on the flank.  But it has turned out not to be so simple (never is).  On the Persian right, The two Persian cavalry could about face and charge the Roman leader but it will test on rep 6, as will the cataphracts, and the cats are at AC6 compared to AC4.  It is worth giving it a go.  However, the alternative is to smash into one side of the centre roman body to cause some damage there.  But then that leaves the Roman Equites to hit the rear of the Levies. Choices.  So I will about face and go for the leader.

Persian heavy cavalry wanting to charge, pass 1 dice: keep charging.  However, the dual mounted unit does not charge and halts.
Romans roll receiving a charge, passed both dice and so are not counted as flanked.  This does mean they don't get to counter-charge so will not get the +1 for shock in melee.
I lined them up into contact.  This is something different from Warrior Kings where opposing units in melee did not have to line up corner to corner. This is one bit I preferred over RRtK, but only marginally, so content to play the RRtK way.

Melee:
Persian d6 = 3 +1 shock +1 enemy mounted = 1 hit
Roman d6 = 6+1 enemy mounted +1 leader =1 hit (vs the AC6)
Involved in melee:
Persians passed 0 dice - routed
Romans pass both dice - fine.  No pursuit I assume as they are facing the wrong way.  In hindsight, there is nothing in the rules to say they should not pursue, so I believe I should have.
Leader passes wounded check.

So that didn't go the way the Persians wanted.

Skirmishers in front of the elephants fire and inflict 1 hit.
Roman skirmishers receive fire test: pass both - return fire - 2 hits (there were 2 firers)
Persian skirmishers receive fire test: snake eyes - pass both - return fire - 1 hit (other skirmisher)
Roman skirmishers receive fire test: pass both - return fire  - 1 hit
...this goes on for a little while longer with only one more hit on the persians who pass 1 dice and retire with one hit.
Can I now move the elephants? I am assuming yes.  If the skirmishers had not retired, then it would be no.  This was covered in a Q and A for Warrior Heroes (skirmishers in front and knights in the rear):

"
 Isn't firing mandatory at the start of the turn? Imagine a Body with knights units in the read and Skirmisher units in front.  As such shouldn't a player's turn open with the skirmishers shooting (whether he wants them to or not), and then blocking the knightly charge as they HAD to fire?
Not if the skirmishers and knights are in the same body. If not yes, the skirmishers are going to continue to fire until they can't, which is good tactics, then the knights can charge although perhaps not on the same turn. If at the end of the battle you still have skirmishers left over then you have not utilized them well. They are very cheap and should be used to inflict casualties to more expensive targets.
The only exception would be mounted skirmishers that should be able to retire away and not be caught in pursuit.

Why is this? As far as I can see missile troops shoot when they begin their turn within range (but not in contact) with an enemy. Why is this waived when they are in a body with the knights? I'm sure it's right in front of me in the rules, but I can't find it . . .
If the units are in the same body then you have the choice as to order of unit activation. So, move the knights first. It's a case of real world desires. I assume that one body is one command so the leader just directs the knights to charge and the skirmishers not to fire.
"

Elephants wanting to charge: pass both dice (rolled boxcars - thought they had failed but skirmisher and an elephant adjacent gave a +2 bonus to their rep of 4).
Two skirmishers (there are 3 stands that are in front of the elephants) with 1 hit pass one dice - fire and rout; the third skirmisher passes both dice - fire and retire.  2 hits inflicted on the elephants - one each.
Elephants received fire:  pass both dice and continue - straight into the legionaries.  But they need to roll for the charge: fail both dice.  Halt.  Thinking later: Should the Roman body have taken an enemy threat test for the elephants.  I am assuming not but can't pin my finger down on why not.  I think it is because the elephants were revealed, rather than moving closer.

The centre  from the Persian view


The two lone undamaged heavy cavalry are about faced (there was a third activation here and have reached the war rating.  It does matter!  Luckily I do not need to activate any other units.)

The heavy cavalry leader body charges the archers (all units in the body will contact the archers so all can charge): pass both dice.
 
Archers take the being charged test: pass 1 dice - rout.  I am assuming a preference order in the results for a reaction test. It may actually be in the rules but haven't looked closely enough.  First result is "foot charged by shock rout".  Later down the list is "foot missile halt and fire 1d6". I assume the latter is only if the foot missile was not charged by shock.
Heavy cavalry do not pursue.

 The empty Roman right once the Archers are routed (but full of Persian cavalry)

Roman
Its all about the centre body for the Romans.
If you look carefully at previous pictures you will see that the 3 Auxilia were staggered/offset to the 5 legionaries.  This is so they can add support to all 5 legionaries.  But in RRtK, corner to corner is sufficient to be in contact (it was in Warrior Kings too) and so it was unnecessary.  As it is solo, I graciously allowed the Roman player to align them corner to corner.

The skirmisher in front of the legionaries moves behind so the legionaries can charge.
The 3 central legionaries are in front of the two elephants.  They are on rep 3, +3 for 3 friends in contact but -1 for elephant/terror being close.  Pass both dice for charging.
Elephants pass 1 die for being charged.  As they are classed as foot, they halt.

Melee:
3 legionaries d6 = 13 +3 combo-weapons +3 elite = 19 or 6 hits (elephants are AC2).
2 elephants d6 = 4 +2 elephants = 6 or 1 hit (legionaries are AC4).
Involved in melee test:
Legionaries pass both dice and pursue.
Elephants pass 0 dice (no surprise) and rout.

Now here it where it gets interesting.  I did read the new rules about elephants - when routing, they go on a rampage - but not carefully enough.  And maybe putting elephants close together is not a good idea..
Anyway, both will rampage; roll randomly to see which one rampages first.  It is the left one (from the Persian view).  It goes straight back.  Skirmisher directly behind routs.  The skirmisher behind that (the elephant is still going!) fires (and scores 1 hit) and routs.  The elephants passes 0 dice for receive fire and routs and is removed from the table.

The second elephant routs in a 45 degree angle back towards is own base edge and narrowly misses the Levy on the way.  It will be off the table next turn.

The Roman Equites with the leader (after removing casualties - see picture) about faces.  The legionaries can go for the levy, time to clean up the left flank.

Came home from work and found the 2 year old had very carefully piled casualty rings onto the Equites.  His dexterity is to be admired.

The Roman Equites with 3 hit points attempts to charge into the rear of the Persian cavalry directly to its front. passes one dice so continues.
The charged Persian cavalry passes one dice and so rout. The Equites pursue and bump into the Equites with the leader.

The Romans are a bit scattered at the moment.  Compare this to the Persians: 5 shock cavalry on the right flank with no damage and another one with 2 hits.  The Romans have a few scattered rep 3 units and a body consisting of rep 3 units.

 End of turn 4 from the Persian side.  Rampaging elephant bottom left.

Turn 5

Persians
Skirmish cavalry moves to behind Equites.

Skirmisher in front of the Levy fires at the legionaries - one hit. Legionaries pass both receive fire dice so advance, which is converted into a wanting to charge. Pass both dice so two legionaries charge (with two Auxilia in train).  Not hard to pass - a unit with 3 friends is testing at +3, so a REP 3 with no other negative modifiers will automatically pass two dice.  So a body with 2 units in front and 2 behind is actually quite formidable.
The skirmisher pass both dice so fires (1 hit) and retires with 1 hit.
Legionaries do not pursue.
Levy cannot move as the skirmishers passed through them.

Elephant routs off the board.

The next leftmost lone Cavalry unit wheels and then charges into the flank of the legionaries/Auxilia body, contacting an Auxilia.  Auxilia unit routs (passed only one die and was charged in flank).
Cavalry pursues, which is converted into a charge into rear of a legionaries, who also routs (box cars).
Cavalry pursues - straight into its own sides Levy and halts.

The lone Cavalry with 2 hits turns 180.

The other lone cavalry wheels not quite 90 degrees (it is a single unit and so can wheel up to 90 degrees, normally bodies are limited to 45 degree wheels) and charges a lone legionaries stand who stands to fight (passes two dice with rep 3!). One hit on the cavalry.
Post melee reactions:
Roman routs (always best to check foot first in cavalry vs foot as the cavalry result depends on what the foot does).
Persian cavalry retires with one hit.

The cavalry body with the leader wheel 45 and move another 4".

Roman
Reformed the centre body somewhat with the stragglers.
..but the centre 4 units will charge the levy who stand to receive.
Romans inflict 5 hits.  Levy 1.
Post melee reaction test:
Both levy and legionaries give ground (and take a hit) but don't move as both don't follow up.
Equites reform.

 End of turn 5 from the Persian side - note the amount of hits on the levy!

Turn 6

Persian
 
Regarding the Levy in melee.  Just realised the third Levy unit that did not fight last turn is actually part of the melee as it is in corner to corner contact.  But I had not included it - something to remember for future games.  I wont include it now - it would change the balance of the melee.

So...the melee.  Levy take 3 his and rout.
Romans take 1 hit, pass 1 die and do not pursue.

The remaining Levy about faces (successfully, as it is undisciplined and has a 50% chance of not being able to do this - a change from Warrior Kings was introducing the undisciplined characteristic.  Good idea.)
This allows the heavy cavalry in front of the Levy to charge into the Roman body, who are not flanked (a 1,2 on the receiving a charge!).
Melee - Romans take 1 hit and pass both dice (another 1,2).  Persians retire with 1 hit.
The other heavy cavalry units on the left flank all wheel and move in the direction of the roman centre.

Roman
All the units are unactivated.  There are 4 bodies and the war rating is only 3.  I choose not to activate a lone skirmisher.
The legionary/auxilia body about face and move up to next to another legionary unit.  This latter unit also about faces.  The Equites wheel and charge the skirmishers who retire with a hit.  The Equites do not pursue.

End of Turn 7 from the Persian side. The Roman body in the centre has about faced, and so the auxilia can take the brunt of the cavalry charges - they have no hits, unlike the legionaries behind them.

Turn 7

Persian
The board is very strange.  Where the Persians deployed, that is where the Romans are defending.  Where the Romans deployed, that is where the Persians are attacking from!

The body with the leader can only move 8" due to the cataphracts, so moves forward the minimum 1/2 move of 4".
There is a lone heavy cavalry with 2 hits that is in line with the auxilia, tries to charge but halts.
Skirmishers move up to behind the Roman foot body.
The Levy about face, move 3", are with 1" of the back of the Roman body so are drawn into melee. They charge, and the legionary unit routs due to being charged from the rear.  The Levy do not pursue.
The remaining heavy cavalry body (2 units), wanted to charge the skirmisher in front of the auxilia body but halt instead.

Roman
It is do or die time - the remaining units in the auxilia body are hemmed in on all sides.  So, go out in a blaze of glory and charge the cataphracts in front!  Surprisingly, 2 auxilia are on one cataphract - the other legionary is more than 1" from the cataphract, had moved its full 6" so isn't even drawn into melee.
Cataphract counter-charges.
The melee results in no damage, auxilia carry on so cataphracts retire with one hit.

Auxilia pursue. The cataphracts only retired 2", and one of the auxilia catches them, so they are routed.  Auxilia do not pursue. An auxilia routing a cataphract - very unlucky and rare - the dice just fell that way.

The other auxilia is charging another cataphract due to pursuing the first cataphract.  Passes the charge test, the cataphract counter-charges.
Melee results in one hit and the auxilia rout. Cataphracts do not pursue.

The Equites move up 4" and then wheel slightly so be directly in front (and about 5" away) from the Persian cavalry.

 End of turn 7 from the Persian side.  Remaining Roman units circled in red.

Turn 8

Persian

The Romans are ripe for the taking - most of there units have damage.  Just need to charge them!

The Persian heavy cavalry wants to charge the Equites - soften them up as I think the Cataphract may get to them this turn too.  But the heavy cavalry halts.
Cataphract with the leader charges the lone legionary unit.  The legionaries rout. Cataphracts pursue into the Equites with the leader.  The Equites with the leader routs (with 3 hits even the leader and one friend does not save it from passing no dice).

Leader lost check for all units occurs:
Equites and two remaining skirmishers carry on.
Legionary and auxilia routs.

With only two skirmishers and one Equites with 2 hits left on the table, I'm giving this game to the Persians.  They are not in a great way themselves, but have 3 melee units with no hits and 3 melee units with 1 or 2 hits.


 End of turn 8 from the Persian side.  Remaining Roman units circled in red.


Verdict
Rally Round the King is a fun game.  This one was very tense and the outcome could have gone to either side.  I enjoyed playing the game.  It is a also good game to play solo due to the reaction tests.  You never know exactly what your units are going to do, and when they will just rout away.   It was also weird playing on a 4'x3' table after so long on smaller ones.  The high movement rates still get to me, but really are not a problem as generally you do not move that far, and the movement restrictions on wheels/about face means that it is hard to run rings around the enemy.